×
ToyotaParts- Hello
- Login or Register
- Quick Links
- Live Chat
- Track Order
- Parts Availability
- RMA
- Help Center
- Contact Us
- Shop for
- Toyota Parts
- Scion Parts
My Garage
My Account
Cart
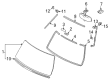
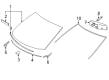
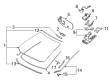
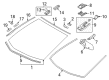
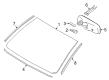
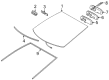
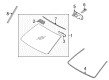
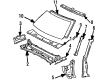
OEM Toyota Windshield
Glass Windshield- Select Vehicle by Model
- Select Vehicle by VIN
Select Vehicle by Model
orMake
Model
Year
Select Vehicle by VIN
For the most accurate results, select vehicle by your VIN (Vehicle Identification Number).
389 Windshields found


Toyota Windshield, Front Part Number: 56101-35072
$534.69 MSRP: $783.59You Save: $248.90 (32%)Ships in 1-3 Business DaysProduct Specifications- Other Name: Glass Sub-Assembly, Windshield; Windshield Glass, Front; Glass, Windshield
- Manufacturer Note: *LAM,T=4.56,GREEN
- Position: Front
- Replaces: 56101-35071, 56101-35070


Toyota Windshield, Front Part Number: 56101-0E151
$587.12 MSRP: $860.44You Save: $273.32 (32%)Ships in 1-3 Business DaysProduct Specifications- Other Name: Glass Sub-Assembly, Windshield; Windshield Glass, Front; Glass, Windshield
- Position: Front
- Replaces: 56101-0E150, 56101-48273, 56101-48272, 56101-48271, 56101-48274, 56101-48270


Toyota Windshield, Front Part Number: 56101-F4120
$390.43 MSRP: $572.18You Save: $181.75 (32%)Ships in 1-3 Business DaysProduct Specifications- Other Name: Glass Sub-Assembly, Windshield; Windshield Glass, Front; Glass, Windshield
- Position: Front


Toyota Windshield, Front Part Number: 56101-0E242
$516.98 MSRP: $757.65You Save: $240.67 (32%)Ships in 1-3 Business DaysProduct Specifications- Other Name: Glass Sub-Assembly, Windshield; Windshield Glass, Front; Glass, Windshield
- Position: Front
- Replaces: 56101-0E241


Toyota Windshield, Front Part Number: 56101-52936
$404.62 MSRP: $592.96You Save: $188.34 (32%)Ships in 1-3 Business DaysProduct Specifications- Other Name: Glass, Wind Shield L/; Windshield Glass, Front; Glass, Windshield
- Position: Front


Toyota Windshield, Front Part Number: 56101-4E954
$440.63 MSRP: $645.75You Save: $205.12 (32%)Ships in 1-3 Business DaysProduct Specifications- Other Name: Windshield Glass, Front; Glass, Windshield
- Position: Front


Toyota Windshield, Front Part Number: 56101-06B11
$455.92 MSRP: $668.16You Save: $212.24 (32%)Ships in 1-3 Business DaysProduct Specifications- Other Name: Glass Sub-Assembly, Windshield; Windshield Glass, Front; Glass, Windshield
- Position: Front
- Replaces: 56101-3Y930


Toyota Windshield, Front Part Number: 56101-35020
$524.02 MSRP: $767.95You Save: $243.93 (32%)Ships in 1-3 Business DaysProduct Specifications- Other Name: Glass Sub-Assembly, Windshield; Windshield Glass, Front; Glass, Windshield
- Position: Front

Toyota Windshield, Front Part Number: 56101-0E222
$535.25 MSRP: $784.42You Save: $249.17 (32%)Ships in 1-3 Business DaysProduct Specifications- Other Name: Glass Sub-Assembly, Windshield; Windshield Glass, Front
- Position: Front
- Replaces: 56101-0E221, 56101-0E220


Toyota Glass, Front Part Number: 56101-AE020
$741.04 MSRP: $1086.00You Save: $344.96 (32%)Ships in 1-3 Business DaysProduct Specifications- Other Name: Glass Sub-Assembly, Windshield; Windshield Glass, Front; Glass, Windshield
- Manufacturer Note: *HSEAL,T=4.7,GREEN
- Position: Front


Toyota Windshield, Front Part Number: 56101-WB006
$336.75 MSRP: $480.82You Save: $144.07 (30%)Ships in 1-3 Business DaysProduct Specifications- Other Name: Glass Sub-Assembly, Windshield; Windshield Glass, Front; Windshield, Front; Glass, Windshield
- Position: Front
- Replaces: 56101-WB002


Toyota Windshield, Front Part Number: 56101-06J80
$391.90 MSRP: $574.34You Save: $182.44 (32%)Ships in 1-3 Business DaysProduct Specifications- Other Name: Glass Sub-Assembly, Windshield; Windshield Glass, Front; Glass, Windshield
- Position: Front
Toyota Windshield, Front Part Number: 56101-06B80
$503.25 MSRP: $737.51You Save: $234.26 (32%)Ships in 1-3 Business DaysProduct Specifications- Other Name: Glass Sub-Assembly, Windshield; Windshield Glass, Front; Glass, Windshield
- Manufacturer Note: HEAD UP DISPLAY-WITH
- Position: Front

Toyota Windshield, Front Part Number: 56101-04082
$390.43 MSRP: $572.18You Save: $181.75 (32%)Product Specifications- Other Name: Glass Sub-Assembly, Windshield; Windshield Glass, Front; Glass, Windshield
- Position: Front

Toyota Windshield, Front Part Number: 56101-4E928
$440.94 MSRP: $646.19You Save: $205.25 (32%)Ships in 1-3 Business DaysProduct Specifications- Other Name: Glass Sub-Assembly, Windshield; Windshield Glass, Front; Glass, Windshield
- Manufacturer Note: *LAM,T=4.56,GREEN
- Position: Front
- Replaces: 56101-47938, 56101-47994

Toyota Windshield, Front Part Number: 56101-35160
$466.70 MSRP: $683.96You Save: $217.26 (32%)Ships in 1-3 Business DaysProduct Specifications- Other Name: Glass Sub-Assembly, Windshield; Windshield Glass, Front; Glass, Windshield
- Position: Front
Toyota Windshield, Front Part Number: 56101-4E930
$455.01 MSRP: $666.82You Save: $211.81 (32%)Ships in 1-3 Business DaysProduct Specifications- Other Name: Glass Sub-Assembly, Windshield; Windshield Glass, Front; Glass, Windshield
- Position: Front
- Replaces: 56101-47905, 56101-47984, 56101-4E929, 56101-47978, 56101-4E900, 56101-47995


Toyota Windshield, Clear Part Number: 56111-89132-83
Product Specifications- Other Name: Glass, Windshield
- Replaces: 56111-89132


Toyota Windshield, Bronze, Front Part Number: 56111-35100
Product Specifications- Other Name: Glass, Windshield; Windshield Glass, Front
- Manufacturer Note: *TL,T=4.76,BRONZE
- Position: Front


Toyota Glass Part Number: 56111-1A070
Product Specifications- Other Name: Glass, Windshield
- Manufacturer Note: *TL,T=5.3
| Page 1 of 20 |Next >
1-20 of 389 Results
Toyota Windshield
OEM parts deliver unmatched quality you can rely on. They pass extensive quality control inspections. Toyota produces them to the official factory specifications. This process helps prevent defects and imperfections. So you can get exceptional lifespan and a flawless fit. Need new OEM Toyota Windshield? You'll love our wide selection of genuine options. Shop in minutes and skip the hunt. Our prices are unbeatable, you'll save time and money. It's easy to shop and find the right piece. Our committed customer service team gives professional help from start to finish. Every part includes a manufacturer's warranty. We ship quickly, your parts will arrive fast at your door.
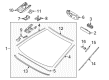
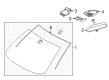
Toyota Windshield maintains the view of the driver and protects cabins against weather at highways. Toyota emerged as a global giant out of a 1937 startup due to the ability to cut waste and solve problems within a short period of time. Toyota lean factories drive off hybrids, plug-ins, tough, and fuel-sipping trucks that are good over ten years. Toyota chassis such as Hybrid Synergy Drive updates and TNGA platform enhance driving speed and crash resistance. The new plug-in RAV4 demonstrates how the company combines an impressive range of electricity with a gritty acceleration rate and maintains a high level of durability during trips and missions. Lean thinking is all over Toyota supply lines; hence the flow of parts is just in time, wastage is almost zero, and quality is held close. Further advances through smarter cooling paths and denser cells that shake off heat have made hybrid batteries more permanent. The Windshield is made of two layers of curved glass glued together and sealed to a durable plastic interior and will remain clear after a collision with gravel, will not shatter during a rollover, will reduce cabin noise, and will cut down on drag and improve mileage. Cameras and sensors on the back of the Windshield scan the lanes and the traffic without glare; therefore, driver-assist technology operates at all times of the day, both mornings and evenings. The fast turnaround time and affordable parts prices imply that owners replace chips in time before they cause vision impairment. The same Windshield benefit is available in coupes, hatchbacks, and SUVs and transforms regular journeys into smoother, healthier journeys. Windshield replacement doesn't take much more than two hours, but the reward is several years of uninterrupted sight lines.
Toyota Windshield Parts and Q&A
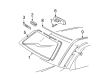
- Q: How to replace the windshield glass on Toyota 4Runner?A:Windshield glass replacement requires initial removal of the roof headlining assembly after unscrewing front door Weather Strips (LH and RH), assist grips and front pillar garnishes (LH and RH), the visor assemblies (LH and RH) and holders, lastly the roof console box assembly. You must start by separating the front wiper arm head caps from both LH and RH wiper arms then detach the front fender to cowl side seals LH and RH and the cowl top ventilator louver sub-assembly before removing the inner rear view mirror assembly. Cut the outside LH windshield moldings and outside RH moldings together with the outer upper moldings apart from the body while taking caution to protect its structure. The windshield glass removal requires passing piano wire between body and glass while securing the wire ends on wooden blocks then applying protective tape to avert scratches. Remove the windshield glass by disengaging stoppers through piano wire cutting and applying a suction rubber to take out the glass while keeping as much adhesive on the body surface. Scrape off damaged stoppers, dam and adhesive from the windshield glass before cleaning the glass surface with white gasoline which should not touch the glass. Two new stoppers numbered No.1 should be placed on the body after applying Primer G to the No.2 windshield glass stopper which needs to dry for at least three minutes. Apply Primer G to the installation area of the window glass adhesive dam then dry it before attaching new components by using double-stick tape. After coating the glass edges and contact surface with Primer G allow them to dry before assembly of the outer upper moulding. Begin by cleaning the contact surface of the vehicle body until it is shaped properly. Then use a suction rubber to position the glass. After that check its alignment with reference marks before taking the glass off. Apply Primer M on the exposed body section while providing Primer G to the glass edge before waiting at least 3 minutes until they become dry. The installation of the glass requires you to apply Part No. 08850-00801 or equivalent adhesive during the specified tack-free period and align the glass with reference marks while pressing gently from the rim. During glass installation users should apply light pressure on the surface to create proper contact before using a scraper to remove excessive adhesive. The leak test comes next after adhesive hardening completes with auto glass sealer needed to handle any detected leaks.
- Q: How to remove and install a windshield on Toyota Tacoma?A:Beginning windshield replacement requires removing inner rear view mirror and sun visors and holders together with assist grips and quarter trim components in addition to front pillar garnishes and cowl louver and wiper arms before removing the windshield outside upper moulding with minimum damage by knife cutting. Drive piano wire between body and glass through the interior before connecting it to a wooden block which you should then secure with protective tape on the outside glass surface. Piano wire is used to cut the adhesive and users should try to preserve as much adhesive on the body as possible after glass removal. During installation the contact area of the body requires cleaning and shaping so the adhesive remains full-strength before cleaning the removed glass carefully. Place the glass correctly onto a new dam that uses double-stick tape and verify all contact surfaces match by scanning them separately from the face of the glass after cleaning up. Apply Primer "M" onto the body contact surface and let it dry for at least 3 minutes before putting Primer "G" on the glass edge and immediately cleaning off excess before drying. Place adhesive from Part No. 08850-00801 on the glass surface so the adhesive height falls between 8.0 - 10 mm before installing the glass by aligning it to reference marks and applying gentle pressure along the rim. Secure the glass by using adhesive on its rim followed by adhesive removal with a scraper while protecting the glass with protective tape until the adhesive solidifies. Performing a leak test post-hardening allows you to fix any detected leaks through the application of Part No. 08833-00030 sealant. Secure the installation area of the moulding before installing the new windshield outside upper moulding by placing it in the body then tapping it into position. The wiper arms should be reinstalled with 20 N.m torque before installing the cowl louver and front pillar garnishes, assist grips, sun visors and holders, and the inner rear view mirror.


Related Toyota Parts
 Toyota Door Lock Actuator
 Toyota Instrument Cluster
 Toyota Lift Support
 Toyota Parking Assist Sensor
 Toyota Tailgate Handle
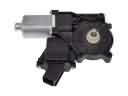 Toyota Window Motor
 Toyota Window Regulator
 Toyota A/C Switch
 Toyota Air Deflector
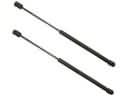 Toyota Liftgate Lift Support
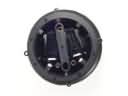 Toyota Mirror Actuator
 Toyota Weather Strip
Browse Toyota Windshield by Models
Tacoma 4Runner Camry Tundra Corolla RAV4 Highlander Prius Sienna Land Cruiser Pickup FJ Cruiser 86 Sequoia T100 Avalon Celica Supra Yaris Matrix MR2 Solara Venza GR86 Echo C-HR Cressida Grand Highlander Paseo Previa Prius C Prius Prime bZ4X Corolla Cross Corolla iM Crown Crown Signia GR Corolla Mirai MR2 Spyder Prius V Starlet Tercel Van Yaris iA Prius Plug-In GR Supra Prius AWD-e RAV4 Prime