×
ToyotaParts- Hello
- Login or Register
- Quick Links
- Live Chat
- Track Order
- Parts Availability
- RMA
- Help Center
- Contact Us
- Shop for
- Toyota Parts
- Scion Parts
My Garage
My Account
Cart
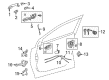
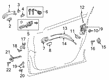
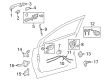
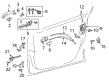
OEM Toyota Door Handle
Inside Door Handle- Select Vehicle by Model
- Select Vehicle by VIN
Select Vehicle by Model
orMake
Model
Year
Select Vehicle by VIN
For the most accurate results, select vehicle by your VIN (Vehicle Identification Number).
2783 Door Handles found

Toyota Handle, Outside, Dark Green
Part Number: 69210-42100-G0$215.05 MSRP: $307.03You Save: $91.98 (30%)Ships in 1-3 Business DaysProduct Specifications- Other Name: Handle Assembly, Door, Outside; Exterior Door Handle, Front Outer; Handle Assembly, Front Door, Outside Passenger Side; Driver Side; Exterior Door Handle
- Manufacturer Note: WIRELESS DOOR LOCK-SMART ENTRY+PANIC BUTTON+POWER BACK DOOR,DK.GREEN MC.,6V4

Toyota Handle, Outside, Black, Front Outer
Part Number: 69210-28090-C4$203.05 MSRP: $289.91You Save: $86.86 (30%)Ships in 1-3 Business DaysProduct Specifications- Other Name: Handle Assembly, Door, Outside; Exterior Door Handle, Front Outer; Handle Assembly, Front Door, Outside Passenger Side; Driver Side; Exterior Door Handle
- Position: Front Outer

Toyota Handle, Outside, Black, Driver Side
Part Number: 69210-30401-C2$242.66 MSRP: $346.46You Save: $103.80 (30%)Ships in 1-3 Business DaysProduct Specifications- Other Name: Handle Assembly, Door, Outside; Exterior Door Handle, Front Left Outer; Handle Assembly, Front Door Outside, Driver Side
- Manufacturer Note: ATTITUDE BLACK MC.,218
- Position: Driver Side
- Replaces: 69210-30400-C2

Toyota Handle, Outside, White Pearl
Part Number: 69210-F4010-A2$212.95 MSRP: $304.05You Save: $91.10 (30%)Ships in 1-3 Business DaysProduct Specifications- Other Name: Handle Assembly, Door, Outside; Exterior Door Handle, Front Left Outer, Front Right Outer; Handle Assembly, Front Door, Outside Passenger Side; Driver Side; Exterior Door Handle

Toyota Handle, Outside
Part Number: 69210-52100-E8$198.97 MSRP: $284.09You Save: $85.12 (30%)Ships in 1-3 Business DaysProduct Specifications- Other Name: Handle Assembly, Door, Outside; Exterior Door Handle, Front Outer; Handle Assembly, Front Door, Outside Passenger Side; Driver Side; Exterior Door Handle
- Manufacturer Note: MANDARIN ORANGE M.M.,4V7
Toyota Handle, Outside, Silver, Front Outer Passenger Side
Part Number: 69210-30371-B3$215.05 MSRP: $307.04You Save: $91.99 (30%)Ships in 1-3 Business DaysProduct Specifications- Other Name: Handle Assembly, Door, Outside; Exterior Door Handle, Front Right Outer; Handle Assembly, Front Door, Outside Passenger Side; Rear Door Outside, Passenger Side & Driver Side.
- Position: Front Outer Passenger Side
- Replaces: 69210-30370-B3
Toyota Handle, Outside, Gray
Part Number: 69210-F4010-B1$203.05 MSRP: $289.91You Save: $86.86 (30%)Ships in 1-3 Business DaysProduct Specifications- Other Name: Handle Assembly, Door, Outside; Exterior Door Handle, Front Left Outer, Front Right Outer; Handle Assembly, Front Door, Outside Passenger Side; Driver Side; Exterior Door Handle

Toyota Handle, Outside, Black, Driver Side
Part Number: 69240-10101-C0$213.65 MSRP: $305.04You Save: $91.39 (30%)Ships in 1-3 Business DaysProduct Specifications- Other Name: Handle Assembly, Rear Door; Exterior Door Handle, Rear Left Outer; Handle Assembly, Rear Door Outside, Driver Side; Exterior Door Handle
- Position: Driver Side
- Replaces: 69240-10100-C0
Toyota Handle, Outside, Dark Blue, Driver Side
Part Number: 69210-30381-J4$215.05 MSRP: $307.04You Save: $91.99 (30%)Ships in 1-3 Business DaysProduct Specifications- Other Name: Handle Assembly, Door, Outside; Exterior Door Handle, Front Left Outer; Handle Assembly, Front Door Outside, Driver Side
- Manufacturer Note: DK. BLUE MC.,8X8
- Position: Driver Side
- Replaces: 69210-30380-J4
Toyota Handle, Outside, White Pearl, Driver Side
Part Number: 69210-30381-A2$213.30 MSRP: $304.55You Save: $91.25 (30%)Ships in 1-2 Business DaysProduct Specifications- Other Name: Handle Assembly, Door, Outside; Handle Assembly, Front Door Outside, Driver Side
- Position: Driver Side

Toyota Handle, Outside, Blue, Passenger Side
Part Number: 69210-08060-J0$200.60 MSRP: $286.41You Save: $85.81 (30%)Ships in 1-3 Business DaysProduct Specifications- Other Name: Handle Assembly, Front Door; Exterior Door Handle, Front Right Outer; Handle Assembly, Front Door, Outside Passenger Side; Exterior Door Handle
- Manufacturer Note: DK. BLUE MC.,8X8
- Position: Outside Passenger Side

Toyota Handle, Outside, Chrome, Passenger Side
Part Number: 69210-0C090$194.31 MSRP: $277.43You Save: $83.12 (30%)Ships in 1-3 Business DaysProduct Specifications- Other Name: Handle Assembly, Front Door; Exterior Door Handle, Front Right Outer; Handle Assembly, Front Door, Outside Passenger Side
- Position: Outside Passenger Side
Toyota Handle, Outside, Black, Driver Side
Part Number: 69210-42171-C0$203.05 MSRP: $289.91You Save: $86.86 (30%)Ships in 1-2 Business DaysProduct Specifications- Other Name: Handle Assembly, Door, Outside; Exterior Door Handle, Front Left Outer; Handle Assembly, Front Door Outside, Driver Side
- Manufacturer Note: ATTITUDE BLACK MC.,218
- Position: Driver Side
Toyota Handle, Outside, Grayish Blue
Part Number: 69210-0R010-J0$183.59 MSRP: $262.13You Save: $78.54 (30%)Ships in 1-3 Business DaysProduct Specifications- Other Name: Handle Assembly, Door, Outside; Exterior Door Handle, Front Outer; Handle Assembly, Front Door, Outside Passenger Side; Driver Side; Exterior Door Handle
- Manufacturer Note: WIRELESS DOOR LOCK-SMART ENTRY,GRAYISH BLUE M.M.,8V5
Toyota Handle, Outside, Dark Green
Part Number: 69210-0R010-G0$200.48 MSRP: $286.25You Save: $85.77 (30%)Ships in 1-3 Business DaysProduct Specifications- Other Name: Handle Assembly, Door, Outside; Exterior Door Handle, Front Outer; Handle Assembly, Front Door, Outside Passenger Side; Driver Side; Exterior Door Handle
- Manufacturer Note: WIRELESS DOOR LOCK-SMART ENTRY,DK.GREEN MC.,6V4

Toyota Handle, Outside, Bronze, Front
Part Number: 69210-02110-E1$198.97 MSRP: $284.09You Save: $85.12 (30%)Ships in 1-3 Business DaysProduct Specifications- Other Name: Handle Assembly, Front Door; Exterior Door Handle, Front Outer, Rear Outer; Handle Assembly, Front Door, Outside Passenger Side; Driver Side; Back Door Outside; Exterior Handle
- Manufacturer Note: BRONZE M.M.,4T3
- Position: Front
- Replaces: 69210-12320-L1
Toyota Handle, Outside, Grayish Blue, Front
Part Number: 69210-02110-J1$198.97 MSRP: $284.09You Save: $85.12 (30%)Ships in 1-3 Business DaysProduct Specifications- Other Name: Handle Assembly, Front Door; Exterior Door Handle, Front Outer, Rear Outer; Handle Assembly, Front Door, Outside Passenger Side; Driver Side; Back Door Outside; Exterior Handle
- Manufacturer Note: GRAYISH BLUE ME.,8R3
- Position: Front
- Replaces: 69210-12320-J9
Toyota Handle, Outside, Lime White
Part Number: 69210-52100-A3$200.72 MSRP: $286.58You Save: $85.86 (30%)Ships in 1-3 Business DaysProduct Specifications- Other Name: Handle Assembly, Door, Outside; Exterior Door Handle, Front Outer; Handle Assembly, Front Door, Outside Passenger Side; Driver Side; Exterior Door Handle
- Manufacturer Note: LIME WHITE PEARL CS.,082
Toyota Handle, Outside, White Pearl, Passenger Side
Part Number: 69210-30371-A2$213.30 MSRP: $304.55You Save: $91.25 (30%)Ships in 1-2 Business DaysProduct Specifications- Other Name: Handle Assembly, Door, Outside; Handle Assembly, Front Door, Outside Passenger Side; Rear Door Outside, Passenger Side & Driver Side.
- Position: Passenger Side
Toyota Handle, Outside, Dark Blue, Driver Side
Part Number: 69210-42171-J0$203.05 MSRP: $289.91You Save: $86.86 (30%)Ships in 1-2 Business DaysProduct Specifications- Other Name: Handle Assembly, Door, Outside; Handle Assembly, Front Door Outside, Driver Side
- Position: Driver Side
| Page 1 of 140 |Next >
1-20 of 2783 Results
Toyota Door Handle
OEM parts deliver unmatched quality you can rely on. They pass extensive quality control inspections. Toyota produces them to the official factory specifications. This process helps prevent defects and imperfections. So you can get exceptional lifespan and a flawless fit. Need new OEM Toyota Door Handle? You'll love our wide selection of genuine options. Shop in minutes and skip the hunt. Our prices are unbeatable, you'll save time and money. It's easy to shop and find the right piece. Our committed customer service team gives professional help from start to finish. Every part includes a manufacturer's warranty. We ship quickly, your parts will arrive fast at your door.
Toyota Door Handle enables you to unlock that latch within a few seconds and get into the car without having to feel in the rain. Toyota drives lean production that reduces waste, enables rapid corrections on the production line, and supplies continuous flow of hybrids constructed on the versatile TNGA platform to handle better and have better safety. In the continents, Toyota continues to have a high trust level by combining fuel prudence and mileage-guzzling toughness that scuds off the ruthless weather and rough roads. Recent achievements have been the RAV4 plug-in of 42 electric miles and the revised Prius system, which demonstrates that Toyota takes electrification as a matter of evolution rather than marketing hype. There is a Door Handle on the outside of the skin that is cast of tough plastic or metal, held with screws, and pulls the latch bar the second you turn and use your fingers to pull. Since Toyota maintains consistency in architecture, a Door Handle will be recognizable between a coupe, a sedan, and an SUV which spares you the embarrassing search on where to enter the car when it is pouring or when you are in the car park and the parking lot is dim. The Door Handle is designed to remain mechanical because it believes in a lever you can rely upon, not flashy sensors, therefore making mud, ice, or scratched paint very infrequent events that put your commute on hiatus. The paint color changes, make-up changes, but the Door Handle continues to provide that pop-open feel that happens as you sit, buckle, and are on your way without a second thought.
Toyota Door Handle Parts and Q&A
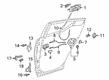
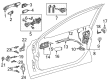
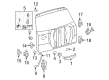
- Q: How to service and repair the rear Door Handle on Toyota Camry?A:A screwdriver wrapped in protective tape allows the user to remove the rear door inside handle bezel plug by unclipping its three claws. Begin by removing the door assist grip cover through a disconnection of its 6 claws using the same screwdriver. First remove the buttons in the rear door trim board sub-assembly with 3 screws before using a clip remover to detach 7 clips and raising the trim board for 4 claw release while separating the connector and the rear door inside handle sub-assembly. Pull out the Number One door scuff plate clamp which is attached to the rear door trim board. To remove the rear power window regulator switch assembly disconnect its connector then detach the assembly through 2 claw releases. After removing 3 clips from the rear door inner glass Weather Strip the rear door armrest base panel upper can be removed through disengaging 4 claws and removing 7 screws. The procedure starts by disconnecting cables of the rear door inside handle sub-assembly then proceeds to remove the rear door inside panel reinforce by removing 4 screws and 4 grommets. The service hole cover requires connector disconnection before both TMC and TMMK made doors can have their check assemblies removed by removing specific bolts and nuts. Twenty clips must be disengaged to take off the rear door Weather Strip before completing the removal of the rear door glass run and the rear door frame garnish. Detach the rear door lower window frame sub-assembly when you uninstall two bolts and one screw and remove the rear door quarter window glass and Weather Strip as a single unit followed by separating the glass from the Weather Strip. Holding the door glass gently, separate it from the window regulator sub-assembly without causing any damage to its structure. Use a cross-driver to remove the temporary bolt from the rear door window regulator sub-assembly and then disconnect the connector and remove 3 bolts and the combined sub-assembly with power window regulator motor assembly rear unit before finishing with bolt removal. The procedure includes using a "TORX" device (T25) to remove 3 screws on the rear power window regulator motor assembly while using a "TORX" socket wrench (T30) to extract 3 screws from the back door lock assembly and extending the release plate downward to dislodge it from the handle frame and extracting the wiring harness seal. The screwdriver-manipulated claw function enables removal of the rear door remote control cable assembly before separating 3 claws from the inside locking assembly of this restraint. A "TORX" socket wrench (T30) should be used to loosen the screw on the rear door outside handle cover followed by removing the two claws to free the cover. To remove the rear door outside handle assembly pull and hold the release plate of the outside handle frame while making sure the release plate stays undamaged. You can remove the rear door front and rear outside handle pads by pulling their individual latches free but the removal requires a "TORX" socket wrench (T30) to unlock the rear door outside handle frame sub-assembly. The last step involves removing the rear door belt moulding assembly and the front window frame moulding together with the upper window frame moulding and outside stripe and lower outside stripe.
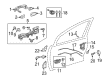
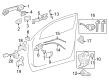
- Q: What is the step-by-step procedure for reassembling the front door and Door Handle on Toyota FJ Cruiser?A:Begin assembling the front door by installing its two cushions as the first step. The right procedure for LH side installation should be used again for front door outside moulding sub-assembly installation. Apply the TORX socket wrench T30 to fasten the front door outside handle frame through the screw while maintaining 7.0 Nm (71 kgf-cm, 62 in-lbf) torque then place a cover between the nut and door panel. The installation of front door outside handle front pad requires engagement of the 3 claws followed by engagement of the 2 claws for rear pad installation. The front door outside handle installation requires pushing the handle according to provided instructions before completing the assembly. Secondly install the front door lock followed by securing two claws for installing the front door outside handle cover using a "Torx" socket wrench T30 at a torque of 5.5 Nm (56 kgf-cm, 49 in-lbf). Maintain the door lock key cylinder rod insertion before completing with a hole plug. Apply MP grease to all sliding and rotating parts of the front door window regulator before using 6 bolts at 8.0 Nm (82 kgf-cm, 71 in-lbf) torque while insisting on precise mounting of the regulator. Connect the connector before installing the front door glass onto the window regulator using 2 bolts at 8.0 Nm (82 kgf-cm, 71 in-lbf) torque strength and place the hole plug. The first task requires installing the front door window frame rear lower by securing its bolt preliminarily before attaching the front door lower frame bracket garnish using a bolt with two screws at 5.5 Nm (56 kgf-cm, 49 in-lbf) tightness. Secure the installed front door frame sub-assembly front lower through its screw while also fastening the bolt loosely. Use the bolt to install the front door glass run while tightening the front door window frame rear lower and the front door frame sub-assembly front lower to the indicated 5.5 Nm (56 kgf-cm, 49 in-lbf) torque. Finally, install the hole plug. First install the front door Weather Strip and put MP grease on the sliding areas of the door check before mounting it onto the door panel with 2 nuts at 5.5 Nm torque (56 kgf-cm / 49 in-lbf). Use adhesive on the bolt threads to fix the front door check onto the body panel while tightening it to 30 Nm (306 kgf-cm, 22 ft-lbf). After securing the front door inside panel plate with 4 screws the worker must apply butyl tape to the door panel and install the new front door service hole cover while checking the seal quality for wrinkles or folds. The installation of front No. 1 speakers is followed by mounting the front door glass outer Weather Strip assembly just like the LH side procedures. Install the outer rear view mirror following the same procedure from the left-hand side and put on the front No. 2 door service hole cover with 4 screws. The front door trim board sub-assembly requires users to connect both the front door lock remote control cable and front door inside locking cable before engaging 10 clips and installing and securing the trim board with two screws. Complete the 2 cover operations on the LH side and follow this same procedure for the RH side. Introduce the driver side power window regulator master switch assembly followed by the front passenger side power window regulator switch assembly together with the door control switch for the front passenger side. The cable needs to be attached to the negative battery terminal while applying torque of 3.9 Nm which equals 40 kgf-cm and 35 in-lbf.


Related Toyota Parts
 Toyota Grille
 Toyota Windshield Wiper
 Toyota Cigarette Lighter
 Toyota Wiper Blade
 Toyota Washer Pump
 Toyota Window Regulator
 Toyota Wiper Linkage
 Toyota Instrument Panel Light Bulb
 Toyota Mirror Actuator
 Toyota Rear Passenger Door Handle Latch
 Toyota Seat Switch
 Toyota Weather Strip
Browse Toyota Door Handle by Models
Tacoma 4Runner Camry Tundra Corolla RAV4 Highlander Prius Sienna Land Cruiser Pickup FJ Cruiser 86 Sequoia T100 Avalon Celica Supra Yaris MR2 Matrix Solara Venza GR86 Echo C-HR Cressida Grand Highlander Paseo Previa Prius C Prius Prime Corolla Cross Corolla iM Crown GR Corolla MR2 Spyder Mirai Prius V Starlet Tercel Van Yaris iA bZ4X Prius Plug-In GR Supra Prius AWD-e RAV4 Prime