×
ToyotaParts- Hello
- Login or Register
- Quick Links
- Live Chat
- Track Order
- Parts Availability
- RMA
- Help Center
- Contact Us
- Shop for
- Toyota Parts
- Scion Parts
My Garage
My Account
Cart
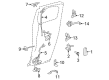
OEM Toyota FJ Cruiser Door Handle
Inside Door Handle- Select Vehicle by Model
- Select Vehicle by VIN
Select Vehicle by Model
orMake
Model
Year
Select Vehicle by VIN
For the most accurate results, select vehicle by your VIN (Vehicle Identification Number).
6 Door Handles found


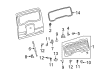
Toyota FJ Cruiser Release Handle
Part Number: 69209-35011$15.16 MSRP: $21.10You Save: $5.94 (29%)Ships in 1-3 Business Days
Toyota FJ Cruiser Handle Base, Driver Side
Part Number: 69208-35010$44.32 MSRP: $61.69You Save: $17.37 (29%)Ships in 1-3 Business DaysToyota FJ Cruiser Handle Base, Passenger Side
Part Number: 69207-35010$41.45 MSRP: $57.70You Save: $16.25 (29%)Ships in 1-3 Business Days
Toyota FJ Cruiser Handle, Outside, Black, Front
Part Number: 69210-35170-B1$89.81 MSRP: $126.06You Save: $36.25 (29%)Ships in 1-3 Business DaysToyota FJ Cruiser Handle, Outside, Silver, Front
Part Number: 69210-35170-B0$89.81 MSRP: $126.06You Save: $36.25 (29%)Ships in 1 Business DayToyota FJ Cruiser Handle, Outside, Front
Part Number: 69210-35160$110.55 MSRP: $155.17You Save: $44.62 (29%)Ships in 1 Business Day
Toyota FJ Cruiser Door Handle
Choose genuine Door Handle that pass strict quality control tests. You can trust the top quality and lasting durability. Shopping for OEM Door Handle for your Toyota FJ Cruiser? Our website is your one-stop destination. We stock an extensive selection of genuine Toyota FJ Cruiser parts. The price is affordable so you can save more. It only takes minutes to browse and find the exact fit. Easily add to cart and check out fast. Our hassle-free return policy will keep you stress-free. We process orders quickly for swift delivery. Your parts will arrive faster, so you can get back on the road sooner.
One of the crucial substitutes that make up the Product is the Toyota FJ Cruiser Door Handle which typifies Toyota's trustworthiness and efficiency. This Door Handle is perfect for numerous FJ Cruiser models to make occupants evacuate the car with ease; making it more efficient and safe. The mechanism works on the principle of retracting the door's hook from the latching mechanism, which has the same fundamental use as the door handle on the outside of the car - it is vital to providing constant access to the vehicle. Due to the high usage on the driver's side, durability constitutes the Toyota FJ Cruiser Door Handle as any wear and tear issues may hinder ably functioning of the door locking mechanism. This Door Handle requires periodic inspection, and it is advisable to service the vehicle to rectify any problem with the handle and maintain the looks of the car. The Toyota FJ Cruiser which has a powerful and 4.0-liter V6 engine and superior off-road performance receives the dependability of Door Handle that affects the drive. Also, non-functional shapes of the FJ Cruiser, including round headlights and the general family-look resembles are enriched by the Door Handle in terms of practicability. This consideration not only improves the function of the vehicle but also maintains the symbol of Toyota in the automobile industry, so in the FJ Cruiser, it becomes a symbol of adventure travel.
Toyota FJ Cruiser Door Handle Parts and Q&A
- Q: How to reassemble the rear door handle on Toyota FJ Cruiser?A:The process of reassembling the rear door handle starts with cleaning both the rear door glass and the outer vehicle body. Use the same steps to install the rear door glass which were used for the left-hand side. The procedure for installing the access door glass outer Weather Strip and access door outside moulding sub-assembly follows the same steps as the ones used for the LH side. The access panel lower lock stop requires installation with a "Torx" socket wrench T40 that applies 23 Nm (235 kgf-cm) torque (17 ft-lbf). To install the new access panel Weather Strip use 20 clips and after that 6 clips must be engaged. Embed the access panel check assembly in sliding areas with MP grease before mounting it to the door panel while using 2 nuts set at 5.5 Nm (56 kgf-cm, 49 in-lbf) torque and applying adhesive to the bolt thread before securing the assembly to the body panel at 30 Nm (306 kgf-cm, 22 ft-lbf). Secure the rear door opening trim along with a new rear door service hole cover making sure the seals operate effectively. The access panel lock striker plate can be installed with 2 T40 "Torx" socket wrench screws at 23 Nm (235 kgf-cm, 17 ft-lbf) torque. A "Torx" socket wrench T30 must be used to install the access panel lock cancel lever assembly at a torque level of 5.0 Nm (51 kgf-cm, 44 in-lbf). Attach the MP grease to sliding and rotating parts of the access panel lock remote control before bolting it to the vehicle with 2 screws and a clip using a torque setting of 12 Nm (122 kgf-cm, 9 ft-lbf) and connecting the rod and connector clamp. Install the access panel lower and upper lock assemblies according to the specified procedure. The access panel inside handle sub-assembly should get installed using 3 bolts that require 12 Nm (122 kgf-cm, 9 ft-lbf) torque while also receiving rod connection. The worker should install the front shoulder belt anchor adjuster assembly before proceeding with the front seat outer belt assembly. Connect the 2 clips for the center pillar upper garnish installation before fastening it with 2 screws and one clip. Attach the rear door trim bracket by using two screws before you use nine clips to install the rear door trim board and fasten the front Seat Belt outer (floor side) using a bolt with a torque of 42 Nm (428 kgf-cm, 31 ft-lbf). Attach the No. 1 cup holder using a screw and install the rear door inside handle sub-assembly by sitting the snap ring on the access panel inside handle. The lap belt outer anchor cover and the access panel rear Weather Strip must be installed using 3 claws. The cable installation requires a torque of 3.9 Nm (40 kgf-cm, 35 in-lbf) when securing it to the negative battery terminal.
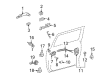
- Q: How to disassemble the front door handle on Toyota FJ Cruiser?A:The handling process for the front door starts with disconnection of the negative battery terminal cable. First remove the front armrest base upper panel by breaking 3 claws and a clip and disconnecting the cable. To access the components in the driver side remove the power window regulator master switch assembly whereas on the front passenger side you must take out the power window regulator switch assembly with the door control switch. You need to take out the front door trim board sub-assembly through a multi-step process which includes removing two covers followed by unscrewing two screws and unclipping ten parts and lastly disconnecting both the front Door Lock remote control cable and inside locking cable. Proceed with the removal of the front No.2 door service hole cover by disassembling its 4 screws before extracting the outer rear view mirror through the same method used on the left-hand side. Tear off the front door glass outer Weather Strip assembly using a similar method to the previous LH side operation before extracting the front No. 1 speaker. Start by unscrewing 4 screws for the removal of front door service hole cover and front door inside panel plate. The front door check assembly must be removed after unthreading two nuts and a bolt while being cautious about mishandling it. You must disengage 24 clips to take out the front door Weather Strip before removing the front door glass run. The removal of the front door frame sub-assembly front lower requires the operator to carefully remove its hole plug and screw and bolt because damage and drops must be avoided. The front door lower frame bracket garnish requires a bolt along with two screws for removal before the front door window frame rear lower can come out with just a bolt removed. Start by removing the hole plug followed by provisional installation of driver-side power window regulator master switch or passenger-side regulator switch. After that, access the 2 bolts through the service holes by moving the glass. Complete the removal by extracting the bolts followed by pulling the door glass upward carefully. Begin power window regulator sub-assembly removal by disconnecting the connector followed by removing the six retaining bolts but protect the assembly from falling or damages. The front door outside handle cover requires removal of its hole plug and "Torx" T30 screw loosening before releasing 2 claws for access. Pluck the front door lock first before you use the indicated direction to slide and pull the front door outside handle assembly. During the removal process the rear pad for the front door outside handle requires disengaging 2 claws while the front pad requires disengaging 3 claws. Application of a "Torx" socket wrench T30 allows you to loosen the screw before pulling off the front door outside handle frame sub-assembly through the service hole. The front door outside moulding sub-assembly should be removed using the same procedure developed for the left-hand side before extracting the two cushions.


Related Toyota FJ Cruiser Parts
 Toyota FJ Cruiser Armrest
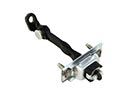 Toyota FJ Cruiser Door Check
 Toyota FJ Cruiser Door Hinge
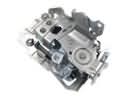 Toyota FJ Cruiser Door Latch Assembly
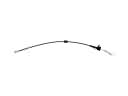 Toyota FJ Cruiser Door Latch Cable
 Toyota FJ Cruiser Door Lock Actuator
 Toyota FJ Cruiser Door Lock Cylinder
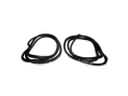 Toyota FJ Cruiser Door Seal
 Toyota FJ Cruiser Lift Support
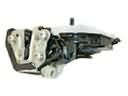 Toyota FJ Cruiser Rear Passenger Door Handle Latch
 Toyota FJ Cruiser Weather Strip
 Toyota FJ Cruiser Window Regulator