×
ToyotaParts- Hello
- Login or Register
- Quick Links
- Live Chat
- Track Order
- Parts Availability
- RMA
- Help Center
- Contact Us
- Shop for
- Toyota Parts
- Scion Parts
My Garage
My Account
Cart
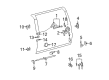
OEM Toyota FJ Cruiser Door Lock
Power Door Lock Actuator- Select Vehicle by Model
- Select Vehicle by VIN
Select Vehicle by Model
orMake
Model
Year
Select Vehicle by VIN
For the most accurate results, select vehicle by your VIN (Vehicle Identification Number).
3 Door Locks found


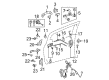
Toyota FJ Cruiser Lock Actuator, Passenger Side Part Number: 69030-52470
$261.65 MSRP: $373.57You Save: $111.92 (30%)Ships in 1-3 Business Days


Toyota FJ Cruiser Lock Actuator, Driver Side Part Number: 69040-47060
$255.71 MSRP: $365.09You Save: $109.38 (30%)Ships in 1-2 Business Days


Toyota FJ Cruiser Lock Actuator, Rear Part Number: 69110-35071
$258.39 MSRP: $368.92You Save: $110.53 (30%)Ships in 1-2 Business Days
Toyota FJ Cruiser Door Lock
Choose genuine Door Lock that pass strict quality control tests. You can trust the top quality and lasting durability. Shopping for OEM Door Lock for your Toyota FJ Cruiser? Our website is your one-stop destination. We stock an extensive selection of genuine Toyota FJ Cruiser parts. The price is affordable so you can save more. It only takes minutes to browse and find the exact fit. Easily add to cart and check out fast. Our hassle-free return policy will keep you stress-free. We process orders quickly for swift delivery. Your parts will arrive faster, so you can get back on the road sooner.
Fitted in every new model of the Toyota FJ Cruiser the Door Lock is a symbol of quality, performance and high security in the Toyota FJ Cruiser models. This important element can be effectively characterized by its general role of protecting the car, locking it and thus providing safety for the passengers as well as the driver when on the road. The door lock systems of the Toyota FJ Cruiser include power locking and unlocking systems and smart keyless entry remote systems that enable the user to operate the lock of the Toyota FJ Cruiser. They even have models with locking mechanisms that engages when the car is in motion adding to the safety features. Compatibility with different FJ Cruiser makes it possible for the owners to have access to these features in whichever model they have. Thus, the Door Lock not only affects the efficiency of a car, but also preserves the essence of the FJ Cruiser as an off-road vehicle. Boasting a stringent look and an almost avant-garde touch, together with actually functional features, the Toyota FJ Cruiser is distinctive in the market offer, and the distinguishing features will always attract clients who appreciate the original design of a car and who do not simply want to be surrounded by a car that is identical to hundreds of other vehicles on the road. High quality lock and newest technology enhances the Door Lock and become complementary item for off road lovers and general user of Toyota FJ Cruiser.
Toyota FJ Cruiser Door Lock Parts and Q&A
- Q: How to install the front door lock on Toyota FJ Cruiser?A:Begin by changing old packing in the connecting piece with new ones and making sure the packing surfaces remain grease and dirt-free before installing the front door lock. Place MP grease on the sliding and rotating capabilities of the front door lock before you connect the front door lock remote control cable and front door inside locking cable. Use the five claws to close the front cover before inserting the door lock open rod into the front door lock and positioning it against the door panel thus securing the outside handle link with the lock. Install the front door lock with three screws using a Torx socket wrench T30 and apply either Toyota Genuine Adhesive 1324 or Three Bond 1324 or an equivalent to the threads before tightening the screws to 5.0 Nm (51 kgf-cm, 44 in-lbf). By using a "Torx" socket wrench T30 you should install the front door lock cylinder assembly at 5.5 Nm (56 kgf-cm, 49 in-lbf) while ensuring the door lock key cylinder rod fits properly followed by installing the hole plug. Proceed to install the front door glass sub-assembly, front door window frame rear lower, front door lower frame bracket garnish, front door frame sub-assembly front lower, front door glass run, front door Weather Strip, front door check assembly, front door inside panel plate, front door service hole cover, front No. 1 speaker, front door glass outer Weather Strip assembly, outer rear view mirror, front No. 2 door service hole cover, front door trim board sub-assembly, front armrest base upper panel, and finally connect the cable to the negative battery terminal with a torque of 3.9 Nm (40 kgf-cm, 35 in-lbf).

Related Toyota FJ Cruiser Parts
 Toyota FJ Cruiser Armrest
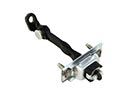 Toyota FJ Cruiser Door Check
 Toyota FJ Cruiser Door Hinge
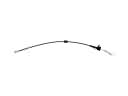 Toyota FJ Cruiser Door Latch Cable
 Toyota FJ Cruiser Door Lock Cylinder
 Toyota FJ Cruiser Instrument Cluster
 Toyota FJ Cruiser Interior Door Handle
 Toyota FJ Cruiser Lift Support
 Toyota FJ Cruiser Liftgate Lift Support
 Toyota FJ Cruiser Weather Strip
 Toyota FJ Cruiser Window Regulator
 Toyota FJ Cruiser Window Run