×
ToyotaParts- Hello
- Login or Register
- Quick Links
- Live Chat
- Track Order
- Parts Availability
- RMA
- Help Center
- Contact Us
- Shop for
- Toyota Parts
- Scion Parts
My Garage
My Account
Cart
OEM 2009 Toyota FJ Cruiser Door Handle
Inside Door Handle- Select Vehicle by Model
- Select Vehicle by VIN
Select Vehicle by Model
orMake
Model
Year
Select Vehicle by VIN
For the most accurate results, select vehicle by your VIN (Vehicle Identification Number).
4 Door Handles found


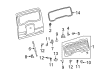
2009 Toyota FJ Cruiser Release Handle
Part Number: 69209-35011$15.16 MSRP: $21.10You Save: $5.94 (29%)Ships in 1-3 Business DaysProduct Specifications- Other Name: Handle Sub-Assembly, Back Door Outside; Liftgate Glass Handle; Handle, Back Door Outside
- Replaces: 69209-35010
- Part Name Code: 69215
- Item Weight: 1.40 Pounds
- Condition: New
- Fitment Type: Direct Replacement
- SKU: 69209-35011
- Warranty: This genuine part is guaranteed by Toyota's factory warranty.

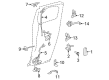
2009 Toyota FJ Cruiser Handle Base, Driver Side
Part Number: 69208-35010$44.32 MSRP: $61.69You Save: $17.37 (29%)Ships in 1-3 Business DaysProduct Specifications- Other Name: Handle Sub-Assembly, Accessory; Exterior Door Handle Base, Center Left; Handle Sub-Assembly, Access Panel Inside, Driver Side
- Position: Driver Side
- Part Name Code: 69208K
- Item Weight: 0.70 Pounds
- Item Dimensions: 7.2 x 3.8 x 2.1 inches
- Condition: New
- Fitment Type: Direct Replacement
- SKU: 69208-35010
- Warranty: This genuine part is guaranteed by Toyota's factory warranty.
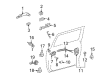
2009 Toyota FJ Cruiser Handle Base, Passenger Side
Part Number: 69207-35010$41.45 MSRP: $57.70You Save: $16.25 (29%)Ships in 1-3 Business DaysProduct Specifications- Other Name: Handle Sub-Assembly, Accessory; Exterior Door Handle Base, Center Right; Handle Sub-Assembly, Access Panel Inside, Passenger Side
- Position: Passenger Side
- Part Name Code: 69207K
- Item Weight: 0.70 Pounds
- Condition: New
- Fitment Type: Direct Replacement
- SKU: 69207-35010
- Warranty: This genuine part is guaranteed by Toyota's factory warranty.

2009 Toyota FJ Cruiser Handle, Outside, Front
Part Number: 69210-35160$110.55 MSRP: $155.17You Save: $44.62 (29%)Ships in 1 Business DayProduct Specifications- Other Name: Handle Assembly, Front Door; Exterior Door Handle, Front Outer; Handle Assembly, Front Door, Outside Passenger Side; Driver Side; Exterior Door Handle
- Position: Front
- Item Weight: 1.00 Pounds
- Item Dimensions: 12.5 x 4.0 x 3.9 inches
- Condition: New
- Fitment Type: Direct Replacement
- SKU: 69210-35160
- Warranty: This genuine part is guaranteed by Toyota's factory warranty.
2009 Toyota FJ Cruiser Door Handle
Looking for affordable OEM 2009 Toyota FJ Cruiser Door Handle? Explore our comprehensive catalogue of genuine 2009 Toyota FJ Cruiser Door Handle. All our parts are covered by the manufacturer's warranty. Plus, our straightforward return policy and speedy delivery service ensure an unparalleled shopping experience. We look forward to your visit!
2009 Toyota FJ Cruiser Door Handle Parts Q&A
- Q: How to disassemble the rear door handle on 2009 Toyota FJ Cruiser?A: The first step to disassemble the rear door handle requires cable disconnection from the negative terminal of the battery. Use a clip remover to remove the access panel rear Weather Strip after disconnecting its 3 claws leading to lap belt outer anchor cover removal. When you insert a clip remover between the door handle and door trim you need to turn the handle then you can remove both the rear door inside handle and snap ring. The next step requires screw removal followed by the No. 1 cup holder and then a bolt removal to break the connection between the front seat belt outer (floor side) before separating the rear door trim panel through disengaging all 9 clips. Take off the No. 1 door trim bracket by detaching its 2 screws before removing the center pillar upper garnish through clip removal and disconnection of 2 screws and 2 clips. After removing the front seat outer belt assembly future steps include removing the front shoulder belt anchor adjuster assembly. You can remove the access panel inside handle by disconnecting the rod and taking off its 3 bolts, and afterward unclipping rod and disconnecting the connector clamp to remove the access panel lock remote control after unscrewing two bolts. The task requires a "Torx" socket wrench T30 to extract the 2 screws on the access panel lock cancel lever while another "Torx" socket wrench T40 is needed to eliminate the 2 screws on the access panel lock striker plate. Gently remove the bolt then 2 nuts to detach the access panel check while preserving it from both damage and drop. The process also includes stripping rear door service hole cover and rear door opening trim. The disengagement of 6 clips requires a clip remover to remove the 20 clips before taking out the access panel Weather Strip. Use a "Torx" socket wrench T40 to remove the access panel lower lock stop after which you should remove the access door outside moulding sub-assembly and the access door glass outer Weather Strip before proceeding to take off the rear door glass.
Related 2009 Toyota FJ Cruiser Parts
 2009 Toyota FJ Cruiser Armrest
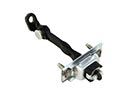 2009 Toyota FJ Cruiser Door Check
 2009 Toyota FJ Cruiser Door Hinge
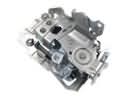 2009 Toyota FJ Cruiser Door Latch Assembly
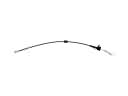 2009 Toyota FJ Cruiser Door Latch Cable
 2009 Toyota FJ Cruiser Door Lock Actuator
 2009 Toyota FJ Cruiser Door Lock Cylinder
 2009 Toyota FJ Cruiser Door Seal
 2009 Toyota FJ Cruiser Lift Support
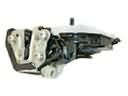 2009 Toyota FJ Cruiser Rear Passenger Door Handle Latch
 2009 Toyota FJ Cruiser Weather Strip
 2009 Toyota FJ Cruiser Window Regulator