×
ToyotaParts- Hello
- Login or Register
- Quick Links
- Live Chat
- Track Order
- Parts Availability
- RMA
- Help Center
- Contact Us
- Shop for
- Toyota Parts
- Scion Parts
My Garage
My Account
Cart
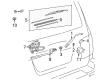
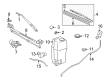
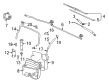
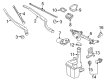
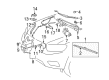
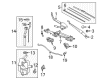
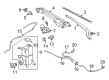
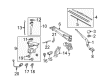
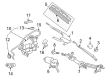
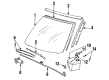
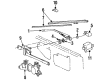
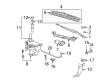
OEM Toyota Wiper Linkage
Wiper Blade- Select Vehicle by Model
- Select Vehicle by VIN
Select Vehicle by Model
orMake
Model
Year
Select Vehicle by VIN
For the most accurate results, select vehicle by your VIN (Vehicle Identification Number).
156 Wiper Linkages found


Toyota Linkage Assembly, Rear Part Number: 85170-60090
$185.69 MSRP: $265.12You Save: $79.43 (30%)Ships in 1-3 Business DaysProduct Specifications- Other Name: Link Assembly, Rear Wiper; Wiper Linkage; Rear Transmission; Link
- Position: Rear


Toyota Wiper Transmission, Front Part Number: 85150-04042
$185.11 MSRP: $264.29You Save: $79.18 (30%)Ships in 1-3 Business DaysProduct Specifications- Other Name: Link Assembly, Front Wiper; Windshield Wiper Linkage; Wiper Linkage; Link Assembly
- Position: Front
- Replaces: 85150-04041, 85150-04040


Toyota Front Transmission Part Number: 85150-60240
$277.49 MSRP: $396.19You Save: $118.70 (30%)Ships in 1-3 Business DaysProduct Specifications- Other Name: Link Assembly, Front Wiper; Windshield Wiper Linkage; Link Assembly; Link Assembly, Windshield Wiper; Wiper Linkage
- Position: Front


Toyota Wiper Transmission, Front Part Number: 85150-AC010
$185.57 MSRP: $264.96You Save: $79.39 (30%)Ships in 1-3 Business DaysProduct Specifications- Other Name: Link Assembly, Front Wiper; Windshield Wiper Linkage; Wiper Linkage; Link Assembly, Windshield Wiper
- Position: Front


Toyota Rear Transmission Part Number: 85170-0E030
$186.04 MSRP: $265.62You Save: $79.58 (30%)Ships in 1-2 Business DaysProduct Specifications- Other Name: Link Assembly, Rear Wiper; Wiper Linkage; Link Assembly; Link
- Position: Rear


Toyota Linkage Assembly, Front Part Number: 85150-0E050
$186.04 MSRP: $265.62You Save: $79.58 (30%)Ships in 1-3 Business DaysProduct Specifications- Other Name: Link Assembly, Front Wiper; Windshield Wiper Linkage; Front Transmission; Link Assembly, Windshield Wiper; Wiper Linkage
- Position: Front


Toyota Front Transmission Part Number: 85150-0T010
$188.14 MSRP: $268.62You Save: $80.48 (30%)Ships in 1-3 Business DaysProduct Specifications- Other Name: Link Assembly, Front Wiper; Windshield Wiper Linkage; Linkage; Link Assembly, Windshield Wiper; Wiper Linkage
- Position: Front


Toyota Link Assembly, Windshield Wiper, Front Part Number: 85150-60321
$202.93 MSRP: $289.74You Save: $86.81 (30%)Ships in 1-3 Business DaysProduct Specifications- Other Name: Link Assembly, Front Wiper; Wiper Linkage
- Position: Front
- Replaces: 85150-60320


Toyota Linkage Assembly, Front Part Number: 85150-0E040
$206.31 MSRP: $294.56You Save: $88.25 (30%)Ships in 1-3 Business DaysProduct Specifications- Other Name: Link Assembly, Front Wiper; Windshield Wiper Linkage; Front Transmission; Link Assembly, Windshield Wiper; Wiper Linkage
- Position: Front
- Replaces: 85150-48070


Toyota Wiper Linkage, Front Part Number: 85150-47140
$207.01 MSRP: $295.56You Save: $88.55 (30%)Ships in 1-3 Business DaysProduct Specifications- Other Name: Link Assembly, Front Wiper; Windshield Wiper Linkage; Front Transmission; Link Assembly, Windshield Wiper
- Position: Front


Toyota Wiper Linkage, Front Part Number: 85150-0C070
$237.18 MSRP: $338.64You Save: $101.46 (30%)Ships in 1-3 Business DaysProduct Specifications- Other Name: Link Assembly, Front Wiper; Windshield Wiper Linkage; Front Transmission; Link Assembly, Windshield Wiper
- Position: Front


Toyota Linkage Assembly, Front Part Number: 85150-35220
$237.42 MSRP: $338.98You Save: $101.56 (30%)Ships in 1-2 Business DaysProduct Specifications- Other Name: Link Assembly, Front Wiper; Windshield Wiper Linkage; Front Transmission; Link Assembly, Wiper; Wiper Linkage
- Position: Front


Toyota Front Transmission Part Number: 85150-AA030
$258.39 MSRP: $368.92You Save: $110.53 (30%)Ships in 1-3 Business DaysProduct Specifications- Other Name: Link Assembly, Front Wiper; Windshield Wiper Linkage; Linkage; Link Assembly, Windshield Wiper; Wiper Linkage
- Manufacturer Note: DENSO
- Position: Front


Toyota Linkage Assembly, Front Part Number: 85150-48060
$275.63 MSRP: $393.54You Save: $117.91 (30%)Ships in 1-3 Business DaysProduct Specifications- Other Name: Link Assembly, Front Wiper; Windshield Wiper Linkage; Front Transmission; Link Assembly, Windshield Wiper; Wiper Linkage
- Position: Front


Toyota Wiper Linkage, Front Part Number: 85150-0C050
$296.60 MSRP: $423.47You Save: $126.87 (30%)Ships in 1-3 Business DaysProduct Specifications- Other Name: Link Assembly, Front Wiper; Windshield Wiper Linkage; Front Transmission; Link Assembly, Windshield Wiper
- Manufacturer Note: COLD SPEC
- Position: Front


Toyota Wiper Linkage, Front Part Number: 85150-0C010
$296.60 MSRP: $423.47You Save: $126.87 (30%)Ships in 1-3 Business DaysProduct Specifications- Other Name: Link Assembly, Front Wiper; Windshield Wiper Linkage; Front Transmission; Link Assembly, Windshield Wiper
- Position: Front


Toyota Wiper Transmission, Front Part Number: 85150-47070
$300.33 MSRP: $428.79You Save: $128.46 (30%)Ships in 1-2 Business DaysProduct Specifications- Other Name: Link Assembly, Front Wiper; Windshield Wiper Linkage; Wiper Linkage; Link Assembly, Windshield Wiper
- Position: Front


Toyota Wiper Transmission, Front Part Number: 85150-33021
$222.65 MSRP: $317.89You Save: $95.24 (30%)Ships in 1-3 Business DaysProduct Specifications- Other Name: Link Assembly, Front Wiper; Wiper Linkage; Front Transmission; Link Assembly, Windshield Wiper
- Manufacturer Note: NIPPONDENSO
- Position: Front
- Replaces: 85150-33020, 85150-06010


Toyota Rear Transmission Part Number: 85170-60070
$88.03 MSRP: $123.57You Save: $35.54 (29%)Ships in 1-2 Business DaysProduct Specifications- Other Name: Link Assembly, Rear Wiper; Wiper Linkage; Link
- Position: Rear


Toyota Linkage Assembly, Front Part Number: 85150-35120
Product Specifications- Other Name: Link Assembly, Front Wiper; Windshield Wiper Linkage; Front Transmission; Link Assembly, Wiper; Wiper Linkage
- Position: Front
| Page 1 of 8 |Next >
1-20 of 156 Results
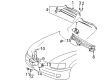
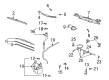
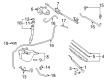
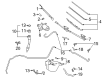
Toyota Wiper Linkage
OEM parts deliver unmatched quality you can rely on. They pass extensive quality control inspections. Toyota produces them to the official factory specifications. This process helps prevent defects and imperfections. So you can get exceptional lifespan and a flawless fit. Need new OEM Toyota Wiper Linkage? You'll love our wide selection of genuine options. Shop in minutes and skip the hunt. Our prices are unbeatable, you'll save time and money. It's easy to shop and find the right piece. Our committed customer service team gives professional help from start to finish. Every part includes a manufacturer's warranty. We ship quickly, your parts will arrive fast at your door.
Toyota Wiper Linkage functions so quickly and sweeps over the windshields by translating motor movement into arcs by a blade. By matching lean production lines with vehicles that take years of abuse without skipping a beat, deft hybrid frameworks and the universal TNGA platform have earned Toyota worldwide fidelity and made its cars feel nimble over hatchbacks, sedans, and SUVs. Toyota drivers place their faith in the badge as new powertrains, including plug-in Prius compacts and long-range RAV4 crossovers, still have a reputation for spending little fuel, fast fault correction, and longevity that other fashionable competitors cannot match. Toyota continues to update lineups across continents without losing affordability and allowing first-time buyers to experience electrified technology and more experienced commuters to enjoy the silent assurance of a machine built to be driven not to be cherished. Wiper Linkage is in between the motor and the arms and it converts the rotary torque to the back and forth motion that scrubs the glass clean during downpours. Pivot joints and robust steel rods in Wiper Linkage will avoid corrosion and as such the movement of the blades will remain smooth as grit and ice struggle with each stroke. Wiper Linkage is connected to the control signal on the vehicle and when the stalk is clicked, it responds immediately, which prevents any wasted time that would blind the next turn. The Wiper Linkage stands the test of time mile after mile as the geometry ensures that the stress is balanced so as to minimize the wear of the bushing and spare the driver the shock of unexpected smear.
Toyota Wiper Linkage Parts and Q&A
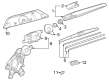
- Q: How to remove the wiper linkage and motor on Toyota Prius?A:The first step to remove the front wiper motor and linkage involves removing the front wiper arm head cap followed by taking off the 2 nuts from the front wiper arm LH. The removal of the front wiper arm RH starts with unscrewing the nut. Begin by detaching the 8 clips which will allow removal of the hood to cowl top seal. Then remove the 8 claws and clip from the cowl top ventilator louver LH after repeating the same steps for the cowl top ventilator louver RH. The process requires disconnecting the connector before removing the 5 bolts which will let you take out the windshield wiper motor and link assembly. To remove the windshield wiper link arm from the crank arm pivot of the windshield wiper motor assembly start by using a flat-head screwdriver taped at the tip and disconnecting the components as needed. First remove the nut with its washer before separating the crank arm. Write down the positions for reinstallation on both the crank arm and the windshield wiper motor. There are three bolts which need removal as the first step to separate the windshield wiper motor.
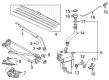
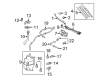
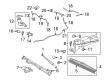
- Q: How to service and repair the wiper linkage on Toyota Sequoia?A:Begin the replacement process on the front wiper linkage and motor by using a screwdriver to remove the front wiper arm LH cap following the step of taping the screwdriver tip first and later removing the nut and wiper arm. Repeat this procedure for the front wiper arm RH. The same steps need to be executed on the front wiper arm which is located on the right-hand side. The cowl top ventilator louver requires 6 clip removal followed by 8 screw uninstallation using a clip remover tool. Unfasten the hood to cowl top seal which is attached to the cowl top ventilator louver. Following the removal of the 4 windshield wiper motor bolts the wiper motor can be extracted while its link is disconnected from the wiper arm. Remove the 6 bolts from the windshield wiper link then extract it through the service hole. Remove the nozzle from each side by disconnecting the washer hose followed by using a screwdriver. Start your installation by inserting the washer nozzle sub-assembly and afterward insert the windshield wiper link through the service hole followed by torquing the 6 bolts to 5.5 N.m (56 kgf.cm, 49 in.lbf). Cowl panel and wiper link claw alignment is necessary before torquing the 4 bolts to 5.5 N.m (56 kgf.cm, 49 in.lbf) while reattaching the connector. Begin with placing the hood to cowl top seal onto the cowl top ventilator louver before securing the louver with the provided 8 screws and 6 clips. First operate the wiper once then turn off the wiper switch before installing the wiper arms while tightening the nuts by hand to positions of 25.4 mm (1.000 in) and 40.0 mm (1.574 in) and make sure the blades stay within the designated boundary of the ceramic edge. The 2 nuts should receive torque of 20 N.m (205 kgf.cm, 15 ft.lbf) for installation of the 2 caps.


Related Toyota Parts
 Toyota Emblem
 Toyota Seat Covers
 Toyota Seat Heater Switch
 Toyota Wiper Blade
 Toyota Exterior Door Handle
 Toyota Windshield Washer Nozzle
 Toyota A/C Switch
 Toyota Fuel Door Release Cable
 Toyota Mirror Actuator
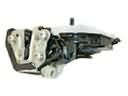 Toyota Rear Passenger Door Handle Latch
 Toyota Wheelhouse
 Toyota Window Run
Browse Toyota Wiper Linkage by Models
Tacoma 4Runner Camry Tundra Corolla RAV4 Highlander Prius Sienna Land Cruiser Pickup FJ Cruiser Sequoia T100 Avalon Celica Supra Yaris Matrix MR2 Solara Venza Echo C-HR Cressida Grand Highlander Paseo Previa Prius C Prius Prime bZ4X Corolla Cross Corolla iM Crown Crown Signia GR Corolla Mirai MR2 Spyder Prius V Starlet Tercel Prius Plug-In Prius AWD-e RAV4 Prime