×
ToyotaParts- Hello
- Login or Register
- Quick Links
- Live Chat
- Track Order
- Parts Availability
- RMA
- Help Center
- Contact Us
- Shop for
- Toyota Parts
- Scion Parts
My Garage
My Account
Cart
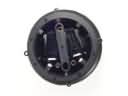
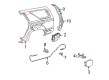
OEM Toyota Fuel Door Release Cable
Gas Door Safety Release Cable- Select Vehicle by Model
- Select Vehicle by VIN
Select Vehicle by Model
orMake
Model
Year
Select Vehicle by VIN
For the most accurate results, select vehicle by your VIN (Vehicle Identification Number).
92 Fuel Door Release Cables found


Toyota Release Cable, Rear Part Number: 77035-35120
$50.54 MSRP: $70.34You Save: $19.80 (29%)Ships in 1-3 Business DaysProduct Specifications- Other Name: Cable Sub-Assembly, Fuel Lid Lock Control; Fuel Filler Door Release Cable, Rear; Fuel Door Release Cable
- Position: Rear


Toyota Release Cable, Rear Part Number: 77035-WB003
$15.46 MSRP: $21.52You Save: $6.06 (29%)Ships in 1-3 Business DaysProduct Specifications- Other Name: Cable Sub-Assembly, Fuel Lid Lock Control; Fuel Filler Door Release Cable, Rear; Fuel Door Release Cable
- Position: Rear


Toyota Release Cable, Rear Part Number: 77035-42171
$35.36 MSRP: $49.22You Save: $13.86 (29%)Ships in 1-3 Business DaysProduct Specifications- Other Name: Cable Sub-Assembly, Fuel Lid Lock Control; Fuel Filler Door Release Cable, Rear; Fuel Door Release Cable
- Position: Rear
- Replaces: 77035-42170


Toyota Release Cable, Rear Part Number: 77035-52250
$35.48 MSRP: $49.39You Save: $13.91 (29%)Ships in 1 Business DayProduct Specifications- Other Name: Cable Sub-Assembly, Fuel Lid Lock Control; Fuel Filler Door Release Cable, Rear; Fuel Door Release Cable
- Position: Rear


Toyota Release Cable, Rear Part Number: 77035-47050
$36.56 MSRP: $50.88You Save: $14.32 (29%)Ships in 1-3 Business DaysProduct Specifications- Other Name: Cable Sub-Assembly, Fuel Lid Lock Control; Fuel Filler Door Release Cable, Rear; Fuel Door Release Cable
- Position: Rear


Toyota Release Cable, Rear Part Number: 77035-0E020
$39.78 MSRP: $55.37You Save: $15.59 (29%)Ships in 1-3 Business DaysProduct Specifications- Other Name: Cable Sub-Assembly, Fuel Lid Lock Control; Fuel Filler Door Release Cable, Rear; Fuel Door Release Cable
- Position: Rear
- Replaces: 77035-48070


Toyota Release Cable, Rear Part Number: 77035-02250
$39.78 MSRP: $55.37You Save: $15.59 (29%)Ships in 1-2 Business DaysProduct Specifications- Other Name: Cable Sub-Assembly, Fuel Lid Lock Control; Fuel Filler Door Release Cable, Rear; Fuel Door Release Cable
- Position: Rear


Toyota Release Cable, Rear Part Number: 77035-06181
$40.14 MSRP: $55.87You Save: $15.73 (29%)Product Specifications- Other Name: Cable Sub-Assembly, Fuel Lid Lock Control; Fuel Filler Door Release Cable, Rear; Fuel Door Release Cable
- Position: Rear
- Replaces: 77035-06180


Toyota Release Cable, Rear Part Number: 77035-47040
$39.90 MSRP: $55.53You Save: $15.63 (29%)Ships in 1-3 Business DaysProduct Specifications- Other Name: Cable Sub-Assembly, Fuel Lid Lock Control; Fuel Filler Door Release Cable, Rear; Fuel Door Release Cable
- Position: Rear


Toyota Release Cable, Rear Part Number: 77035-42100
$41.10 MSRP: $57.20You Save: $16.10 (29%)Ships in 1-3 Business DaysProduct Specifications- Other Name: Cable Sub-Assembly, Fuel Lid Lock Control; Fuel Filler Door Release Cable, Rear; Fuel Door Release Cable
- Position: Rear


Toyota Release Cable, Rear Part Number: 77035-02100
$41.10 MSRP: $57.20You Save: $16.10 (29%)Ships in 1-3 Business DaysProduct Specifications- Other Name: Cable Sub-Assembly, Fuel Lid Lock Control; Fuel Filler Door Release Cable, Rear; Fuel Door Release Cable
- Position: Rear


Toyota Release Cable, Rear Part Number: 77035-33130
$41.45 MSRP: $57.70You Save: $16.25 (29%)Ships in 1-3 Business DaysProduct Specifications- Other Name: Cable Sub-Assembly, Fuel Lid Lock Control; Fuel Filler Door Release Cable, Rear; Fuel Door Release Cable
- Position: Rear


Toyota Release Cable, Rear Part Number: 77035-0R010
$42.05 MSRP: $58.53You Save: $16.48 (29%)Ships in 1-2 Business DaysProduct Specifications- Other Name: Cable Sub-Assembly, Fuel Lid Lock Control; Fuel Filler Door Release Cable, Rear; Fuel Door Release Cable
- Position: Rear
- Replaces: 77035-42160


Toyota Release Cable, Rear Part Number: 77035-06090
$45.28 MSRP: $63.02You Save: $17.74 (29%)Ships in 1-3 Business DaysProduct Specifications- Other Name: Cable Sub-Assembly, Fuel Lid Lock Control; Fuel Filler Door Release Cable, Rear; Fuel Door Release Cable
- Position: Rear


Toyota Release Cable, Rear Driver Side Part Number: SU003-01405
$27.60 MSRP: $35.73You Save: $8.13 (23%)Ships in 1-3 Business DaysProduct Specifications- Other Name: Cable Assembly Fuel Left-Hand; Fuel Filler Door Release Cable, Rear; Fuel Door Release Cable; Cable Sub-Assembly, Fuel Lid Lock Control
- Position: Rear Driver Side


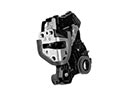
Toyota Cable Sub-Assembly, Fuel Lid Lock Control Part Number: 77035-60020
$60.90 MSRP: $85.48You Save: $24.58 (29%)Ships in 1-3 Business DaysProduct Specifications- Other Name: Fuel Door Release Cable


Toyota Release Cable, Rear Part Number: 77035-12520
$40.14 MSRP: $55.87You Save: $15.73 (29%)Product Specifications- Other Name: Cable Sub-Assembly, Fuel Lid Lock Control; Fuel Filler Door Release Cable, Rear; Fuel Door Release Cable
- Position: Rear


Toyota Release Cable, Rear Part Number: 77035-AA030
$39.90 MSRP: $55.53You Save: $15.63 (29%)Product Specifications- Other Name: Cable Sub-Assembly, Fuel Lid Lock Control; Fuel Filler Door Release Cable, Rear; Fuel Door Release Cable
- Position: Rear


Toyota Release Cable, Rear Part Number: 77035-33100
$41.10 MSRP: $57.20You Save: $16.10 (29%)Product Specifications- Other Name: Cable Sub-Assembly, Fuel Lid Lock Control; Fuel Filler Door Release Cable, Rear; Fuel Door Release Cable
- Position: Rear


Toyota Release Cable, Rear Part Number: 77035-52201
$41.81 MSRP: $58.20You Save: $16.39 (29%)Product Specifications- Other Name: Cable Sub-Assembly, Fuel Lid Lock Control; Fuel Filler Door Release Cable, Rear; Fuel Door Release Cable
- Position: Rear
| Page 1 of 5 |Next >
1-20 of 92 Results
Toyota Fuel Door Release Cable
OEM parts deliver unmatched quality you can rely on. They pass extensive quality control inspections. Toyota produces them to the official factory specifications. This process helps prevent defects and imperfections. So you can get exceptional lifespan and a flawless fit. Need new OEM Toyota Fuel Door Release Cable? You'll love our wide selection of genuine options. Shop in minutes and skip the hunt. Our prices are unbeatable, you'll save time and money. It's easy to shop and find the right piece. Our committed customer service team gives professional help from start to finish. Every part includes a manufacturer's warranty. We ship quickly, your parts will arrive fast at your door.
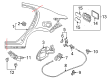
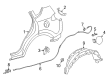
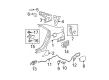
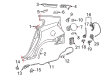
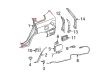
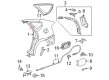
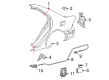
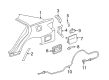
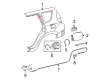
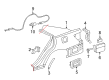
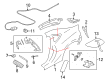
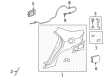
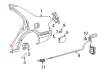
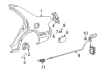
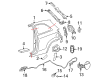
Toyota Fuel Door Release Cable opens the fuel flap without any problem and will save drivers the fiddling around outside. Toyota eliminates waste with lean assembly line and allows frontline workers to stop product production to resolve hiccups. These rapid corrections are central to increasingly superior hybrids, novel TNGA platforms, and more precise handling throughout the range. Toyota continues to add electric range as the recent plug-in systems expand the daily commute to rely entirely on batteries. Toyota is a sure choice for customers who desire cars that last longer than the fad because it has earned its longevity over decades. The Fuel Door Release Cable connects the cabin lever to the hinge latch, just as a finger tugs into a popping door. Constructed of non-corrosive steel strands within a low-friction sheath allows it to resist grit, winter salt, and repetitive bends so the flap opens at the command of many years. A Toyota driver wastes no additional seconds at the pump when the Fuel Door Release Cable is moving freely. Frayed wire or breakage of wires in the Fuel Door Release Cable manifests immediately as a recalcitrant cap and thus it makes good sense to replace the cable immediately. Installing a new Fuel Door Release Cable would only need a few simple pieces of equipment and not a specialized tool. Fueling is smooth and ensures that trips are quick and fumbling at the roadside is removed in case of bad weather.
Toyota Fuel Door Release Cable Parts and Q&A
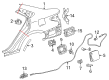
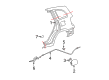
- Q: How to install the Fuel Door Release Cable Assembly and related components on Toyota Land Cruiser?A:The installation process for the Fuel Lid Lock Control Cable Assembly begins with clamp attachment according to illustrations. Install the fuel filler opening lid lock retainer by clockwise rotation and next install the cable according to the same procedure. Process the fuel lid lock control cable by hooking it onto the fuel lid lock open lever then connect both claws to maintain the lever position. You should start by putting in the No. 1 Woofer Box Speaker Assembly followed by the Front Quarter Trim Panel Assembly RH and closing with the Rear Seat Cover Cap, the No. 1 Luggage Compartment Trim Hook, the Rear Floor Mat Rear Support Plate and the Front Floor Carpet Assembly. The installation of the Rear Console Box Sub-Assembly must be done with or without the Cool Box according to specifications. The installation sequence includes Rear No. 2 Seat Protector followed by Rear No. 1 Seat Protector as well as Air Duct Guide, Air Duct Plug, Air Heater Guide and No. 2 Air Duct Plug. The next step requires installing the Rear Door Scuff Plates LH and RH and the Rear Step Cover followed by the Cowl Side Trim Boards LH and RH and Front Door Scuff Plates LH and RH together with the Instrument Side Panels LH and RH. Install the Rear No. 1 Seat Assembly RH before moving on to the Rear No. 3 Seat Cushion Hinge Cover, then the Rear No. 1 Seat Cushion Hinge Cover, the Rear No. 4 Seat Cushion Hinge Cover, followed by the Rear No. 2 Seat Cushion Hinge Cover. Required components also include the Rear No. 1 Seat Assembly LH, the Rear No. 4 Seat Cushion Hinge Cover, the Rear No. 2 Seat Cushion Hinge Cover, the Rear No. 5 Seat Cushion Hinge Cover, and the Rear No. Finish the installation by adding the Rear No. 2 Seat Assembly RH, the Front Seat Assembly RH, the Front Seat Assembly LH and afterward connect the cable to the negative battery terminal.
- Q: How to service the Fuel Door Release Cable Assembly on Toyota Solara?A:The service process for Fuel Lid Lock Control Cable Assembly starts by removing 7 clips that hold the floor mat down from the luggage compartment before unmounting the 2 clips from the rear finish plate. Any service work on the Fuel Lid Lock Control Cable Assembly begins with removing the luggage compartment side tray assembly and its bolt and tray before moving onto the luggage compartment trim cover inner LH that requires a clip remover to release its two clips. First tape the screwdriver tip and use it to detach the LH front door scuff plate through disengaging its 3 clips. First detach the cowl side trim sub-assembly LH in the same fashion before removing the rear seat assembly and quarter trim panel lower LH. The procedure for the luggage door lock open bezel consists of pulling it up from the rear edge until the clip detaches before sliding it backward to free the claw while keeping the clip inside the opener until reattachment. The technician begins by unbolting two fittings and cutting two cables from the luggage door lock open lever sub-assembly then moves to unbolting and removing the bolt and cylinder from the luggage opener cancel cylinder assembly. The last step for removal includes disconnection of the claw and retainer from the fuel lid lock control cable sub-assembly. The initial stage of assembly requires installing the lock retainer and cable in accordance with illustrations for the fuel lid lock control cable sub-assembly. Mount the luggage opener cancel cylinder assembly after installing its bolt then torque it to 5.5 N.m (56 kgf.cm, 49 in.lbf). After that, install the luggage door lock open lever sub-assembly using two bolts torqued to 5.5 N.m (56 kgf.cm, 49 in.lbf).