×
ToyotaParts- Hello
- Login or Register
- Quick Links
- Live Chat
- Track Order
- Parts Availability
- RMA
- Help Center
- Contact Us
- Shop for
- Toyota Parts
- Scion Parts
My Garage
My Account
Cart
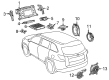
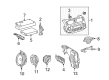
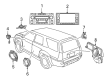
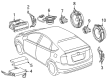
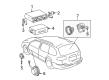
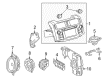
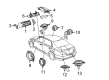
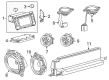
OEM Toyota Car Speakers
Audio Speakers- Select Vehicle by Model
- Select Vehicle by VIN
Select Vehicle by Model
orMake
Model
Year
Select Vehicle by VIN
For the most accurate results, select vehicle by your VIN (Vehicle Identification Number).
Filter by Part Type
Filter by Part Type
654 Car Speakers found


Toyota Door Speaker, Front Part Number: 86160-0E250
$87.44 MSRP: $118.96You Save: $31.52 (27%)Ships in 1-2 Business DaysProduct Specifications- Other Name: Speaker Assembly, Radio; Speaker, Front; Speaker Assembly, Front
- Position: Front


Toyota Door Speaker, Rear Part Number: 86160-2B580
$120.54 MSRP: $165.39You Save: $44.85 (28%)Ships in 1-2 Business DaysProduct Specifications- Other Name: Speaker Assembly, Radio; Speaker, Center, Center Rear, Front, Front Lower, Rear, Rear Lower; Rear Speaker; Front Driver Speaker; Rear Driver Speaker; Speaker; Speaker Assembly, Front; Speaker Assembly, Rear
- Manufacturer Note: TYPE B:REFER ILLUST.
- Position: Rear


Toyota Instrument Panel Speaker, Outer Part Number: 86160-0E240
$87.44 MSRP: $118.96You Save: $31.52 (27%)Ships in 1-3 Business DaysProduct Specifications- Other Name: Speaker Assembly, Radio; Speaker, Outer; Speaker Assembly, Front
- Position: Outer


Toyota Rear Speaker Part Number: 86150-0W040
$540.93 MSRP: $768.33You Save: $227.40 (30%)Product Specifications- Other Name: Speaker Assembly, With Box; Speaker, Rear; Speaker Assembly, W/Box
- Position: Rear


Toyota Front Driver Speaker Part Number: 86160-0W880
$142.63 MSRP: $195.70You Save: $53.07 (28%)Ships in 1-3 Business DaysProduct Specifications- Other Name: Speaker Assembly, Radio; Speaker, Center; Speaker Assembly, Front
- Manufacturer Note: AUDIO-AM/FM,CST,CD-JBL-9SP


Toyota Front Driver Speaker Part Number: 86160-22A00
$91.35 MSRP: $124.28You Save: $32.93 (27%)Ships in 1-2 Business DaysProduct Specifications- Other Name: Speaker Assembly, Radio; Speaker, Front Lower; Speaker Assembly, Front


Toyota Front Driver Speaker Part Number: 86160-0WJ30
$169.78 MSRP: $232.94You Save: $63.16 (28%)Ships in 1-3 Business DaysProduct Specifications- Other Name: Speaker Assembly, Radio; Speaker, Center Front; Speaker Assembly, Front


Toyota Front Driver Speaker Part Number: 86160-0W110
$250.70 MSRP: $346.92You Save: $96.22 (28%)Ships in 1-3 Business DaysProduct Specifications- Other Name: Speaker Assembly, Radio; Speaker, Front, Front Lower; Speaker Assembly, Front


Toyota Instrument Panel Speaker, Driver Side Part Number: SU003-02651
$107.52 MSRP: $140.35You Save: $32.83 (24%)Ships in 1-3 Business DaysProduct Specifications- Other Name: Speaker Assembly Bil; Speaker, Left; Speaker; Speaker Assembly, Front
- Manufacturer Note: LH
- Position: Driver Side


Toyota Woofer, Rear Part Number: 86160-0WF40
$458.76 MSRP: $672.31You Save: $213.55 (32%)Ships in 1-3 Business DaysProduct Specifications- Other Name: Speaker Assembly, Radio; Speaker, Rear; Speaker Assembly, Stereo Component, Rear
- Position: Rear


Toyota Instrument Panel Speaker, Front Part Number: 86160-AE010
$120.91 MSRP: $171.16You Save: $50.25 (30%)Ships in 1-3 Business DaysProduct Specifications- Other Name: Speaker Assembly, Radio; Speaker, Front, Outer; Speaker; Tweeter; Speaker Assembly, Front; Speaker Set, Front
- Position: Front


Toyota Instrument Panel Speaker Part Number: 86160-07080
$143.57 MSRP: $203.25You Save: $59.68 (30%)Ships in 1-3 Business DaysProduct Specifications- Other Name: Speaker Assembly, Radio; Speaker Assembly, Front


Toyota Rear Speaker Part Number: 86160-06360
$172.53 MSRP: $244.22You Save: $71.69 (30%)Ships in 1-3 Business DaysProduct Specifications- Other Name: Speaker Assembly, Radio; Speaker, Rear; Package Tray Speaker; Speaker Assembly, Rear
- Position: Rear
- Replaces: 86160-06370, 86160-33720


Toyota Instrument Panel Speaker Part Number: 86160-AA440
$188.36 MSRP: $268.93You Save: $80.57 (30%)Ships in 1-3 Business DaysProduct Specifications- Other Name: Speaker Assembly, Radio; Speaker, Center, Center Front, Front, Front Lower; Front Driver Speaker; Speaker; Speaker Assembly, Front


Toyota Speaker Bracket, Rear Passenger Side Part Number: 86160-08040
$224.52 MSRP: $320.57You Save: $96.05 (30%)Ships in 1-3 Business DaysProduct Specifications- Other Name: Speaker Assembly, Radio; Radio Speaker Bracket, Right; Speaker, Right; Speaker; Speaker Assembly, Rear
- Manufacturer Note: RH
- Position: Rear Passenger Side
- Replaces: 86161-08010


Toyota Speaker, Passenger Side Part Number: 86150-35091
$231.47 MSRP: $330.49You Save: $99.02 (30%)Ships in 1 Business DayProduct Specifications- Other Name: Speaker Assembly, With Bracket; Speaker, Right; Tweeter; Speaker Assembly, Front
- Manufacturer Note: AUDIO-*DA & NAVIGATION & 15SPEAKER
- Position: Passenger Side
- Replaces: 86150-35090


Toyota Package Tray Speaker, Rear Part Number: 86160-AC250
$326.42 MSRP: $466.05You Save: $139.63 (30%)Product Specifications- Other Name: Speaker Assembly, Radio; Radio Bracket, Rear Upper Inner; Speaker Assembly, Stereo Component, Rear
- Position: Rear


Toyota Speaker Part Number: 86150-0C040
$360.12 MSRP: $511.52You Save: $151.40 (30%)Ships in 1-3 Business DaysProduct Specifications- Other Name: Speaker Assembly, With Box; Woofer; Speaker Assembly, W/Box


Toyota Woofer Part Number: 86150-0W020
$453.53 MSRP: $644.19You Save: $190.66 (30%)Product Specifications- Other Name: Speaker Assembly, With Box; Speaker; Speaker Assembly, W/Box


Toyota Woofer Part Number: 86150-60040
$515.49 MSRP: $732.20You Save: $216.71 (30%)Ships in 1-3 Business DaysProduct Specifications- Other Name: Speaker Assembly, With Box; Speaker; Speaker Assembly, W/Box
| Page 1 of 33 |Next >
1-20 of 654 Results
Toyota Car Speakers
OEM parts deliver unmatched quality you can rely on. They pass extensive quality control inspections. Toyota produces them to the official factory specifications. This process helps prevent defects and imperfections. So you can get exceptional lifespan and a flawless fit. Need new OEM Toyota Car Speakers? You'll love our wide selection of genuine options. Shop in minutes and skip the hunt. Our prices are unbeatable, you'll save time and money. It's easy to shop and find the right piece. Our committed customer service team gives professional help from start to finish. Every part includes a manufacturer's warranty. We ship quickly, your parts will arrive fast at your door.
Toyota Car Speakers sound well-balanced, punchy and make commuting to work every day a mini concert. Toyota was a garage experiment in 1937 that had grown to be a global powerhouse with the elimination of production waste, building assembly lines, and the introduction of hybrids that combine electric push with gasoline power in the wallet range. The modular TNGA platform by Toyota lowers the center of gravity, increases rigidity and distributes modern safety technology through subcompacts, SUVs and trucks without adding to the price or service complexities. Toyota retains its owners, as its vehicles seem to shake off decades of abuse, burn fuel slowly, and even seem tight when the odometer reaches stratospheric levels. Toyota demonstrates that trust is not just marketing propaganda through supporting new powertrains with strong warranty and sales of millions of hybrids that have already traveled billions of real miles. Car Speakers fitted in the door and dash utilize paper-polypropylene low profile woofers that do not increase the weight of the vehicle and allow the vehicle to handle sharp. Car Speakers include silk composite tweeters designed to face the ear region and produce bright vocals that can cut across the crosswinds and highway noise. Car Speakers separate frequencies using specific crossovers and direct mids to the woofers and highs to the tweeters to ensure nothing bleeds or blurs. Car Speakers are also safety friends as they shoot seatbelt alarms and lane alarms that drivers cannot hear.
Toyota Car Speakers Parts and Q&A
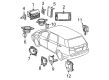
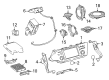
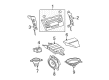
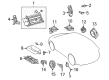
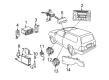
- Q: How to Remove Car Speakers and Radio on a 2002-2006 Toyota Avalon?A:To disconnect the negative battery cable, remove the dash panel surrounding the radio. If necessary, remove the air conditioning control panel and front console trim to access the radio mounting screws. Remove the mounting bolts and pull the radio outward to access the backside, then disconnect the electrical connectors and antenna lead. For the Car Speakers, remove the door trim panel and disconnect the electrical connector. Remove the speaker mounting screws and remove the speaker from the vehicle. For tweeters, remove the door trim panels or package tray to access the screws mounting the tweeters. Disconnect the electrical connector and remove the tweeter. On Sciara models, pry up the speaker grilles and unbolt the tweeters. Installation is the reverse of removal.

Related Toyota Parts
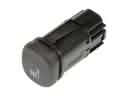 Toyota Seat Heater Switch
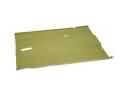 Toyota Floor Pan
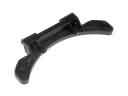 Toyota Fuel Door Hinge
 Toyota Hood Release Cable
 Toyota Mirror Cover
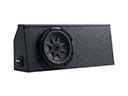 Toyota Subwoofer
 Toyota Tailgate Handle
 Toyota Window Crank Handle
 Toyota Wiper Linkage
 Toyota Center Console Base
 Toyota Rear Passenger Door Handle Latch
 Toyota Weather Strip
Browse Toyota Car Speakers by Models
Tacoma 4Runner Camry Tundra Corolla RAV4 Highlander Prius Sienna Land Cruiser Pickup FJ Cruiser 86 Sequoia T100 Avalon Celica Supra Yaris Matrix MR2 Solara Venza GR86 Echo C-HR Cressida Grand Highlander Paseo Previa Prius C Prius Prime bZ4X Corolla Cross Corolla iM Crown Crown Signia GR Corolla Mirai MR2 Spyder Prius V Tercel Yaris iA Prius Plug-In GR Supra Prius AWD-e RAV4 Prime