×
ToyotaParts- Hello
- Login or Register
- Quick Links
- Live Chat
- Track Order
- Parts Availability
- RMA
- Help Center
- Contact Us
- Shop for
- Toyota Parts
- Scion Parts
My Garage
My Account
Cart
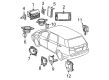
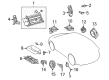
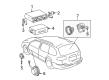
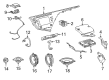
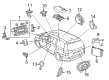
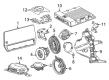
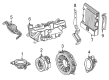
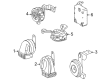
OEM Toyota Sienna Car Speakers
Audio Speakers- Select Vehicle by Model
- Select Vehicle by VIN
Select Vehicle by Model
orMake
Model
Year
Select Vehicle by VIN
For the most accurate results, select vehicle by your VIN (Vehicle Identification Number).
Part Type
Select Part Type
47 Car Speakers found


Toyota Sienna Instrument Panel Speaker, Front Part Number: 86160-AE010
$120.91 MSRP: $171.16You Save: $50.25 (30%)Ships in 1-3 Business Days

Toyota Sienna Instrument Panel Speaker Part Number: 86160-AA440
$188.36 MSRP: $268.93You Save: $80.57 (30%)Ships in 1-3 Business Days


Toyota Sienna Speaker Bracket, Rear Passenger Side Part Number: 86160-08040
$224.52 MSRP: $320.57You Save: $96.05 (30%)Ships in 1-3 Business Days


Toyota Sienna Instrument Panel Speaker, Front Part Number: 86160-0C070
$154.27 MSRP: $211.66You Save: $57.39 (28%)Ships in 1-3 Business Days
Toyota Sienna Rear Speaker Part Number: 86160-02B40
$71.44 MSRP: $97.19You Save: $25.75 (27%)Ships in 1-3 Business Days
Toyota Sienna Front Driver Speaker Part Number: 86160-AA420
$207.66 MSRP: $296.49You Save: $88.83 (30%)Ships in 1-3 Business Days
Toyota Sienna Front Driver Speaker, Center Part Number: 86160-0E340
$43.13 MSRP: $58.18You Save: $15.05 (26%)Ships in 1-3 Business DaysToyota Sienna Instrument Panel Speaker, Front Part Number: 86160-0WF61
$80.45 MSRP: $109.45You Save: $29.00 (27%)Ships in 1-3 Business Days
Toyota Sienna Quarter Panel Speaker, Rear Driver Side Part Number: 86160-08170
$87.44 MSRP: $118.96You Save: $31.52 (27%)Ships in 1-3 Business Days
Toyota Sienna Front Driver Speaker, Lower Part Number: 86160-06850
$367.27 MSRP: $521.67You Save: $154.40 (30%)Ships in 1-3 Business Days
Toyota Sienna Rear Speaker Part Number: 86160-06A40
$139.34 MSRP: $191.19You Save: $51.85 (28%)Ships in 1-3 Business Days
Toyota Sienna Woofer Part Number: 86160-08160
$526.74 MSRP: $771.94You Save: $245.20 (32%)Ships in 1-3 Business Days
Toyota Sienna Speaker, Rear Center Part Number: 86150-08030
$861.91 MSRP: $1263.14You Save: $401.23 (32%)Ships in 1-3 Business Days
Toyota Sienna Rear Speaker Part Number: 86160-AE030
$164.66 MSRP: $233.11You Save: $68.45 (30%)Ships in 1-3 Business Days
Toyota Sienna Pedestrian Speaker Part Number: 86570-45040
$55.20 MSRP: $76.84You Save: $21.64 (29%)Ships in 1-3 Business Days

Toyota Sienna Speaker, Passenger Side Part Number: 86160-08090
$129.59 MSRP: $177.80You Save: $48.21 (28%)Ships in 1-3 Business Days


Toyota Sienna Speaker Part Number: 86160-AE060

Toyota Sienna Speaker, Driver Side Part Number: 86160-08100


Toyota Sienna Front Driver Speaker Part Number: 86160-AA382

Toyota Sienna Speaker Part Number: 86150-AE030
| Page 1 of 3 |Next >
1-20 of 47 Results
Toyota Sienna Car Speakers
Choose genuine Car Speakers that pass strict quality control tests. You can trust the top quality and lasting durability. Shopping for OEM Car Speakers for your Toyota Sienna? Our website is your one-stop destination. We stock an extensive selection of genuine Toyota Sienna parts. The price is affordable so you can save more. It only takes minutes to browse and find the exact fit. Easily add to cart and check out fast. Our hassle-free return policy will keep you stress-free. We process orders quickly for swift delivery. Your parts will arrive faster, so you can get back on the road sooner.
Toyota Sienna Car Speakers Parts and Q&A
- Q: How to install the stereo component Car Speakers assembly on Toyota Sienna?A:Begin installation of the stereo component speaker assembly by connecting the connector followed by screw installation using two screws while maintaining specific screw tightening procedures. Install the instrument cluster finish panel garnish after connecting it to the system. Plug in the connector for the front No. 2 speaker assembly and fasten it with both screws before tightening the screws according to their specified sequence. The instrument panel speaker panel sub-assembly needs installation as the last step.
- Q: How to remove the luggage Car Speakers on Toyota Sienna?A:The process for removing the luggage speaker starts with taking off the rear door scuff plate followed by removing back door Weather Strip and finally removing the back door scuff plate and the rear door Weather Strip. The next step requires removal of the quarter trim front panel assembly. The rear speaker assembly requires unconnecting its connector before the removal of three screws for detachment. The removal of the No. 1 speaker assembly with box requires unfastening two screws from it. Disconnection of the connector and unfastening 5 bolts will finish the removal process for the No. 2 speaker assembly with box.


Related Toyota Sienna Parts
 Toyota Sienna Hood Latch
 Toyota Sienna Subwoofer
 Toyota Sienna Lift Support
 Toyota Sienna Car Mirror
 Toyota Sienna Floor Pan
 Toyota Sienna Fuel Door Release Cable
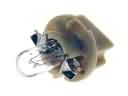 Toyota Sienna Instrument Panel Light Bulb
 Toyota Sienna Interior Door Handle
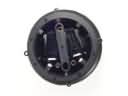 Toyota Sienna Mirror Actuator
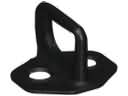 Toyota Sienna Rear Door Striker
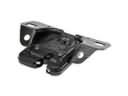 Toyota Sienna Trunk Lid Latch
 Toyota Sienna Weather Strip