×
ToyotaParts- Hello
- Login or Register
- Quick Links
- Live Chat
- Track Order
- Parts Availability
- RMA
- Help Center
- Contact Us
- Shop for
- Toyota Parts
- Scion Parts
My Garage
My Account
Cart
OEM Toyota Door Lock Actuator
Power Door Lock Actuator- Select Vehicle by Model
- Select Vehicle by VIN
Select Vehicle by Model
orMake
Model
Year
Select Vehicle by VIN
For the most accurate results, select vehicle by your VIN (Vehicle Identification Number).
929 Door Lock Actuators found


Toyota Lock Actuator, Driver Side Part Number: 69040-02440
$255.24 MSRP: $364.43You Save: $109.19 (30%)Product Specifications- Other Name: Lock Assembly, Front Door; Latch Assembly, Front/Rear Left; Lock Actuator Motor; Door Lock; Lock Assembly; Lock; Lock Assembly, Front Door W/Motor, Driver Side
- Position: Driver Side


Toyota Lock Actuator, Driver Side Part Number: 69040-42250
$289.61 MSRP: $413.49You Save: $123.88 (30%)Ships in 1-2 Business DaysProduct Specifications- Other Name: Lock Assembly, Front Door W; Door Lock Actuator Motor, Front Left; Door Latch Assembly, Front Left; Lock Assembly; Front Door W/Motor, Driver Side; Door Lock Actuator Motor; Door Latch Assembly.
- Position: Driver Side


Toyota Lock Assembly, Back Door, Rear Part Number: 69350-60120
$139.58 MSRP: $197.59You Save: $58.01 (30%)Ships in 1-3 Business DaysProduct Specifications- Other Name: Door Lock Actuator; Door Lock
- Position: Rear


Toyota Lock Actuator, Passenger Side Part Number: 69030-42230
$267.82 MSRP: $382.39You Save: $114.57 (30%)Ships in 1-2 Business DaysProduct Specifications- Other Name: Lock Assembly, Front Door W; Door Lock Actuator Motor, Front Right; Door Latch Assembly, Front Right; Lock Assembly; Front Door W/Motor, Passenger Side; Door Lock Actuator Motor; Door Latch Assembly.
- Manufacturer Note: WIRELESS DOOR LOCK-WITH(PANIC BUTTON)&DOOR OUTSIDE HANDLE-BODY COLOR,W/O(PASSENGER KEY CYLINDER)&POWER WINDOW-WITH(DRIVER ONE TOUCH DOWN)
- Position: Passenger Side


Toyota Lock Actuator, Rear Part Number: 69110-35090
$287.39 MSRP: $410.33You Save: $122.94 (30%)Ships in 1 Business DayProduct Specifications- Other Name: Lock Assembly, With Motor Back Door; Liftgate Latch, Rear; Door Lock Actuator Motor; Door Lock Actuator; Door Lock; Lock
- Position: Rear
- Replaces: 69110-35060, 69110-35062


Toyota Lock Actuator, Driver Side Part Number: 69040-0C050
$255.24 MSRP: $364.43You Save: $109.19 (30%)Product Specifications- Other Name: Lock Assembly, Front Door W; Door Lock Actuator Motor, Front Left; Door Latch Assembly, Front Left; Lock Assembly; Front Door W/Motor, Driver Side; Door Lock Actuator Motor.
- Position: Driver Side
- Replaces: 69040-06180


Toyota Lock Assembly, Rear Door, Driver Side Part Number: 69060-60062
$288.56 MSRP: $412.00You Save: $123.44 (30%)Ships in 1-3 Business DaysProduct Specifications- Other Name: Lock Assembly, Rear Door W; Door Latch Assembly; Door Lock Actuator; Door Lock
- Position: Driver Side
- Replaces: 69060-60060, 69060-60061


Toyota Lock, Passenger Side Part Number: 69050-60062
$297.30 MSRP: $424.47You Save: $127.17 (30%)Ships in 1-3 Business DaysProduct Specifications- Other Name: Lock Assembly, Rear Door W; Door Latch Assembly, Rear Right; Door Lock Actuator; Door Lock; Lock Assembly, Rear Door, Passenger Side; Door Latch Assembly
- Position: Passenger Side
- Replaces: 69050-60060, 69050-60061


Toyota Lock Actuator, Passenger Side Part Number: 69030-02380
$265.14 MSRP: $378.57You Save: $113.43 (30%)Ships in 1-2 Business DaysProduct Specifications- Other Name: Lock Assembly, Front Door; Latch Assembly, Front/Rear Right; Lock Actuator Motor; Door Lock; Lock Assembly; Lock; Lock Assembly, Front Door W/Motor, Passenger Side
- Position: Passenger Side


Toyota Lock Actuator, Driver Side Part Number: 69140-AC010
$158.03 MSRP: $223.70You Save: $65.67 (30%)Ships in 1-3 Business DaysProduct Specifications- Other Name: Actuator Assembly, Rear Door Lock; Door Lock Actuator Motor, Rear Left; Actuator; Actuator Assembly, Rear Door Lock, Driver Side; Door Lock Actuator Motor; Door Lock Actuator; Door Lock
- Position: Driver Side


Toyota Lock, Driver Side Part Number: 69306-0C020
$173.07 MSRP: $245.00You Save: $71.93 (30%)Ships in 1-3 Business DaysProduct Specifications- Other Name: Lock Sub-Assembly, Rear Door; Door Latch Assembly, Rear Left; Door Lock Actuator Motor; Door Lock Actuator; Door Lock; Latch; Lock Assembly, Rear Door, Driver Side; Door Latch Assembly
- Position: Driver Side


Toyota Lock Assembly, Front Door, Driver Side Part Number: 69040-60191
$297.30 MSRP: $424.47You Save: $127.17 (30%)Ships in 1-3 Business DaysProduct Specifications- Other Name: Lock Assembly, Front Door W; Door Lock Actuator; Door Lock
- Position: Driver Side
- Replaces: 69040-60190


Toyota Lock, Rear Part Number: 69301-0C010
$112.33 MSRP: $157.67You Save: $45.34 (29%)Product Specifications- Other Name: Lock Sub-Assembly, Back; Liftgate Latch, Rear; Door Lock Actuator; Door Lock; Lock Assembly, Back Door
- Position: Rear


Toyota Lock Assembly, Driver Side Part Number: 69320-35500
$161.79 MSRP: $229.03You Save: $67.24 (30%)Ships in 1-2 Business DaysProduct Specifications- Other Name: Lock Assembly, Front Door; Door Latch Assembly, Front Left; Door Lock Actuator; Door Lock; Lock; Lock Assembly, Front Door, Driver Side
- Manufacturer Note: W(ELECTROMAGNETIC LOCK)
- Position: Driver Side


Toyota Lock Actuator, Passenger Side Part Number: 69110-35050
$185.92 MSRP: $265.45You Save: $79.53 (30%)Ships in 1-3 Business DaysProduct Specifications- Other Name: Actuator Assembly, Front Door Lock; Door Lock Actuator Motor, Front Right; Actuator; Actuator Assembly, Front Door Lock, Passenger Side; Door Lock Actuator Motor; Door Lock Actuator; Door Lock
- Manufacturer Note: W(ELECTROMAGNETIC LOCK)
- Position: Passenger Side


Toyota Lock Actuator, Passenger Side Part Number: 69030-52470
$261.65 MSRP: $373.57You Save: $111.92 (30%)Ships in 1-3 Business DaysProduct Specifications- Other Name: Lock Assembly, Front Door W; Door Lock Actuator Motor, Front Right; Door Latch Assembly, Front Right; Lock Assembly; Front Door W/Motor, Passenger Side; Door Lock Actuator Motor.
- Position: Passenger Side


Toyota Lock Assembly, Front Door W/Motor, Passenger Side Part Number: 69030-0C050
$267.82 MSRP: $382.39You Save: $114.57 (30%)Product Specifications- Other Name: Lock Assembly, Front Door W; Passenger Side; Door Lock Actuator Motor; Actuator; Lock
- Position: Passenger Side
- Replaces: 69030-06200


Toyota Lock Assembly, Passenger Side Part Number: 69200-08011
$599.16 MSRP: $878.07You Save: $278.91 (32%)Ships in 1-3 Business DaysProduct Specifications- Other Name: Lock Assembly, Power Slide Door; Sliding Door Latch, Rear Right; Door Lock Actuator; Door Lock; Lock; Lock Assembly, Slide Door, Passenger Side
- Position: Passenger Side
- Replaces: 69200-08010


Toyota Lock Assembly, Rear Part Number: 69350-52261
$122.66 MSRP: $173.64You Save: $50.98 (30%)Ships in 1-3 Business DaysProduct Specifications- Other Name: Lock Assembly, Back Door; Liftgate Latch, Rear; Door Lock Actuator; Door Lock; Lock; Lock Assembly, Back Door, W/Courtesy Lamp Switch
- Position: Rear
- Replaces: 69350-52260


Toyota Lock Assembly, Driver Side Part Number: 69040-0C010
$281.80 MSRP: $402.35You Save: $120.55 (30%)Product Specifications- Other Name: Lock Assembly, Front Door W; Door Latch Assembly, Front Left; Door Lock Actuator; Door Lock; Lock; Lock Assembly, Front Door, Driver Side
- Manufacturer Note: W(POWER DOOR LOCK)
- Position: Driver Side
| Page 1 of 47 |Next >
1-20 of 929 Results
Toyota Door Lock Actuator
OEM parts deliver unmatched quality you can rely on. They pass extensive quality control inspections. Toyota produces them to the official factory specifications. This process helps prevent defects and imperfections. So you can get exceptional lifespan and a flawless fit. Need new OEM Toyota Door Lock Actuator? You'll love our wide selection of genuine options. Shop in minutes and skip the hunt. Our prices are unbeatable, you'll save time and money. It's easy to shop and find the right piece. Our committed customer service team gives professional help from start to finish. Every part includes a manufacturer's warranty. We ship quickly, your parts will arrive fast at your door.
Toyota Door Lock Actuator opens or closes the doors within a second, providing easy one-button access. Toyota was started way back in 1937 and continues to drive lean manufacturing that reduces waste and accelerates corrections. The Toyota showrooms are full of hybrids that conserve fuel, such as the Prius plug-in models or the new RAV4 plug-in. On its TNGA platform, Toyota depends on it to lose weight, reduce centers of gravity, and improve handling. Good components and sensible designs make Toyota owners maintain a vehicle longer since they are unpunished by daily abuse. The drivers in the global market believe in the badge in terms of longevity that can withstand intense weather and miles. Hybrid Synergy Drive attains additional electric range and maintains a low level of emissions and costs of operation. The new platform also makes manufacturing lines easier, that is, updates are made faster throughout the entire lineup in a waste-free manner. Door Lock Actuator is mounted in each of the doors with a small reversible motor pushing or pulling a latch rod with the use of gears. Door Lock Actuator isolates failure; therefore, where the rear right motor burns out, the other doors still respond to power commands. Door Lock Actuator is available with different styles of plugs, either male or female, and different numbers of prongs depending on the harness required to be fitted. Door Lock Actuator can be easily clamped back to provide fast clicking locks and unlocks at the switch or key fob.
Toyota Door Lock Actuator Parts and Q&A
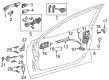
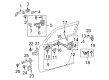
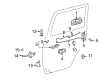
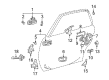
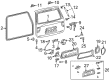
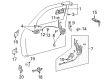
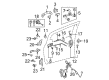
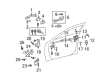
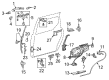
- Q: How to remove the power door lock actuator on Toyota Camry?A:The process of removing the power door lock actuator starts with the removal of front door lower frame bracket garnish as well as inside handle bezel plug assist grip cover courtesy light assembly and front door trim board sub-assembly inner glass Weather Strip inside handle sub-assembly front No. 1 speaker assembly service hole cover glass sub-assembly rear lower frame sub-assembly and outside handle cover. Start the procedure by disconnecting the front door lock assembly connector before moving on to remove the 3 "torx" socket wrench (T30) screws. To separate the front door lock assembly along with its cables the technician will slide it down and extract the front door lock open rod from the outside handle frame. To perform the repair you must first pry off the front door lock open rod from the assembly then strip away the door lock wiring harness seal along with extracting the front door lock remote control cable assembly. The process ends with a screwdriver unclipping 3 claws after taping the screwdriver tip properly and taking out the front door inside locking cable assembly.
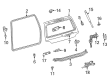
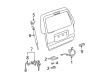
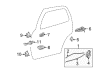
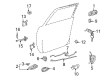
- Q: How to install the front door lock actuator for the LH side of a Regular Cab on Toyota Tundra?A:Begin the front door lock actuator installation for the LH side of a Regular Cab by installing front door inside locking cable assembly LH and then add front door lock remote control cable assembly LH. Place the front door lock assembly LH before you put on the front door glass sub-assembly LH followed by the front door rear lower frame sub-assembly LH. The front door service hole cover LH must be installed first followed by the front No.1 door trim bracket and the front door trim board sub-assembly LH. Install the front door armrest cover LH and the courtesy light assembly one after the other. The installation process requires front door lower frame bracket garnish LH and front door window regulator handle assembly (without power window) before setting the front armrest upper base panel LH. The process concludes with installing the front door inside handle bezel plug LH then connecting its cable to the negative battery terminal while acknowledging possible system initialization requirements after reattaching the cable.


Related Toyota Parts
 Toyota Windshield Wiper
 Toyota Wiper Blade
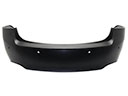 Toyota Bumper Cover
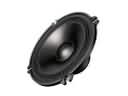 Toyota Car Speakers
 Toyota Fuel Door Hinge
 Toyota Instrument Cluster
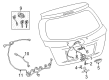
 Toyota Tailgate Handle
 Toyota Windshield Washer Nozzle
 Toyota Shift Indicator
 Toyota Seat Switch
 Toyota Side Marker Light
 Toyota Weather Strip
Browse Toyota Door Lock Actuator by Models
Tacoma 4Runner Camry Tundra Corolla RAV4 Highlander Prius Sienna Land Cruiser Pickup FJ Cruiser Sequoia T100 Avalon Celica Supra Yaris Matrix MR2 Solara Venza GR86 Echo C-HR Cressida Grand Highlander Paseo Previa Prius C Prius Prime bZ4X Corolla Cross Corolla iM Crown Crown Signia GR Corolla Mirai MR2 Spyder Prius V Starlet Tercel Van Yaris iA Prius Plug-In GR Supra Prius AWD-e RAV4 Prime