×
ToyotaParts- Hello
- Login or Register
- Quick Links
- Live Chat
- Track Order
- Parts Availability
- RMA
- Help Center
- Contact Us
- Shop for
- Toyota Parts
- Scion Parts
My Garage
My Account
Cart
OEM Toyota Land Cruiser Door Lock Actuator
Power Door Lock Actuator- Select Vehicle by Model
- Select Vehicle by VIN
Select Vehicle by Model
orMake
Model
Year
Select Vehicle by VIN
For the most accurate results, select vehicle by your VIN (Vehicle Identification Number).
59 Door Lock Actuators found


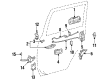
Toyota Land Cruiser Lock Actuator, Driver Side Part Number: 69040-42250
$289.61 MSRP: $413.49You Save: $123.88 (30%)Ships in 1-2 Business Days

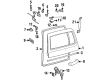
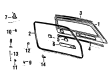
Toyota Land Cruiser Lock Assembly, Back Door, Rear Part Number: 69350-60120
$139.58 MSRP: $197.59You Save: $58.01 (30%)Ships in 1-3 Business Days


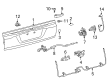
Toyota Land Cruiser Lock Actuator, Passenger Side Part Number: 69030-42230
$267.82 MSRP: $382.39You Save: $114.57 (30%)Ships in 1-2 Business Days

Toyota Land Cruiser Lock Actuator, Driver Side Part Number: 69040-0C050
$255.24 MSRP: $364.43You Save: $109.19 (30%)

Toyota Land Cruiser Lock Assembly, Rear Door, Driver Side Part Number: 69060-60062
$288.56 MSRP: $412.00You Save: $123.44 (30%)Ships in 1-3 Business Days

Toyota Land Cruiser Lock, Passenger Side Part Number: 69050-60062
$297.30 MSRP: $424.47You Save: $127.17 (30%)Ships in 1-3 Business Days

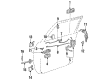
Toyota Land Cruiser Lock Assembly, Front Door, Driver Side Part Number: 69040-60191
$297.30 MSRP: $424.47You Save: $127.17 (30%)Ships in 1-3 Business Days


Toyota Land Cruiser Lock Assembly, Driver Side Part Number: 69040-60081
$307.55 MSRP: $439.11You Save: $131.56 (30%)Ships in 1-3 Business Days

Toyota Land Cruiser Actuator, Driver Side Part Number: 69140-60010
$155.21 MSRP: $219.71You Save: $64.50 (30%)Ships in 1 Business Day

Toyota Land Cruiser Actuator, Passenger Side Part Number: 69130-60010
$150.62 MSRP: $213.22You Save: $62.60 (30%)Ships in 1-3 Business Days

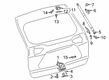
Toyota Land Cruiser Lock Assembly, Back Door Part Number: 69350-60040
$151.92 MSRP: $215.06You Save: $63.14 (30%)Ships in 1-3 Business DaysToyota Land Cruiser Lock Assembly, Front Door, Passenger Side Part Number: 69030-60221
$297.30 MSRP: $424.47You Save: $127.17 (30%)Ships in 1-3 Business Days
Toyota Land Cruiser Lock Actuator, Rear Part Number: 69350-42090
$209.69 MSRP: $299.39You Save: $89.70 (30%)Ships in 1-3 Business Days

Toyota Land Cruiser Lock Actuator, Lower Passenger Side Part Number: 69380-60061
$86.97 MSRP: $122.07You Save: $35.10 (29%)

Toyota Land Cruiser Lock Part Number: 69350-90A03

Toyota Land Cruiser Lock Part Number: 69350-90A02


Toyota Land Cruiser Lock, Passenger Side Part Number: 69030-60041


Toyota Land Cruiser Lock, Driver Side Part Number: 69040-60041
| Page 1 of 3 |Next >
1-20 of 59 Results
Toyota Land Cruiser Door Lock Actuator
Choose genuine Door Lock Actuator that pass strict quality control tests. You can trust the top quality and lasting durability. Shopping for OEM Door Lock Actuator for your Toyota Land Cruiser? Our website is your one-stop destination. We stock an extensive selection of genuine Toyota Land Cruiser parts. The price is affordable so you can save more. It only takes minutes to browse and find the exact fit. Easily add to cart and check out fast. Our hassle-free return policy will keep you stress-free. We process orders quickly for swift delivery. Your parts will arrive faster, so you can get back on the road sooner.
It is among Toyota's reliable and performing parts that are indispensable for the LMC4 model identified as the Door Lock Actuator. This motorized device opens and closes the doors as desired, and it improves the comfort and security that drivers and or passengers experience. All Toyota Land Cruiser comes with individual Door Lock Actuators for each door to minimize the effect of a faulty unit because while one actuator can be faulty, the others still work. The above layout prevents distortion and retains the general performance of the car. The Toyota Land Cruiser has had Door Lock Actuators change in terminal and connector throughout the models it has had and thus it is important for users of the Toyota Land Cruiser to check compatibility when replacing the said actuators. In addition to the convenience aspect, the Door Lock Actuator is through still very vital in enhancing the safety of the Toyota Land Cruiser the comfort as it offers in different driving situations. However, it is important to point out that the Toyota Land Cruiser is one of the handiest automobiles durable in the extreme conditions and rough terrains and the same is valid about the Door Lock Actuator. Specified characteristics that make the automaker unique in the market are higher motor performance and significant build quality of the Door Lock Actuator. As to the Door Lock Actuator, for which Toyota has sold thousands around the world and which has been found to fit well installed on a variety of the Land Cruiser models, this part still testifies to Toyota's focused efforts on delivering the prime quality engineering to its customers.
Toyota Land Cruiser Door Lock Actuator Parts and Q&A
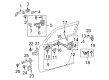
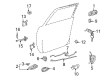
- Q: How to remove the front door lock actuator on the LH side on Toyota Land Cruiser?A:The first step to remove the front door lock actuator of the LH side requires disconnecting the negative battery terminal cable while waiting 90 seconds to disable the SRS system. The service requirements begin with removing the front lower door frame bracket garnish LH followed by front door armrest base panel assembly LH then front door inside handle bezel LH then door assist grip cover LH before taking off the courtesy light assembly. The next steps require the removal of the LH side front door trim board sub-assembly and front door service hole cover and front No. 2 door stiffener cushion. The next step removes both the front door rear lower frame sub-assembly LH and the front door outside handle cover LH. With caution hold the door lock in position because loose handling can lead to damage while using a T30 "TORX" wrench to remove the three screws of the front door lock assembly LH. Remove both the front door lock remote control cable assembly and the front door inside locking cable assembly LH.
- Q: How to install the front door lock actuator on the LH side on Toyota Land Cruiser?A:The LH side installation of the front door lock actuator begins with the front door inside locking cable assembly LH then continues with front door lock remote control cable assembly LH. Begin the front door lock assembly LH installation process through part lubrication with MP grease then insert the front door lock open rod before achieving complete connection. A "TORX" T30 wrench should be used to handle three screws that need 5.0 Nm (51 kgf-cm, 44 in-lbf) torque for door lock installation. The front door installation sequence includes adding the front door outside handle cover LH followed by the front door rear lower frame sub-assembly LH and concludes with attaching the front No. 2 door stiffener cushion and the front door service hole cover LH then the front door trim board sub-assembly LH. From here finish installation by adding the front door inside handle bezel LH and door assist grip cover LH and front door armrest base panel assembly LH as well as front lower door frame bracket garnish LH. For final steps you should link the cable to the negative battery terminal while confirming that the SRS warning light functions correctly.


Related Toyota Land Cruiser Parts
 Toyota Land Cruiser Cigarette Lighter
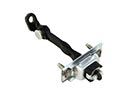 Toyota Land Cruiser Door Check
 Toyota Land Cruiser Door Hinge
 Toyota Land Cruiser Door Lock Cylinder
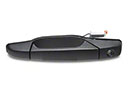 Toyota Land Cruiser Exterior Door Handle
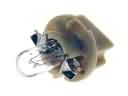 Toyota Land Cruiser Instrument Panel Light Bulb
 Toyota Land Cruiser Lift Support
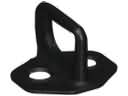 Toyota Land Cruiser Rear Door Striker
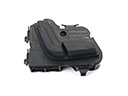 Toyota Land Cruiser Seat Switch
 Toyota Land Cruiser Tailgate Lock
 Toyota Land Cruiser Trunk Lid Latch
 Toyota Land Cruiser Window Run
Browse Toyota Land Cruiser Door Lock Actuator by Years
2025
2024
2021
2020
2019
2018
2017
2016
2015
2014
2013
2011
2010
2009
2008
2007
2006
2005
2004
2003
2002
2001
2000
1999
1998
1997
1996
1995
1994
1993
1992
1991
1990 1989
1988
1987
1986
1985
1984