×
ToyotaParts- Hello
- Login or Register
- Quick Links
- Live Chat
- Track Order
- Parts Availability
- RMA
- Help Center
- Contact Us
- Shop for
- Toyota Parts
- Scion Parts
My Garage
My Account
Cart
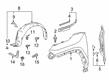
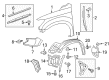
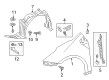
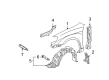
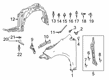
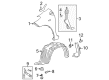
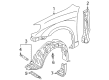
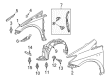
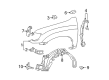
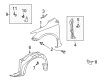
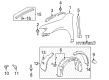
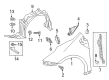
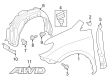
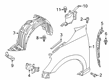
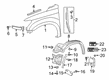
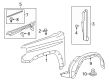
OEM Toyota Wheelhouse
Outer Wheelhouse- Select Vehicle by Model
- Select Vehicle by VIN
Select Vehicle by Model
orMake
Model
Year
Select Vehicle by VIN
For the most accurate results, select vehicle by your VIN (Vehicle Identification Number).
409 Wheelhouses found


Toyota Fender Liner, Driver Side Part Number: 53876-0R080
$100.95 MSRP: $141.71You Save: $40.76 (29%)Ships in 1-2 Business DaysProduct Specifications- Other Name: Liner, Front Fender, Left-Hand; Fender Splash Shield, Front Left; Liner, Front Fender, Driver Side; Fender Splash Shield
- Position: Driver Side
- Replaces: 53876-42100


Toyota Liner Extension, Passenger Side Part Number: 53805-0C040
$43.49 MSRP: $60.53You Save: $17.04 (29%)Ships in 1-3 Business DaysProduct Specifications- Other Name: Shield Sub-Assembly, Fender Splash; Fender Liner Extension, Front Right; Fender Splash Shield; Shield Sub-Assembly, Front Fender Splash, Passenger Side
- Position: Passenger Side


Toyota Fender Liner, Passenger Side Part Number: 53875-47070
$84.83 MSRP: $119.08You Save: $34.25 (29%)Ships in 1-2 Business DaysProduct Specifications- Other Name: Liner, Front Fender, Right-Hand; Fender Splash Shield, Front Right; Liner, Front Fender, Passenger Side; Fender Splash Shield
- Position: Passenger Side


Toyota Fender Liner, Driver Side Part Number: 53876-02110
$88.03 MSRP: $123.57You Save: $35.54 (29%)Ships in 1-3 Business DaysProduct Specifications- Other Name: Liner, Front Fender, Left-Hand; Fender Splash Shield, Front Left; Liner, Front Fender, Driver Side; Fender Splash Shield
- Position: Driver Side


Toyota Fender Liner, Passenger Side Part Number: 53805-12100
$103.56 MSRP: $145.36You Save: $41.80 (29%)Ships in 1-3 Business DaysProduct Specifications- Other Name: Shield Sub-Assembly, Fender Splash; Liner, Front Fender, Passenger Side
- Position: Passenger Side


Toyota Fender Liner, Passenger Side Part Number: 53875-52180
$65.32 MSRP: $91.69You Save: $26.37 (29%)Ships in 1-2 Business DaysProduct Specifications- Other Name: Liner, Front Fender, Right-Hand; Fender Splash Shield, Front Right; Liner, Front Fender, Passenger Side; Fender Splash Shield
- Position: Passenger Side


Toyota Fender Liner, Driver Side Part Number: 53876-02090
$91.11 MSRP: $127.90You Save: $36.79 (29%)Ships in 1-3 Business DaysProduct Specifications- Other Name: Liner, Front Fender, Left-Hand; Fender Splash Shield, Front Left; Liner, Front Fender, Driver Side; Fender Splash Shield
- Position: Driver Side


Toyota Fender Liner, Passenger Side Part Number: 53875-47030
$72.15 MSRP: $101.28You Save: $29.13 (29%)Product Specifications- Other Name: Fender Splash Shield, Front Right; Liner, Front Fender, Passenger Side; Fender Splash Shield
- Position: Passenger Side
- Replaced by: 53875-47031


Toyota Liner Extension, Driver Side Part Number: 53806-0C040
$43.96 MSRP: $61.19You Save: $17.23 (29%)Ships in 1-2 Business DaysProduct Specifications- Other Name: Shield Sub-Assembly, Fender Splash; Fender Liner Extension, Front Left; Fender Splash Shield; Shield Sub-Assembly, Front Fender Splash, Driver Side
- Position: Driver Side


Toyota Fender Liner, Passenger Side Part Number: 53875-0C010
$72.39 MSRP: $101.61You Save: $29.22 (29%)Ships in 1-3 Business DaysProduct Specifications- Other Name: Liner, Front Fender, Right-Hand; Fender Splash Shield, Front Right; Liner, Front Fender, Passenger Side; Fender Splash Shield
- Manufacturer Note: W(STEEL BUMPER)
- Position: Passenger Side


Toyota Fender Liner, Passenger Side Part Number: 53875-02370
$72.39 MSRP: $101.61You Save: $29.22 (29%)Ships in 1-3 Business DaysProduct Specifications- Other Name: Liner, Front Fender, Right-Hand; Fender Splash Shield, Front Right; Liner, Front Fender, Passenger Side; Fender Splash Shield
- Position: Passenger Side
- Replaces: 53875-12540


Toyota Fender Liner, Passenger Side Part Number: 53875-06060
$72.51 MSRP: $101.78You Save: $29.27 (29%)Ships in 1-3 Business DaysProduct Specifications- Other Name: Liner, Front Fender, Right-Hand; Fender Splash Shield, Front Right; Liner, Front Fender, Passenger Side; Fender Splash Shield
- Position: Passenger Side
- Replaces: 53875-33150

Toyota Fender Liner, Driver Side Part Number: 53876-02720
$81.75 MSRP: $114.75You Save: $33.00 (29%)Ships in 1-2 Business DaysProduct Specifications- Other Name: Liner, Front Fender, Left-Hand; Fender Splash Shield, Front Left; Liner, Front Fender, Driver Side; Fender Splash Shield
- Position: Driver Side


Toyota Fender Liner, Passenger Side Part Number: 53875-47110
$83.77 MSRP: $117.58You Save: $33.81 (29%)Ships in 1-3 Business DaysProduct Specifications- Other Name: Liner, Front Fender, Right-Hand; Fender Splash Shield, Front Right; Liner, Front Fender, Passenger Side; Fender Splash Shield
- Position: Passenger Side


Toyota Fender Liner, Passenger Side Part Number: 53805-08030
$89.57 MSRP: $125.74You Save: $36.17 (29%)Ships in 1 Business DayProduct Specifications- Other Name: Shield Sub-Assembly, Fender Splash; Fender Splash Shield, Front Right; Liner, Front Fender, Passenger Side; Fender Splash Shield
- Position: Passenger Side


Toyota Fender Liner, Driver Side Part Number: 53806-0E110
$115.05 MSRP: $161.49You Save: $46.44 (29%)Ships in 1 Business DayProduct Specifications- Other Name: Shield Sub-Assembly, Fender Splash; Fender Splash Shield; Liner, Front Fender, Driver Side
- Manufacturer Note: TOWING PACKAGE-5000LBS
- Position: Driver Side


Toyota Fender Liner, Driver Side Part Number: 53876-WB001
$36.90 MSRP: $51.37You Save: $14.47 (29%)Ships in 1-3 Business DaysProduct Specifications- Other Name: Liner, Front Fender, Left-Hand; Fender Splash Shield, Front Left; Liner, Front Fender, Driver Side; Fender Splash Shield
- Position: Driver Side


Toyota Liner Extension, Passenger Side Part Number: 53805-0C011
$46.59 MSRP: $64.85You Save: $18.26 (29%)Ships in 1-3 Business DaysProduct Specifications- Other Name: Shield Sub-Assembly, Fender Splash; Fender Liner Extension, Front Right; Fender Splash Shield; Shield Sub-Assembly, Front Fender Splash, Passenger Side
- Position: Passenger Side
- Replaces: 53805-0C010


Toyota Fender Liner, Driver Side Part Number: 53876-35150
$70.97 MSRP: $99.62You Save: $28.65 (29%)Ships in 1-3 Business DaysProduct Specifications- Other Name: Liner, Front Fender, Left-Hand; Fender Splash Shield, Front Left; Liner, Front Fender, Driver Side; Fender Splash Shield
- Position: Driver Side


Toyota Fender Liner, Passenger Side Part Number: 53875-35150
$70.97 MSRP: $99.62You Save: $28.65 (29%)Ships in 1-3 Business DaysProduct Specifications- Other Name: Liner, Front Fender, Right-Hand; Fender Splash Shield, Front Right; Liner, Front Fender, Passenger Side; Fender Splash Shield
- Position: Passenger Side
| Page 1 of 21 |Next >
1-20 of 409 Results
Toyota Wheelhouse
OEM parts deliver unmatched quality you can rely on. They pass extensive quality control inspections. Toyota produces them to the official factory specifications. This process helps prevent defects and imperfections. So you can get exceptional lifespan and a flawless fit. Need new OEM Toyota Wheelhouse? You'll love our wide selection of genuine options. Shop in minutes and skip the hunt. Our prices are unbeatable, you'll save time and money. It's easy to shop and find the right piece. Our committed customer service team gives professional help from start to finish. Every part includes a manufacturer's warranty. We ship quickly, your parts will arrive fast at your door.
Wheelhouse are also covered by Toyota to prevent grit and water so that cars remain solid on any road. Toyota became a house known all around the world by scrubbing rubbish out of production belts and allowing problems to be resolved as soon as they arise. Toyota hybrid systems continue to increase the number of miles per gallon and plug-in systems now offer electric range to over 40 miles. The TNGA platform includes one stiff and low backbone between compacts and SUVs, reduces the center of gravity, tightens the handling, and disperses safety technology. Toyota is rewarding customer trust by creating machines that shake off rust, accrue a high number of miles, and drive even on cold mornings. That attitude makes Toyota extend hybrids to virtually all segments so that drivers can choose efficiency without sacrificing space or power. The Wheelhouse panel in that durability push closes the gap between tire and body so the stones, salt, and slush never gnash on fenders or spurt on critically important electronics. Replacements of stamped steel to hardy thermoplastic switches allow the Wheelhouse to shake off dents, as well as shedding pounds. The same Wheelhouse shield has been applied on every generation, SR5 up to TRD Pro to ensure that daily run-outs and mountain-top ascents are corrosion-free. Grime and the locking of the year after year the Wheelhouse silently doubles service life and maintains ride quality.
Toyota Wheelhouse Parts and Q&A
- Q: How to remove the front Wheelhouse on Toyota Highlander?A:The first step of removing the front fender liner requires uninstalling the engine under cover assembly together with the No. 1 engine under cover. The same approach should be used for removing the front fender moulding sub-assembly LH and RH. The LH front wheel opening extension pad removal requires two screws before working on the LH front fender liner by unscrewing the single bolt followed by a pin holder clip removal using a screwdriver to rotate the pin 90 degrees then using a 4 mm hexagon wrench to remove the two screws followed by extracting the two grommets that need new replacements because they become damaged when removed. Finish the fender liner LH installation by removing its 5 clips along with 8 screws and the front fender liner LH piece. The RH front fender liner process requires removing one screw followed by turning the pin 90 degrees with a screwdriver to extract the pin hold clip then utilizing a 4 mm hexagon wrench to remove the two screws before eliminating the two grommets and finishing with the removal of the 5 clips and 7 screws and RH front fender liner.
- Q: How to remove and install the front Wheelhouse on the LH side for Steel and Resin Type Bumpers on Toyota Tundra?A:The fender apron mudguard seal can be detached by unfastening 18 clips when using a Steel Type Bumper or 17 clips if using Resin Type Bumper. Prior to this removal process it's necessary to remove the side step and fender mudguard and pin hold clip from both bumper types. The first step in front fender splash shield sub-assembly removal calls for the removal of three clips and two screws for Steel Type Bumpers and the removal of the pin hold clip together with two clips and two screws for Resin Type Bumpers. You need to install the front fender splash shield sub-assembly first; to do this for a Steel Type Bumper use 2 screws with a clip and 2 new clips A but for a Resin Type Bumper apply 2 screws followed by 2 clips by maintaining 5.4 N.m (55 kgf.cm, 48 in.lbf) torque and position the pin hold clip with its groove vertical orientation. To finish the installation, install the fender apron mudguard seal using three clips and fifteen new clips labeled A according to a Steel Type Bumper procedure and two clips and fifteen new clips labeled A for a Resin Type Bumper before placing the front fender mudguard and side step when the pin hold clip remains vertical.


Related Toyota Parts
 Toyota Emblem
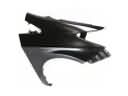 Toyota Fender
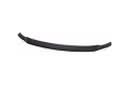 Toyota Spoiler
 Toyota Windshield
 Toyota Floor Pan
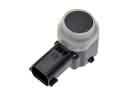 Toyota Parking Assist Sensor
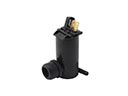 Toyota Windshield Washer Pump
 Toyota Wiper Arm
 Toyota Wiper Motor
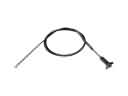 Toyota Fuel Door Release Cable
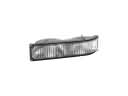 Toyota Side Marker Light
 Toyota Weather Strip
Browse Toyota Wheelhouse by Models
Tacoma 4Runner Camry Tundra Corolla RAV4 Highlander Prius Sienna Land Cruiser Pickup FJ Cruiser Sequoia T100 Avalon Celica Supra Yaris Matrix MR2 Solara Venza GR86 Echo C-HR Cressida Grand Highlander Paseo Previa Prius C Prius Prime bZ4X Corolla Cross Corolla iM Crown Crown Signia GR Corolla Mirai MR2 Spyder Prius V Starlet Tercel Yaris iA Prius Plug-In GR Supra Prius AWD-e RAV4 Prime