×
ToyotaParts- Hello
- Login or Register
- Quick Links
- Live Chat
- Track Order
- Parts Availability
- RMA
- Help Center
- Contact Us
- Shop for
- Toyota Parts
- Scion Parts
My Garage
My Account
Cart
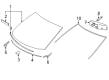
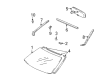
OEM Toyota Highlander Windshield
Glass Windshield- Select Vehicle by Model
- Select Vehicle by VIN
Select Vehicle by Model
orMake
Model
Year
Select Vehicle by VIN
For the most accurate results, select vehicle by your VIN (Vehicle Identification Number).
23 Windshields found


Toyota Highlander Windshield, Front Part Number: 56101-0E151
$587.12 MSRP: $860.44You Save: $273.32 (32%)Ships in 1-3 Business Days


Toyota Highlander Windshield, Front Part Number: 56101-0E242
$516.98 MSRP: $757.65You Save: $240.67 (32%)Ships in 1-3 Business Days
Toyota Highlander Windshield, Front Part Number: 56101-0E222
$535.25 MSRP: $784.42You Save: $249.17 (32%)Ships in 1-3 Business DaysToyota Highlander Windshield, Front Part Number: 56101-0E263
$509.38 MSRP: $746.50You Save: $237.12 (32%)Ships in 1-3 Business DaysToyota Highlander Windshield, Front Part Number: 56101-0E251
$524.70 MSRP: $768.95You Save: $244.25 (32%)Toyota Highlander Windshield, Front Part Number: 56101-0E333
$532.53 MSRP: $780.43You Save: $247.90 (32%)Toyota Highlander Windshield, Front Part Number: 56101-0E301
$521.52 MSRP: $764.29You Save: $242.77 (32%)Ships in 1-3 Business DaysToyota Highlander Windshield, Front Part Number: 56101-0E562
$524.59 MSRP: $768.79You Save: $244.20 (32%)Ships in 1-3 Business DaysToyota Highlander Windshield, Front Part Number: 56101-0E552
$540.36 MSRP: $791.91You Save: $251.55 (32%)Ships in 1-3 Business Days
Toyota Highlander Windshield, Front Part Number: 56111-48130
$528.96 MSRP: $775.19You Save: $246.23 (32%)Ships in 1-3 Business DaysToyota Highlander Windshield, Front Part Number: 56101-0E572
$551.37 MSRP: $808.04You Save: $256.67 (32%)Ships in 1-3 Business DaysToyota Highlander Windshield, Front Part Number: 56101-0E312
$545.36 MSRP: $799.23You Save: $253.87 (32%)Ships in 1-3 Business Days
Toyota Highlander Windshield, Bronze, Front Part Number: 56101-0E621
$545.92 MSRP: $800.05You Save: $254.13 (32%)Ships in 1-3 Business DaysToyota Highlander Windshield, Bronze Part Number: 56101-0EE50
$563.97 MSRP: $826.50You Save: $262.53 (32%)Ships in 1-2 Business DaysToyota Highlander Windshield, Front Part Number: 56101-0E141
$587.12 MSRP: $860.44You Save: $273.32 (32%)Ships in 1-3 Business DaysToyota Highlander Windshield, Front Part Number: 56111-48140
$604.23 MSRP: $885.51You Save: $281.28 (32%)Ships in 1-3 Business Days
Toyota Highlander Windshield, Front Part Number: 56111-48311
$637.40 MSRP: $934.12You Save: $296.72 (32%)Ships in 1-3 Business DaysToyota Highlander Windshield, Front Part Number: 56111-48291
$648.19 MSRP: $949.93You Save: $301.74 (32%)Ships in 1-3 Business DaysToyota Highlander Windshield, Front Part Number: 56111-48321
$682.69 MSRP: $1000.49You Save: $317.80 (32%)Ships in 1-3 Business DaysToyota Highlander Windshield, Front Part Number: 56101-0E610
$538.32 MSRP: $788.91You Save: $250.59 (32%)
| Page 1 of 2 |Next >
1-20 of 23 Results
Toyota Highlander Windshield
Choose genuine Windshield that pass strict quality control tests. You can trust the top quality and lasting durability. Shopping for OEM Windshield for your Toyota Highlander? Our website is your one-stop destination. We stock an extensive selection of genuine Toyota Highlander parts. The price is affordable so you can save more. It only takes minutes to browse and find the exact fit. Easily add to cart and check out fast. Our hassle-free return policy will keep you stress-free. We process orders quickly for swift delivery. Your parts will arrive faster, so you can get back on the road sooner.
Toyota Highlander Windshield Parts and Q&A
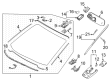
- Q: How to remove the windshield glass on Toyota Highlander?A:Remove windshield glass by taking off the inner rear view mirror assembly without EC mirror followed by removal of the inner rear view mirror stay holder cover along with the inner rear view mirror assembly that includes an EC mirror. Separate the front Wiper Blades from each side along with the wiper arm assemblies then detach front fender to cowl side seals from both locations while breaking free of claws and double-sided tapes. Release the clips and claws from the cowl top ventilator louver sub-assembly before removing both front pillar garnishes and the roof console box assembly and the visor assemblies and covers on both sides. You should remove the front assist grip sub-assembly by breaking free the claws and clips when working on vehicles which do not have the sliding roof but vehicles with sliding roofs require you to remove the assist grip assembly. Windshield glass removal becomes possible by either removing or dropping the assembly of visor holder and roof headlining. If the deicer has its own connector as well as clamp go ahead and remove them but be very careful when cutting the adhesive since it needs to avoid damaging the glass. Position protective tape at the necessary installation points on the vehicle body before using piano wire to cut adhesive around the windshield glass sub-assembly while maintaining a plastic sheet against the instrument panel. Trace the important points on both the windshield glass sub-assembly and vehicle body before slowly removing the glass with suction cups. You should utilize a scraper to eliminate the window glass adhesive dam and No. 2 windshield glass stoppers while avoiding damage to the glass before installing new components. When working with two-piece types it is necessary to remove No. 1 windshield glass stoppers after cleaning the windshield glass by scraping off damaged stoppers, dams, and adhesive and wiping exterior glass edges with a non-residue solvent. The cleaning process includes shaping contact surfaces and removing unnecessary adhesive before using a cleaning agent to treat the body until abundant adhesive remains.
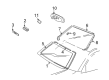
- Q: How to install the windshield glass on Toyota Highlander?A:Before installing the windshield glass start by applying Primer G to No. 2 windshield glass stoppers that will require a minimum 3-minute drying time before discarding unused primer. The installation of new windshield glass stoppers No. 2 requires placement on both glass surfaces with the 2-piece stoppers type. Put 2 new No. 1 windshield glass stoppers on the vehicle body following the application of 2-piece stoppers. The new window glass adhesive dam requires coating with Primer G in its application area followed by a 3-minute dry time after which you should discard any excess material before placing the adhesive dam properly along the dam reference line. Use suction cups to position the windshield glass so its contact surface remains flat while mark-points receive placement on both glass surfaces and vehicle body. First apply a thin layer of Primer M on the accessible vehicle body segment for a 3-minute dry time before you use Primer G on the adhesive area without overfilling and let it dry. Apply Toyota Genuine Windshield Glass Adhesive or its equivalent through a sealer gun by cutting the cartridge nozzle to adhesive the glass directly on the ceramic notches. The windscreen glass assembly needs to be installed while correctly aligning the matchmarks followed by gentle rim pressure until stoppers do their job and you verify that there is enough space between window glass and vehicle body. You can adjust the adhesive level by using a scraper but keep the glass steady with protective tape until the adhesive sets up completely while you should not operate the vehicle during the specified minimum waiting period. To check for leaks after the adhesive has cured, apply water from outside the vehicle. In case of leaks appear, let the area dry and reapply adhesive when needed before taking off the protective tape. Complete the procedure by installing the roof headlining assembly then follow with the rear assist grip assembly and front assist grip sub-assembly along with visor assemblies and the roof console box assembly together with the front pillar garnishes and cowl top ventilator louver and front fender to cowl side seals and front wiper arm and blade assemblies and inner rear view mirror assemblies in their correct sequence.


Related Toyota Highlander Parts
 Toyota Highlander Emblem
 Toyota Highlander Mud Flaps
 Toyota Highlander Windshield Wiper
 Toyota Highlander Door Seal
 Toyota Highlander Instrument Cluster
 Toyota Highlander Mirror Actuator
 Toyota Highlander Parking Assist Sensor
 Toyota Highlander Weather Strip
 Toyota Highlander Windshield Washer Fluid Reservoir
 Toyota Highlander Windshield Washer Nozzle
 Toyota Highlander Wiper Blade
 Toyota Highlander Wiper Linkage