×
ToyotaParts- Hello
- Login or Register
- Quick Links
- Live Chat
- Track Order
- Parts Availability
- RMA
- Help Center
- Contact Us
- Shop for
- Toyota Parts
- Scion Parts
My Garage
My Account
Cart
OEM Toyota Highlander Mud Flaps
Mud Flap Splash Guards- Select Vehicle by Model
- Select Vehicle by VIN
Select Vehicle by Model
orMake
Model
Year
Select Vehicle by VIN
For the most accurate results, select vehicle by your VIN (Vehicle Identification Number).
56 Mud Flaps found


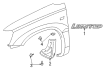
Toyota Highlander Mud Guard, Passenger Side Part Number: 76621-0E010
$31.18 MSRP: $43.40You Save: $12.22 (29%)Ships in 1-2 Business Days


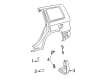
Toyota Highlander Mud Guard, Rear Passenger Side Part Number: 76625-0E010
$54.60 MSRP: $76.00You Save: $21.40 (29%)Ships in 1 Business Day
Toyota Highlander Mud Guard, Driver Side Part Number: 76622-0E010
$31.18 MSRP: $43.40You Save: $12.22 (29%)Ships in 1-3 Business Days


Toyota Highlander Mud Guard, Rear Driver Side Part Number: 76626-0E010
$54.60 MSRP: $76.00You Save: $21.40 (29%)Ships in 1-3 Business Days

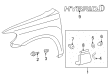
Toyota Highlander Mud Guard, Blue, Passenger Side Part Number: 76621-48020-J1
$84.24 MSRP: $118.25You Save: $34.01 (29%)Ships in 1-3 Business Days
Toyota Highlander Mud Guard, Champagne, Driver Side Part Number: 76622-48020-F0
$82.31 MSRP: $115.54You Save: $33.23 (29%)Ships in 1-3 Business Days

Toyota Highlander Mud Guard, Beige, Rear Passenger Side Part Number: 76625-48020-E1
$84.83 MSRP: $119.08You Save: $34.25 (29%)Ships in 1-3 Business Days
Toyota Highlander Mud Guard, Black, Rear Passenger Side Part Number: 76625-48020-C0
$84.83 MSRP: $119.08You Save: $34.25 (29%)Ships in 1-3 Business Days
Toyota Highlander Mud Guard, Silver, Rear Passenger Side Part Number: 76625-48020-B0
$84.83 MSRP: $119.08You Save: $34.25 (29%)Ships in 1-3 Business Days
Toyota Highlander Mud Guard, Grayish Blue, Driver Side Part Number: 76622-48020-J0
$84.12 MSRP: $118.08You Save: $33.96 (29%)Ships in 1-3 Business Days
Toyota Highlander Mud Guard, Green, Driver Side Part Number: 76622-48020-G1
$84.12 MSRP: $118.08You Save: $33.96 (29%)Ships in 1-3 Business Days
Toyota Highlander Mud Guard, Beige, Driver Side Part Number: 76622-48020-E1
$84.12 MSRP: $118.08You Save: $33.96 (29%)

Toyota Highlander Mud Guard, Silver, Driver Side Part Number: 76622-48020-B0
$84.12 MSRP: $118.08You Save: $33.96 (29%)Ships in 1-3 Business Days

Toyota Highlander Mud Guard, White, Driver Side Part Number: 76622-48020-A0
$84.12 MSRP: $118.08You Save: $33.96 (29%)Ships in 1-3 Business Days

Toyota Highlander Mud Guard, Grayish Blue, Passenger Side Part Number: 76621-48020-J0
$84.12 MSRP: $118.08You Save: $33.96 (29%)Ships in 1-3 Business Days
Toyota Highlander Mud Guard, Silver, Passenger Side Part Number: 76621-48020-B0
$84.12 MSRP: $118.08You Save: $33.96 (29%)Ships in 1-3 Business Days
Toyota Highlander Mud Guard, White, Passenger Side Part Number: 76621-48020-A0
$83.41 MSRP: $117.09You Save: $33.68 (29%)Ships in 1-3 Business Days
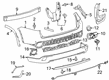
Toyota Highlander Mud Guard, Front Part Number: PT908-48080-FT
$28.13 MSRP: $39.16You Save: $11.03 (29%)Ships in 1-3 Business Days
Toyota Highlander Mud Guard Part Number: PT908-48111
$39.03 MSRP: $54.33You Save: $15.30 (29%)Ships in 1-3 Business Days
Toyota Highlander Mud Guard, Rear Part Number: PT908-48080-RR
$37.82 MSRP: $52.64You Save: $14.82 (29%)
| Page 1 of 3 |Next >
1-20 of 56 Results
Toyota Highlander Mud Flaps
Choose genuine Mud Flaps that pass strict quality control tests. You can trust the top quality and lasting durability. Shopping for OEM Mud Flaps for your Toyota Highlander? Our website is your one-stop destination. We stock an extensive selection of genuine Toyota Highlander parts. The price is affordable so you can save more. It only takes minutes to browse and find the exact fit. Easily add to cart and check out fast. Our hassle-free return policy will keep you stress-free. We process orders quickly for swift delivery. Your parts will arrive faster, so you can get back on the road sooner.
Toyota Highlander Mud Flaps Parts and Q&A
- Q: How to remove the side Mud Flaps on Toyota Highlander?A:The procedure for removing the side mudguard begins with warming the vehicle body and side mudguard through heat light application while avoiding overheating. Starting with the front fender moulding sub-assembly removal involves several steps: removing the clip followed by using a 4 mm hexagon wrench after which you remove the screw then peel off the front fender side protector to finally disengage 3 clips and complete the sub-assembly removal. The pad and two No. 4 clips should be taken from the front fender moulding sub-assembly before removing the front fender outside moulding pad. Start by turning back the front door Weather Strip and then unscrew the nut followed by peeling off the upper front door outside moulding pad while simultaneously removing the 11 clips to detach the sub-assembly and its gasket with 3 No. 3 clips and 8 No. 4 clips. The last step is to remove the upper front door outside moulding pad. The rear door outside moulding sub-assembly requires turning back the rear door No. 2 Weather Strip followed by removing the nut and pulling off the upper rear door outside moulding pad before releasing the 8 clips to extract the sub-assembly with the gasket and 2 No. 3 clips and 6 No. 4 clips while ending with upper rear door outside moulding pad removal.
- Q: How to install the side Mud Flaps on Toyota Highlander?A:You should start by warming both the vehicle shell and the side mudguard using a heat light and avoid overheating conditions. First clean the vehicle body surface while removing the upper rear door outside moulding pad before wiping off all adhesive residue. When using the existing rear door outside moulding sub-assembly professionals should clean the components before installing a new upper rear door outside moulding pad with 2 new No. 3 clips and 6 new No. 4 clips as well as a fresh gasket. Use heat on both the vehicle body and rear door outside moulding sub-assembly then strip off the release paper before you can clip and lock it using 8 clips which should be secured with a nut at 5.0 Nm (51 kgf-cm, 44 in-lbf) before you add the rear door No. 2 Weather Strip. You should execute the cleaning procedure again before installing 3 new No. 3 clips and 8 new No. 4 clips with a new gasket for the front door outside moulding sub-assembly. The installer must heat the vehicle body and front door outside moulding sub-assembly while removing release paper and then securing the assembly with 11 clips using a nut at 5.0 Nm torque (51 kgf-cm, 44 in-lbf) for eventually installing the front door Weather Strip. New front fender outside moulding pads should be installed by wiping down adhesive residue first and then removing the release paper. The vehicle body needs cleaning along with the front fender moulding sub-assembly while removing the front fender side protector and all adhesive residue until installing a new side protector together with 2 new No. 4 clips and a new pad. The technician should use heat to activate the front fender moulding sub-assembly while eliminating the release paper. They must fasten the assembly through 3 clips then complete the installation with a 4 mm hexagon wrench and screw before applying the clip.


Related Toyota Highlander Parts
 Toyota Highlander Bumper
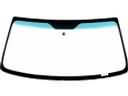 Toyota Highlander Windshield
 Toyota Highlander Emblem
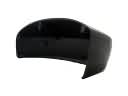 Toyota Highlander Mirror Cover
 Toyota Highlander A/C Switch
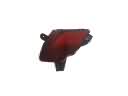 Toyota Highlander Bumper Reflector
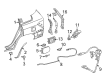
 Toyota Highlander Fuel Door
 Toyota Highlander Lift Support
 Toyota Highlander Liftgate Hinge
 Toyota Highlander Liftgate Lift Support
 Toyota Highlander Mirror Actuator
 Toyota Highlander Side Marker Light