×
ToyotaParts- Hello
- Login or Register
- Quick Links
- Live Chat
- Track Order
- Parts Availability
- RMA
- Help Center
- Contact Us
- Shop for
- Toyota Parts
- Scion Parts
My Garage
My Account
Cart
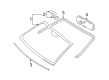
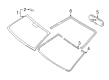
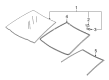
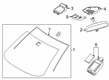
OEM Toyota Yaris Windshield
Glass Windshield- Select Vehicle by Model
- Select Vehicle by VIN
Select Vehicle by Model
orMake
Model
Year
Select Vehicle by VIN
For the most accurate results, select vehicle by your VIN (Vehicle Identification Number).
9 Windshields found

Toyota Yaris Windshield, Front Part Number: 56101-52490
$349.09 MSRP: $511.60You Save: $162.51 (32%)Ships in 1-3 Business Days
Toyota Yaris Windshield, Front Part Number: 56101-52322
$423.46 MSRP: $620.59You Save: $197.13 (32%)Ships in 1-3 Business DaysToyota Yaris Windshield, Front Part Number: 56101-52924
$423.68 MSRP: $620.91You Save: $197.23 (32%)Ships in 1-3 Business Days
Toyota Yaris Windshield, Front Part Number: 56101-0D810
$545.36 MSRP: $799.23You Save: $253.87 (32%)Ships in 1-3 Business Days
Toyota Yaris Windshield, Front Part Number: 56101-WB009
$567.28 MSRP: $831.36You Save: $264.08 (32%)Ships in 1-3 Business DaysToyota Yaris Windshield, Front Part Number: 56101-WB008
$568.91 MSRP: $833.74You Save: $264.83 (32%)Ships in 1-3 Business DaysToyota Yaris Windshield, Front Part Number: 56101-0D580
$342.85 MSRP: $489.51You Save: $146.66 (30%)Toyota Yaris Windshield, Front Part Number: 56101-0D830
$346.92 MSRP: $508.42You Save: $161.50 (32%)Toyota Yaris Windshield, Front Part Number: 56101-52630
$423.12 MSRP: $620.09You Save: $196.97 (32%)
Toyota Yaris Windshield
Choose genuine Windshield that pass strict quality control tests. You can trust the top quality and lasting durability. Shopping for OEM Windshield for your Toyota Yaris? Our website is your one-stop destination. We stock an extensive selection of genuine Toyota Yaris parts. The price is affordable so you can save more. It only takes minutes to browse and find the exact fit. Easily add to cart and check out fast. Our hassle-free return policy will keep you stress-free. We process orders quickly for swift delivery. Your parts will arrive faster, so you can get back on the road sooner.
Toyota Yaris Windshield Parts and Q&A
- Q: How to remove the windshield glass from a sedan on Toyota Yaris?A:The first step to remove a sedan windshield glass is disconnecting the negative battery cable then waiting at least 90 seconds to protect the Air Bags from activating. Commence operation by taking out front wiper arm head caps then disassembling front wiper arms and blades throughout both passenger-side and driver-side lines. You must separate both cowl side ventilator sub-assemblies with the cowl top ventilator louver sub-assembly and the front door scuff plates from both sides of the vehicle. You must remove from both sides the instrument panel under cover sub-assemblies in addition to the cowl side trim boards and front door opening trim Weather Strips from both sides. Proceed to eliminate the front pillar garnishes and assist grip cover combined with sub-assembly followed by removing the visor assemblies with holders from both sides along with the room light assembly and the map light assembly. Detach the inner rear view mirror while managing to leave the front roof headlining portion in its place. Start by cutting the external windshield molding with a knife to protect the vehicle body and afterward take it out. Protective tape should be applied first to the windshield glass perimeter and piano wires inserted between bodywork and glass to which handles get tied. Secure the vehicle paintwork by placing plastic between the piano wire and safety pad while also preventing any damage to vehicle ornaments. First mark both windshield glass and vehicle body when reusing the glass before using piano wire to slice through adhesive and removing the glass using suction cups and leaving maximum adhesive on the car.
- Q: How to install the windshield glass for a sedan on Toyota Yaris?A:Begin the windshield glass installation process for sedans by scraping the windshield glass to remove stoppers, dam and adhesive before wiping its outer circumference with non-residue solvent and staying away from the surface area. After knife-shaping the contact area to eliminate rough adhesive from the vehicle body surface you should clean it with a shop rag or cloth. The vehicle body receives two new stoppers which require a Primer G application on their installation zones before they dry for 3 minutes while discarding unused primer. Secondly install the new dam with double-sided tape after applying Primer G to it. Set the windshield glass in place with suction cups so the contact area forms a flat surface with exact matchmarks applied. Take out the glass and brush Primer M onto the uncovered body area for drying time of 3 minutes. Use Primer G on the windshield glass perimeter along with its contact area while waiting 3 minutes for the product to dry before proceeding. Use the sealer gun to cut the nozzle tip of Toyota Genuine Windshield Glass Adhesive. Place this ready nozzle into the gun to apply adhesive onto the windshield glass that needs installing onto the vehicle body. Align the matchmarks of the windshield during installation while performing a gentle press. Secure the fit by pressing the front surface after applying the adhesive correctly and ensuring a small gap exists between the body and glass and avoid driving the vehicle for its required minimum time. Primer G should cover both the glass perimeter and contact region before new moulding installation to achieve proper sealing. Check for any leaks by performing a leak test when the adhesive hardens then fill the leaks with auto glass sealer. Finally, proceed to install the roof headlining assembly, inner rear view mirror, map light assembly, room light assembly, visor holders, visor assemblies, assist grip sub-assemblies, assist grip covers, front pillar garnishes, front door opening trim Weather Strips, cowl side trim boards, instrument panel under cover sub-assemblies, front door scuff plates, cowl top ventilator louver sub-assembly, cowl side ventilator sub-assemblies, front wiper arm and blade assemblies, front wiper arm head cap, and connect the cable to the negative battery terminal with a torque of 5.4 Nm (55 kgf-cm, 48 in-lbf), followed by inspecting the SRS warning light.


Related Toyota Yaris Parts
 Toyota Yaris Windshield Wiper
 Toyota Yaris Side Marker Light
 Toyota Yaris Windshield Washer Pump
 Toyota Yaris Wiper Arm
 Toyota Yaris Wiper Motor
 Toyota Yaris Car Mirror
 Toyota Yaris Dash Panel Vent Portion Covers
 Toyota Yaris Shift Indicator
 Toyota Yaris Windshield Washer Fluid Reservoir
 Toyota Yaris Windshield Washer Nozzle
 Toyota Yaris Wiper Blade
 Toyota Yaris Wiper Linkage