×
ToyotaParts- Hello
- Login or Register
- Quick Links
- Live Chat
- Track Order
- Parts Availability
- RMA
- Help Center
- Contact Us
- Shop for
- Toyota Parts
- Scion Parts
My Garage
My Account
Cart
OEM 2010 Toyota Yaris Windshield
Glass Windshield- Select Vehicle by Model
- Select Vehicle by VIN
Select Vehicle by Model
orMake
Model
Year
Select Vehicle by VIN
For the most accurate results, select vehicle by your VIN (Vehicle Identification Number).
1 Windshield found

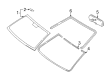
2010 Toyota Yaris Windshield, Front
Part Number: 56101-52322$423.46 MSRP: $620.59You Save: $197.13 (32%)Ships in 1-3 Business DaysProduct Specifications- Other Name: Glass Sub-Assembly, Windshield; Windshield Glass, Front; Glass, Windshield
- Manufacturer Note: *LAM,T=4.56,GREEN
- Position: Front
- Replaces: 56101-52320, 56101-52321, 56101-52510, 56101-52511
- Part Name Code: 56111
- Condition: New
- Fitment Type: Direct Replacement
- SKU: 56101-52322
- Warranty: This genuine part is guaranteed by Toyota's factory warranty.
2010 Toyota Yaris Windshield
Looking for affordable OEM 2010 Toyota Yaris Windshield? Explore our comprehensive catalogue of genuine 2010 Toyota Yaris Windshield. All our parts are covered by the manufacturer's warranty. Plus, our straightforward return policy and speedy delivery service ensure an unparalleled shopping experience. We look forward to your visit!
2010 Toyota Yaris Windshield Parts Q&A
- Q: How to remove the windshield glass from a Sedan on 2010 Toyota Yaris?A: The sediment windshield's removal process starts with disconnecting the negative battery cable then waiting 90 seconds because Air Bags should not deploy during this operation. Initiate the process by taking out the front wiper arm head caps before proceeding to detach the front wiper arms with their blades from the left and right sides. Begin by removing one after another the cowl side ventilator sub-assemblies from both sides combined with the cowl top ventilator louver sub-assembly followed by the front door scuff plates on both sides. Remove the instrument panel under covers and their attached assemblies from both sides along with both cowl side trim boards and Weather Strips from the front door open areas. The service begins with the elimination of front pillar garnishes and assist grip cover and sub-assembly along with visor assemblies and holders from both sides and the room light assembly and map light assembly. Proceed by removing the inner rear view mirror followed by gently lowering the front part of the roof headlining framework. Cleanly cut the windshield outside moulding with a knife while being cautious of vehicle damage before removing it. Protective tape should be applied around the windshield glass outer edge and piano wires need to be inserted between body and glass while handles secure to wire ends. When securing the piano wire cover the paintwork with a plastic sheet to avoid damages. Also ensure no damage happens to the vehicle's ornaments. Use a marker to mark the windshield glass and body when resuming glass usage before using piano wire to cut adhesive and dragging out the stoppers before extracting the glass with suction cups and letting adhesive stay on the vehicle body.
Related 2010 Toyota Yaris Parts
 2010 Toyota Yaris Windshield Wiper
 2010 Toyota Yaris Bumper
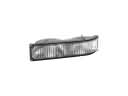 2010 Toyota Yaris Side Marker Light
 2010 Toyota Yaris Wiper Arm
 2010 Toyota Yaris Wiper Motor
 2010 Toyota Yaris Washer Pump
 2010 Toyota Yaris Car Mirror
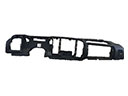 2010 Toyota Yaris Dash Panel Vent Portion Covers
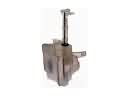 2010 Toyota Yaris Washer Reservoir
 2010 Toyota Yaris Windshield Washer Nozzle
 2010 Toyota Yaris Wiper Blade
 2010 Toyota Yaris Wiper Linkage