×
ToyotaParts- Hello
- Login or Register
- Quick Links
- Live Chat
- Track Order
- Parts Availability
- RMA
- Help Center
- Contact Us
- Shop for
- Toyota Parts
- Scion Parts
My Garage
My Account
Cart
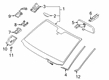
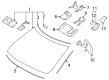
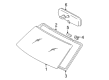
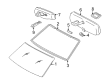
OEM Toyota Sequoia Windshield
Glass Windshield- Select Vehicle by Model
- Select Vehicle by VIN
Select Vehicle by Model
orMake
Model
Year
Select Vehicle by VIN
For the most accurate results, select vehicle by your VIN (Vehicle Identification Number).
15 Windshields found

Toyota Sequoia Windshield, Front Part Number: 56101-0C130
$506.31 MSRP: $742.00You Save: $235.69 (32%)Ships in 1-3 Business Days
Toyota Sequoia Windshield, Front Part Number: 56101-0C210
$516.41 MSRP: $756.81You Save: $240.40 (32%)Ships in 1-3 Business Days
Toyota Sequoia Windshield, Front Part Number: 56101-0C111
$520.95 MSRP: $763.47You Save: $242.52 (32%)Ships in 1-3 Business DaysToyota Sequoia Windshield, Front Part Number: 56101-0C220
$571.23 MSRP: $837.15You Save: $265.92 (32%)Ships in 1-3 Business DaysToyota Sequoia Windshield, Front Part Number: 56101-0C150
$595.30 MSRP: $872.41You Save: $277.11 (32%)Ships in 1-3 Business Days
Toyota Sequoia Windshield Part Number: 56101-0C250
$582.47 MSRP: $853.62You Save: $271.15 (32%)Ships in 1-3 Business Days
Toyota Sequoia Windshield, Front Part Number: 56101-0C030
$583.49 MSRP: $855.11You Save: $271.62 (32%)Ships in 1-3 Business DaysToyota Sequoia Windshield Part Number: 56101-0C240
$647.05 MSRP: $948.26You Save: $301.21 (32%)Ships in 1-3 Business DaysToyota Sequoia Windshield, Front Part Number: 56101-0C071
$735.01 MSRP: $1077.18You Save: $342.17 (32%)Ships in 1-3 Business DaysToyota Sequoia Windshield, Front Part Number: 56101-0C101
$817.30 MSRP: $1197.77You Save: $380.47 (32%)Ships in 1-3 Business DaysToyota Sequoia Windshield, Front Part Number: 56101-0C081
$619.13 MSRP: $907.35You Save: $288.22 (32%)Toyota Sequoia Windshield, Front Part Number: 56101-0C091
$677.02 MSRP: $992.17You Save: $315.15 (32%)Toyota Sequoia Windshield, Front Part Number: 56101-0C121
$556.59 MSRP: $815.70You Save: $259.11 (32%)
Toyota Sequoia Windshield, Front Part Number: 56101-0C040
$558.18 MSRP: $818.02You Save: $259.84 (32%)Toyota Sequoia Windshield, Front Part Number: 56101-0C031
Toyota Sequoia Windshield
Choose genuine Windshield that pass strict quality control tests. You can trust the top quality and lasting durability. Shopping for OEM Windshield for your Toyota Sequoia? Our website is your one-stop destination. We stock an extensive selection of genuine Toyota Sequoia parts. The price is affordable so you can save more. It only takes minutes to browse and find the exact fit. Easily add to cart and check out fast. Our hassle-free return policy will keep you stress-free. We process orders quickly for swift delivery. Your parts will arrive faster, so you can get back on the road sooner.
The Toyota Sequoia Windshield functions as an essential element because it demonstrates the durability and safety characteristics which make the Toyota Sequoia SUV a reliable and dependable vehicle. The Windshield functions as an essential part because it offers clear sight and environmental defense to drivers while improving their complete driving interaction. Safety glass laminates constitute the Toyota Sequoia Windshield through a combination of two curved glass panes bonded with plastic between them which provides both visual clarity and mechanical stability. The particular design of this product reduces air resistance which results in better fuel efficiency and improved aerodynamics fitting this vehicle's classification. Owners of all Toyota Sequoia generations can access standardized Toyota specifications because the products accommodate both first and second generation models. The Windshield needs regular maintenance because small flaws in its condition can reduce driving visibility which endangers safety. The Toyota Sequoia Windshield provides unique value through exceptional durability and its resistance to harsh weather conditions and flying objects thereby making it an excellent option for family and adventuring customers. A Windshield replacement invests a minimal $110 to $140 to deliver improved safety and efficiency which makes it a wise decision to protect the the automaker Sequoia's solid performance reputation and dependable features.
Toyota Sequoia Windshield Parts and Q&A
- Q: How to install the windshield glass on Toyota Sequoia?A:A proper windshield glass installation process starts with cleaning the windshield glass through stopper and adhesive removal followed by dam scraping. Perform the operation while protecting the glass from damage. Next clean the window frame edges using a non-residue solvent but avoid touching the surface. You should clean the vehicle body through knife use to shape the contact area free of rough adhesive before employing a shop rag or cloth for further cleaning. The application area needs to be coated with Primer G before installation of new No. 2 stoppers on windshield glass while the drying time needs to be at least 3 minutes. The same procedure should be used to install 2 new No. 1 stoppers on the vehicle body framework. Install new adhesive dams on the ceramic notches after applying Primer G to the dedicated area and waiting for drying time. The windshield outside upper moulding requires coating its edge and contact surface with Primer G before allowing them to dry completely before installation. Begin by positioning the windshield glass with suction cups before aligning matchmarks and enabling the contact surface to maintain evenness. Then apply Primer M to the vehicle body installation area but avoid coating the adhesive area before letting the substance dry. Prepare areas containing adhesive with Primer G and apply Toyota Genuine Windshield Glass Adhesive or an equivalent to the glass surface by cutting the cartridge tip while ensuring complete adhesive usage before a specific time limit. After checking the stoppers and clearance while pressing gently against the glass rim with a scraper to achieve proper adhesive levels one should use protective tape to secure the windshield until the adhesive hardens. Test the leak resistance by applying water from outside after adhesive setting. In case of leaks, perform needed adhesive reapplication. Finally, install the inner rear view mirror assembly, roof headlining assembly, assist grip plug, assist grip sub-assembly, visor assemblies, visor bracket covers, room light assemblies, roof console box assembly, front pillar garnishes, front door opening trim Weather Strips, cowl side trim boards, front door scuff plates, cowl top ventilator louver sub-assembly, front fender to cowl side seals, front wiper arm and blade assemblies, reconnect the negative battery terminal with a torque of 5.4 Nm, and inspect the SRS warning light.
- Q: How to Properly Remove and Replace a Windshield on Toyota Sequoia?A:First remove the Weather Strips from the front door opening trim before using a screwdriver to take out the plugs and screws from the assist grip to uninstall the front pillar garnish. This procedure needs to be performed again on the additional side. First remove the sun visors and holders and proceed to remove the roof console box by unscrewing 2 screws and disconnecting the connector for vehicles with sliding roofs while performing the alternative method of removing the roof console box through unscrewing 4 screws and disconnecting the connectors when it is not equipped with this feature. Detach the wiper arms by first removing the 2 caps and then the 2 nuts after you have removed the inner rear view mirror. The procedure to remove the cowl top ventilator louver begins with removing the hood to cowl top seal followed by using a clip remover on six clips and then unscrewing eight screws. The removal of the roof side rail Weather Strip requires using tool SST 09806-30010 on the front end of the component. Begin by unscrewing the 8 screws and windshield outside mouldings before carefully using a knife to cut off the exterior upper part of the windshield while monitoring body damage prevention. The windshield glass removal requires inserting piano wire between the body and glass through the interior followed by wooden block attachment to wire ends and protective tape application on the exterior surface. The piano wire technique should be used to cut the adhesive before gently removing the glass so that you preserve as much adhesive on the body. Test the installation process by trimming and cleaning the body surface before using a shop rag to treat the adhesive. Scrape off adhesive from the glass and clean it without using hands to touch its surface. During this operation remove all damaged No. 2 stoppers and dams from the glass. Users should replace the No. 1 stopper through a process that involves getting rid of defective stoppers while removing old adhesive followed by an area clean-up before proper attachment of new stoppers at the notched position. Position newly installed No. 2 stoppers onto the glass based on its ceramic notches followed by the installation of new dams using adhesive tape. Check for even glass contact by placing the glass properly then clean and mark its reference points before cleaning the black contact surface at the glass rim. Apply Primer M to the body parts until their surface becomes dry for minimum 3 minutes then prepare the glass rim with Primer G before it dries completely by removing extra Primer G from the surface. The windshield glass must receive adhesive from cartridge Part No. 08850-00801 or equivalent before installation while following the time restrictions and applying pressure correctly. After basic adhesive correction with a spatula technicians must install a new windshield outside an upper moulding when the adhesive reaches its solid state while tape protects all sections during the setting time. Perform leak tests before you reposition the roof side rail Weather Strip. Then reattach the cowl top ventilator louver and wiper arms followed by the inner rear view mirror and roof console box before installing the sun visors together with their holders and front pillar garnishes and front door opening trim Weather Strips.


Related Toyota Sequoia Parts
 Toyota Sequoia Car Mirror
 Toyota Sequoia Emblem
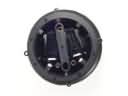 Toyota Sequoia Mirror Actuator
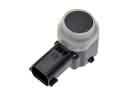 Toyota Sequoia Parking Assist Sensor
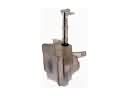 Toyota Sequoia Windshield Washer Fluid Reservoir
 Toyota Sequoia Windshield Washer Nozzle
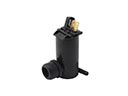 Toyota Sequoia Windshield Washer Pump
 Toyota Sequoia Windshield Wiper
 Toyota Sequoia Wiper Arm
 Toyota Sequoia Wiper Blade
 Toyota Sequoia Wiper Linkage
 Toyota Sequoia Wiper Motor