×
ToyotaParts- Hello
- Login or Register
- Quick Links
- Live Chat
- Track Order
- Parts Availability
- RMA
- Help Center
- Contact Us
- Shop for
- Toyota Parts
- Scion Parts
My Garage
My Account
Cart
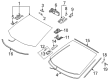
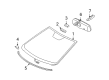
OEM Toyota Venza Windshield
Glass Windshield- Select Vehicle by Model
- Select Vehicle by VIN
Select Vehicle by Model
orMake
Model
Year
Select Vehicle by VIN
For the most accurate results, select vehicle by your VIN (Vehicle Identification Number).
13 Windshields found

Toyota Venza Windshield, Front Part Number: 56101-48910
$738.42 MSRP: $1082.16You Save: $343.74 (32%)Ships in 1-3 Business Days
Toyota Venza Windshield, Front Part Number: 56101-0T071
$512.10 MSRP: $750.49You Save: $238.39 (32%)Ships in 1-3 Business DaysToyota Venza Windshield, Front Part Number: 56101-0T051
$507.22 MSRP: $743.34You Save: $236.12 (32%)Ships in 1-3 Business DaysToyota Venza Windshield, Front Part Number: 56101-0T081
$526.17 MSRP: $771.12You Save: $244.95 (32%)Ships in 1-3 Business DaysToyota Venza Windshield, Front Part Number: 56101-0T061
$524.02 MSRP: $767.96You Save: $243.94 (32%)Ships in 1-3 Business DaysToyota Venza Windshield, Front Part Number: 56101-0T010
$545.87 MSRP: $799.97You Save: $254.10 (32%)Ships in 1-3 Business DaysToyota Venza Windshield, Front Part Number: 56101-0T020
$561.13 MSRP: $822.34You Save: $261.21 (32%)Ships in 1-3 Business DaysToyota Venza Windshield, Front Part Number: 56101-48908
$609.71 MSRP: $893.53You Save: $283.82 (32%)Ships in 1-3 Business DaysToyota Venza Windshield, Front Part Number: 56101-0T030
$617.54 MSRP: $905.02You Save: $287.48 (32%)Ships in 1-3 Business DaysToyota Venza Windshield, Front Part Number: 56101-0T040
$671.11 MSRP: $983.52You Save: $312.41 (32%)Toyota Venza Windshield, Front Part Number: 56101-48909
$767.48 MSRP: $1124.75You Save: $357.27 (32%)Ships in 1-3 Business Days
Toyota Venza Side Molding, Outside Lower Driver Side Part Number: 75536-48020
$28.07 MSRP: $39.08You Save: $11.01 (29%)Ships in 1-3 Business DaysToyota Venza Windshield, Front Part Number: 56101-48911
$779.96 MSRP: $1143.04You Save: $363.08 (32%)
Toyota Venza Windshield
Choose genuine Windshield that pass strict quality control tests. You can trust the top quality and lasting durability. Shopping for OEM Windshield for your Toyota Venza? Our website is your one-stop destination. We stock an extensive selection of genuine Toyota Venza parts. The price is affordable so you can save more. It only takes minutes to browse and find the exact fit. Easily add to cart and check out fast. Our hassle-free return policy will keep you stress-free. We process orders quickly for swift delivery. Your parts will arrive faster, so you can get back on the road sooner.
Toyota Venza Windshield Parts and Q&A
- Q: How to install windshield glass on Toyota Venza?A:The installation of new windshield glass begins with applying Primer G onto 2 new No. 2 windshield glass stoppers, using moderation and waiting for at least 3 minutes before discarding excess primer. Place the stoppers onto the windshield glass followed by the installation of 2 No. 1 windshield glass stoppers to the vehicle body. The installation of 2 new windshield glass retainers demands treatment with Primer G on their application regions before following the same primer application procedures. Extending the new adhesive dam follows the correct position of the dam reference line. To install the windshield glass on vehicles without sliding roofs users must first apply suction cups that provide an even surface with proper alignment of matchmarks before removing the glass. The vehicle body requires coating of Primer M on the installation area except the adhesive zone before drying occurs. Apply Primer G first onto the adhesive area while focusing on the ceramic notches before using Toyota Genuine Windshield Glass Adhesive or equivalent on the glass by cutting the cartridge nozzle. The glass assembly should be installed by matching the marks while pressing the rim gently until the stoppers are properly positioned and the clearance area is checked. After the adhesive dries keep the glass in position with tape during the mentioned minimum downtime period while driving the vehicle is forbidden. Vehicle owners with sliding roofs must conduct their sliding roof fix procedure starting from correct positioning steps and moving towards primer application followed by adhesive application. There should be a leaking test conducted by spraying water onto the vehicle from outside after adhesive curing. If any leakage occurs you must allow drying until you can add more adhesive as required. Reinstall the roof headlining assembly and applicable components such as visor holders, assist grip sub-assemblies, visor assemblies, visor bracket covers, roof console box assembly, inner rear view mirror assemblies, front pillar garnishes, door opening trim Weather Strips, and cowl top ventilator louver sub-assembly and front fender to cowl side seals and front wiper arm and blade assemblies.
- Q: How to remove the windshield glass on Toyota Venza?A:First remove the front wiper head caps before taking out each front wiper arm assembly with blade on both left and right sides of the car. You should remove the front fender to cowl side seals that exist on both sides together with the cowl top ventilator louver sub-assembly. Both the front door opening trim Weather Strips should disconnect from their mounts so that front pillar garnish removal becomes possible. The service begins with removal of the inner rear view mirror stay holder cover and inner rear view mirror assembly before proceeding to the roof console box assembly as well as visor bracket covers and visor assemblies from both sides. The assist grip sub-assemblies along with the visor holder should be removed before lowering the front portion of the roof headlining assembly for windshield glass removal. Apply protective tape to the windshield glass installment area and disconnect the deicer connector when present before cutting the adhesive with a piano wire which must avoid touching the clips. Mark the windshield glass and vehicle body and then disconnect all guides alongside stoppers by using suction cups for safe removal without incident. Use careful hands to eliminate the window glass adhesive dam together with the windshield glass retainers in order to prevent glass damage. The next step involves removing both No. 2 and No. 1 windshield glass stoppers but replace each one with fresh units. Wash the windshield glass by wiping off tape residue before cleaning the glass circumference with non-residue solvent. After preparation the vehicle body needs cleaning to enable proper installation of the new windshield.

Related Toyota Venza Parts
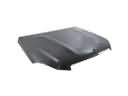 Toyota Venza Hood
 Toyota Venza Car Mirror
 Toyota Venza Door Lock Cylinder
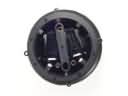 Toyota Venza Mirror Actuator
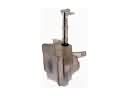 Toyota Venza Windshield Washer Fluid Reservoir
 Toyota Venza Windshield Washer Nozzle
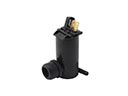 Toyota Venza Windshield Washer Pump
 Toyota Venza Windshield Wiper
 Toyota Venza Wiper Arm
 Toyota Venza Wiper Blade
 Toyota Venza Wiper Linkage
 Toyota Venza Wiper Motor