×
ToyotaParts- Hello
- Login or Register
- Quick Links
- Live Chat
- Track Order
- Parts Availability
- RMA
- Help Center
- Contact Us
- Shop for
- Toyota Parts
- Scion Parts
My Garage
My Account
Cart
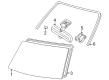
OEM Toyota 4Runner Windshield
Glass Windshield- Select Vehicle by Model
- Select Vehicle by VIN
Select Vehicle by Model
orMake
Model
Year
Select Vehicle by VIN
For the most accurate results, select vehicle by your VIN (Vehicle Identification Number).
23 Windshields found


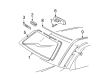
Toyota 4Runner Windshield, Front Part Number: 56101-35020
$524.02 MSRP: $767.95You Save: $243.93 (32%)Ships in 1-3 Business Days
Toyota 4Runner Windshield, Front Part Number: 56101-35160
$466.70 MSRP: $683.96You Save: $217.26 (32%)Ships in 1-3 Business Days
Toyota 4Runner Windshield Part Number: 56101-35310
$508.36 MSRP: $745.00You Save: $236.64 (32%)Ships in 1-3 Business DaysToyota 4Runner Windshield, Front Part Number: 56101-35190
$389.41 MSRP: $570.69You Save: $181.28 (32%)Ships in 1-3 Business DaysToyota 4Runner Windshield, Front Part Number: 56101-35170
$402.46 MSRP: $589.81You Save: $187.35 (32%)Ships in 1-3 Business DaysToyota 4Runner Windshield, Front Part Number: 56101-35180
$467.50 MSRP: $685.12You Save: $217.62 (32%)Ships in 1-3 Business DaysToyota 4Runner Windshield, Front Part Number: 56101-35050
$508.70 MSRP: $745.50You Save: $236.80 (32%)Ships in 1-3 Business Days
Toyota 4Runner Glass Sub-Assembly, Windshield Part Number: 56101-35901
$532.30 MSRP: $780.10You Save: $247.80 (32%)Ships in 1-2 Business Days
Toyota 4Runner Windshield, Green, Front Part Number: 56111-35161
$557.95 MSRP: $817.69You Save: $259.74 (32%)Toyota 4Runner Glass Sub-Assembly, Windshield Part Number: 56101-35902
$570.89 MSRP: $836.65You Save: $265.76 (32%)Ships in 1-2 Business DaysToyota 4Runner Glass Sub-Assembly, Windshield Part Number: 56101-35903
$588.83 MSRP: $862.93You Save: $274.10 (32%)Ships in 1-2 Business DaysToyota 4Runner Windshield, Front Part Number: 56101-35130
$603.92 MSRP: $885.06You Save: $281.14 (32%)Ships in 1-3 Business DaysToyota 4Runner Windshield, Front Part Number: 56101-35110
$625.49 MSRP: $916.66You Save: $291.17 (32%)Ships in 1-3 Business DaysToyota 4Runner Windshield, Front Part Number: 56101-35080
$623.33 MSRP: $913.50You Save: $290.17 (32%)Ships in 1-3 Business DaysToyota 4Runner GLASS S/A, WINDSHIEL Part Number: 56101-35904
$677.70 MSRP: $993.17You Save: $315.47 (32%)Ships in 1-2 Business Days

Toyota 4Runner Windshield, Clear Part Number: 56111-89132-83

Toyota 4Runner Windshield, Bronze, Front Part Number: 56111-35100
Toyota 4Runner Windshield Part Number: 56101-35320
$476.46 MSRP: $698.26You Save: $221.80 (32%)

Toyota 4Runner Windshield, Bronze Part Number: 56111-89148-83
Toyota 4Runner Windshield Part Number: 56111-89135-83
| Page 1 of 2 |Next >
1-20 of 23 Results
Toyota 4Runner Windshield
Choose genuine Windshield that pass strict quality control tests. You can trust the top quality and lasting durability. Shopping for OEM Windshield for your Toyota 4Runner? Our website is your one-stop destination. We stock an extensive selection of genuine Toyota 4Runner parts. The price is affordable so you can save more. It only takes minutes to browse and find the exact fit. Easily add to cart and check out fast. Our hassle-free return policy will keep you stress-free. We process orders quickly for swift delivery. Your parts will arrive faster, so you can get back on the road sooner.
The Toyota 4Runner Windshield stands as a critical element which demonstrates the dependability and operational excellence of the Toyota 4Runner mid-size SUV that first launched back in 1984. A distinctive Windshield design of laminated safety glass consists of two curved pieces bonded together with plastic material to protect vehicle visibility and exterior elements. The Windshield design optimizes aerodynamics to improve Toyota 4Runner efficiency through reduced fuel consumption while securing passengers inside the vehicle. The fourth and fifth generation Toyota 4Runner models along with their variants SR5 and TRD Pro benefit from this Windshield because it can fit all these versions. All Windshield owners must conduct regular care since small damage areas can reduce both safety and visibility. Due to its solid manufacturing and Toyota's dedication to delivering exceptional quality the the automaker 4Runner Windshield has become a preferred choice among drivers who want dependable vehicles. Because Windshield replacement costs between $110 and $140, customers getmaximum safety benefits at a reasonable financial investment. The car part provides both superior driving comfort and contributes to the model's status as a long-lasting transportation vehicle in the automotive sphere.
Toyota 4Runner Windshield Parts and Q&A
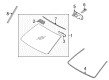
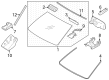
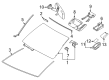
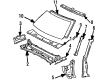
- Q: How to remove the windshield on Toyota 4Runner?A:The windshield removal process begins by disassembling the roof headliner assembly through the removal sequence of front door Weather Strips LH and RH and the two assist grips and front pillar garnishes LH/RH along with the LH/RH Visor assemblies, visors, and two visor holders and roof console box assembly. The removal of the inner rear view mirror assembly follows as the second operating step. Removal of the windshield starts by detaching the dual front wiper arm head caps followed by FR wiper arm LH and RH then front fender to cowl side seals LH and RH and finally the cowl top ventilator louver. First remove the windshield moulding outside both the left-hand and right-hand sides followed by outer upper moulding that requires knife cutting to prevent vehicle body damage before disconnecting the deicer connector if present. Pass a piano wire from the interior onto the glass then to the vehicle body between them before securing both ends on wooden blocks while applying protective tape to the outer vehicle surface to avoid scratches. When separating the vehicle ensure you avoid scratching paint or ornaments and place plastic sheeting between piano wire and safety pad. You should detach the adhesive through piano wire pulling before disabling stoppers while extracting glass with a suction cup so that adhesive remains stuck to the body. The last step requires you to scrape off damaged stoppers along with adhesive from the windshield glass and use white gasoline to clean its outer perimeter while taking care to avoid cleaning the glass surface.
- Q: How to install windshield glass on Toyota 4Runner?A:Windshield glass NO. 2 stopper requires an application of Primer G on its installation area which needs to dry for 3 minutes before installing two new stoppers onto the glass. The installation of windshield glass NO. 1 stopper starts with placing 2 new stoppers directly onto the vehicle body. The installation part of window glass adhesive dam requires Primer G before cleaning it and waiting three minutes to apply new self-adhesive tape around the glass while keeping stopper installation zones clear. Apply Primer G to both the glass edge and contact surface of windshield moulding outer upper but allow it to dry for 3 minutes before putting it in place. Require the vehicle body contact surface to undergo cleaning followed by shaping its adhesive area before cutting away rough parts and wiping it clean with a shop rag. First mark reference points on the glass before you remove it from the positioning site through use of a suction cup. Maintain the glass surface at a level position. Prime the vehicle body with Primer M before it dries for three minutes, and then use Primer G to coat the glass edge and contact surface and allow dry time. Use adhesive Part NO.08850-00801 or its equivalent by cutting the cartridge nozzle into the sealer gun for applying it to the glass surface. Put the glass into place so it matches the reference points then push it softly until the stoppers are in position without touching the body of the vehicle and verify the space between the glass and car body. Check the glass fit at the front surface before scraping away surplus adhesive while driving the car only after the specified minimum downtime period has passed. After the adhesive has reached hardness perform a leak test then use auto glass sealer to close any found leaks.

Related Toyota 4Runner Parts
 Toyota 4Runner Door Lock Actuator
 Toyota 4Runner Wiper Blade
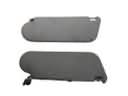 Toyota 4Runner Sun Visor
 Toyota 4Runner Windshield Washer Nozzle
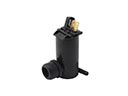 Toyota 4Runner Windshield Washer Pump
 Toyota 4Runner Wiper Arm
 Toyota 4Runner Car Mirror
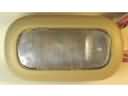 Toyota 4Runner Dome Light
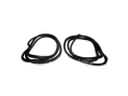 Toyota 4Runner Door Seal
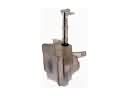 Toyota 4Runner Windshield Washer Fluid Reservoir
 Toyota 4Runner Windshield Wiper
 Toyota 4Runner Wiper Motor