×
ToyotaParts- Hello
- Login or Register
- Quick Links
- Live Chat
- Track Order
- Parts Availability
- RMA
- Help Center
- Contact Us
- Shop for
- Toyota Parts
- Scion Parts
My Garage
My Account
Cart
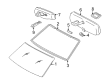
OEM Toyota Tundra Windshield
Glass Windshield- Select Vehicle by Model
- Select Vehicle by VIN
Select Vehicle by Model
orMake
Model
Year
Select Vehicle by VIN
For the most accurate results, select vehicle by your VIN (Vehicle Identification Number).
17 Windshields found

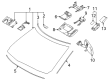
Toyota Tundra Windshield, Front Part Number: 56101-0C190
$582.47 MSRP: $853.62You Save: $271.15 (32%)Ships in 1-3 Business Days
Toyota Tundra Windshield, Front Part Number: 56101-0C130
$506.31 MSRP: $742.00You Save: $235.69 (32%)Ships in 1-3 Business Days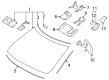
Toyota Tundra Windshield, Front Part Number: 56101-0C210
$516.41 MSRP: $756.81You Save: $240.40 (32%)Ships in 1-3 Business Days
Toyota Tundra Windshield, Front Part Number: 56101-0C111
$520.95 MSRP: $763.47You Save: $242.52 (32%)Ships in 1-3 Business DaysToyota Tundra Windshield, Front Part Number: 56101-0C220
$571.23 MSRP: $837.15You Save: $265.92 (32%)Ships in 1-3 Business DaysToyota Tundra Windshield, Front Part Number: 56101-0C150
$595.30 MSRP: $872.41You Save: $277.11 (32%)Ships in 1-3 Business DaysToyota Tundra Windshield, Front Part Number: 56101-0C071
$735.01 MSRP: $1077.18You Save: $342.17 (32%)Ships in 1-3 Business DaysToyota Tundra Windshield, Front Part Number: 56101-0C101
$817.30 MSRP: $1197.77You Save: $380.47 (32%)Ships in 1-3 Business Days
Toyota Tundra Windshield, Front Part Number: 56101-0C020-83
$305.16 MSRP: $435.69You Save: $130.53 (30%)Ships in 1-3 Business DaysToyota Tundra Windshield, Front Part Number: 56101-0C081
$619.13 MSRP: $907.35You Save: $288.22 (32%)Toyota Tundra Windshield, Front Part Number: 56101-0C091
$677.02 MSRP: $992.17You Save: $315.15 (32%)Toyota Tundra Windshield, Front Part Number: 56101-0C121
$556.59 MSRP: $815.70You Save: $259.11 (32%)
Toyota Tundra Windshield, Front Part Number: 56101-0C040
$558.18 MSRP: $818.02You Save: $259.84 (32%)Toyota Tundra Windshield, Front Part Number: 56101-0C180
$628.21 MSRP: $920.65You Save: $292.44 (32%)Toyota Tundra Windshield, Front Part Number: 56101-0C060
Toyota Tundra Windshield, Front Part Number: 56101-0C010-83
Toyota Tundra Windshield, Front Part Number: 56101-0C031
Toyota Tundra Windshield
Choose genuine Windshield that pass strict quality control tests. You can trust the top quality and lasting durability. Shopping for OEM Windshield for your Toyota Tundra? Our website is your one-stop destination. We stock an extensive selection of genuine Toyota Tundra parts. The price is affordable so you can save more. It only takes minutes to browse and find the exact fit. Easily add to cart and check out fast. Our hassle-free return policy will keep you stress-free. We process orders quickly for swift delivery. Your parts will arrive faster, so you can get back on the road sooner.
Toyota Tundra Windshield Parts and Q&A
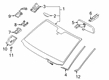
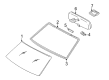
- Q: How to remove the windshield glass on Toyota Tundra?A:Uninstall the windshield glass by first removing the front wiper assembly tonearms LH and RH and subsequently removing the cowl hood seal and front fender seal LH and RH. Start by taking off the cowl top ventilator louver sub-assembly before exposing the front pillar garnish LH by partially removing the front door opening trim Weather Strip LH and then proceed to detach both the front pillar garnish RH along with the front pillar garnish LH. After removing the inner rear view mirror assembly customers should take out the roof console box assembly (short or long type) and the visor bracket covers LH and RH. Take out the visor assemblies LH and RH along with their corresponding cab type holders and assist grip subassembly which includes its grip plug. Lower part of the roof headliner first then detach the rear roof drip side finish mouldings from both LH and RH sides before removing their clips. Use a knife to eliminate the outside windshield moulding and the upper windshield outside moulding but maintain the vehicle body undamaged. Windshield glass removal requires detachments of the clip and connector when present along with protective tape application to the vehicle body followed by inserting a piano wire with tied handles between the glass and body. When working with the instrument panel area take preventive measures to avoid paint and ornament damage while applying a plastic sheet for protection. Smoothly remove the windshield glass by first marking alignment points and then cutting adhesive with piano wire before disengaging stoppers with suction cups. To clean the windshield glass you should remove all faulty stoppers and dams and adhesive residues then treat the edges with a non-residue solvent while avoiding the glass surface. To prepare the vehicle for new glass installation the vehicle body should be cleaned through surface shape modification and adhesive removal before using cleaning agents to establish an optimal glue bond.
- Q: How to install the windshield glass on Toyota Tundra?A:The first step for windshield glass installation requires users to apply Primer G on glass areas that will receive spacers before the solution dries for at least 3 minutes while disposing of excess primer. Position 2 new stoppers alongside the glass segment as well as 2 new stoppers on the vehicle's body structure. Before mounting adhesive dams to the glass surface use Primer G then wait for it to dry for 3 minutes before pulling away the adhesive paper from the dam while you position the dam to its correct ceramic notch and dam reference line. The glass border along with its contact area requires application of Primer G followed by three minutes of drying time before windshield outside moulding installation. The vehicle body requires application of Primer M followed by Primer G application to glass contact surfaces with both solutions set to dry for 3 minutes. Apply Toyota Genuine Windshield Glass Adhesive or equivalent to the glass through proper nozzle tip cutting followed by immediate application of all adhesive. Suction cups aid the glass placement by aligning matchmarks before applying gentle pressure around the rim to verify stopper attachment and verify an appropriate gap exists between the body of the vehicle and glass. Cover the glass with tape during the curing process and afterward apply the outside moulding then Prime G to the designated area. Perform a leak test when the adhesive finishes hardening then apply auto glass sealer to handle any leakage. Install the roof drip side finish clips in two sides before adding both left and right side finish mouldings before moving on to the rear roof drip side finish mouldings. Reposition the roof headlining before installing assist grip plugs with sub-assemblies as well as visor holders and visors for left and right sides. The installation process begins with inserting visor bracket covers followed by the roof console box assembly and then continues with the inner rear view mirror assembly and eventually ends with front pillar garnishes and front door opening trim Weather Strips. To complete the body shop installation process you must add the cowl top ventilator louver and both front fender to cowl side seals and front wiper arm and blade assemblies for their respective left and right sides.

Related Toyota Tundra Parts
 Toyota Tundra Windshield Washer Nozzle
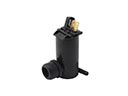 Toyota Tundra Windshield Washer Pump
 Toyota Tundra Wiper Arm
 Toyota Tundra Wiper Linkage
 Toyota Tundra Wiper Motor
 Toyota Tundra Car Mirror
 Toyota Tundra Door Hinge
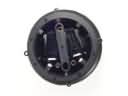 Toyota Tundra Mirror Actuator
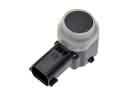 Toyota Tundra Parking Assist Sensor
 Toyota Tundra Windshield Washer Fluid Reservoir
 Toyota Tundra Windshield Wiper
 Toyota Tundra Wiper Blade