×
ToyotaParts- Hello
- Login or Register
- Quick Links
- Live Chat
- Track Order
- Parts Availability
- RMA
- Help Center
- Contact Us
- Shop for
- Toyota Parts
- Scion Parts
My Garage
My Account
Cart
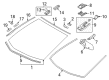
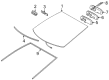
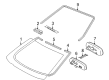
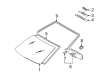
OEM Toyota Prius Windshield
Glass Windshield- Select Vehicle by Model
- Select Vehicle by VIN
Select Vehicle by Model
orMake
Model
Year
Select Vehicle by VIN
For the most accurate results, select vehicle by your VIN (Vehicle Identification Number).
28 Windshields found


Toyota Prius Windshield, Front Part Number: 56101-4E954
$440.63 MSRP: $645.75You Save: $205.12 (32%)Ships in 1-3 Business Days
Toyota Prius Windshield, Front Part Number: 56101-4E928
$440.94 MSRP: $646.19You Save: $205.25 (32%)Ships in 1-3 Business DaysToyota Prius Windshield, Front Part Number: 56101-4E930
$455.01 MSRP: $666.82You Save: $211.81 (32%)Ships in 1-3 Business DaysToyota Prius Windshield, Front Part Number: 56101-4E951
$440.03 MSRP: $644.87You Save: $204.84 (32%)Ships in 1-3 Business Days
Toyota Prius Windshield, Front Part Number: 56101-47141
$697.85 MSRP: $1022.72You Save: $324.87 (32%)Ships in 1-3 Business DaysToyota Prius Windshield, Front Part Number: 56101-4E952
$432.58 MSRP: $633.95You Save: $201.37 (32%)Ships in 1-3 Business DaysToyota Prius Windshield, Front Part Number: 56103-47937
$445.14 MSRP: $652.35You Save: $207.21 (32%)Ships in 1-3 Business DaysToyota Prius Windshield, Front Part Number: 56103-47944
$448.31 MSRP: $657.01You Save: $208.70 (32%)Ships in 1-3 Business DaysToyota Prius Windshield, Front Part Number: 56101-4E955
$453.14 MSRP: $664.07You Save: $210.93 (32%)Ships in 1-3 Business DaysToyota Prius Windshield, Front Part Number: 56101-4E953
$459.32 MSRP: $673.14You Save: $213.82 (32%)Ships in 1-3 Business DaysToyota Prius Windshield, Front Part Number: 56101-4E933
$462.39 MSRP: $677.63You Save: $215.24 (32%)Ships in 1-3 Business DaysToyota Prius Windshield, Front Part Number: 56103-47906
$465.91 MSRP: $682.79You Save: $216.88 (32%)Ships in 1-3 Business DaysToyota Prius Windshield, Front Part Number: 56101-4E931
$467.84 MSRP: $685.62You Save: $217.78 (32%)Ships in 1-3 Business DaysToyota Prius Windshield, Front Part Number: 56101-4E949
$472.38 MSRP: $692.28You Save: $219.90 (32%)Ships in 1-3 Business DaysToyota Prius Windshield, Front Part Number: 56103-47920
$474.99 MSRP: $696.10You Save: $221.11 (32%)Ships in 1-3 Business DaysToyota Prius Windshield, Front Part Number: 56101-4E956
$475.89 MSRP: $697.43You Save: $221.54 (32%)Ships in 1-3 Business DaysToyota Prius Windshield, Front Part Number: 56101-4F949
$489.74 MSRP: $717.72You Save: $227.98 (32%)Ships in 1-3 Business DaysToyota Prius Windshield, Front Part Number: 56101-4E950
$518.24 MSRP: $759.48You Save: $241.24 (32%)Ships in 1-3 Business DaysToyota Prius Windshield, Front Part Number: 56101-4E932
$522.54 MSRP: $765.80You Save: $243.26 (32%)Ships in 1-3 Business Days
Toyota Prius Windshield, Front Part Number: 56111-47020
$555.46 MSRP: $814.03You Save: $258.57 (32%)Ships in 1-3 Business Days
| Page 1 of 2 |Next >
1-20 of 28 Results
Toyota Prius Windshield
Choose genuine Windshield that pass strict quality control tests. You can trust the top quality and lasting durability. Shopping for OEM Windshield for your Toyota Prius? Our website is your one-stop destination. We stock an extensive selection of genuine Toyota Prius parts. The price is affordable so you can save more. It only takes minutes to browse and find the exact fit. Easily add to cart and check out fast. Our hassle-free return policy will keep you stress-free. We process orders quickly for swift delivery. Your parts will arrive faster, so you can get back on the road sooner.
Toyota Prius Windshield Parts and Q&A
- Q: How to replace the windshield glass on Toyota Prius?A:The windshield glass replacement process starts with the roof headlining assembly removal followed by front door scuff plates LH and RH, cowl side trim boards LH and RH, front door opening trim Weather Strips LH and RH, front pillar garnish corner pieces LH and RH, front pillar garnishes LH and RH, visors LH and RH, visor holders, assist grip, and map lamp respectively. Additionally, lower the roof headlining partially without full extraction. Start with the removal of the inner rear view mirror assembly followed by softening the cowl top ventilator louver by unfastening the hood cowl top seal and front wiper arms LH and RH. After cutting the windshield moulding outside with care use a knife to protect the vehicle body. Then remove the windshield glass through piano wire insertion between body and glass followed by handle attachment to the wire ends to cut the adhesive before detaching the stoppers to finish with a suction cup that preserves vehicle body adhesive. Scrape off damaged stoppers, adhesive, and dam from the windshield glass before cleaning the outer edge with white gasoline while taking measures to avoid contact with glass surfaces. The contact surface needs shaping and thick adhesive removal with a knife before applying shop rag saturated in cleaner. Install Windshield Glass Stopper No. 2 through a primer application on the installation section followed by a drying period exceeding three minutes and the disposal of extra primer material before putting two new stoppers on the glass. The installation of Windshield Glass Stopper No. 1 requires two new stoppers to be installed on the vehicle body. The window glass adhesive dam requires application of Primer G coating on its installation area before it dries and addition of new dam pieces which must use double-sided tape except in stopper installation areas. Use a suction cup to position the windshield glass by maintaining an even contact surface and apply reference marks if you have a new glass. Paint the body parts exposed after glass removal with Primer M until dry and proceed to add Primer G to glass edges and contact points by wiping off excess before it dries. The glass needs adhesive (Part No. 08850-00801 or equivalent) for application through nozzle cutting and sealer gun loading before glass coating. Insert the glass into the vehicle body while maintaining alignment to the reference marks and use gentle pressure along the rim while keeping the vehicle body and glass separated by a small amount. Fold down the glass front surface before using light pressure to fix it into place while scratching away any leftover adhesive. The windshield moulding installation should occur externally while the adhesive remains unbonded and a leak test must happen upon adhesive full-drying before sealing residual leaks with auto glass sealer.
- Q: How to remove the windshield glass on Toyota Prius?A:The first step to remove windshield glass requires disconnecting the negative cable from the battery terminal then waiting 90 seconds to avoid Air Bag and seat belt pretensioner activation. The installment requires removal of the front door scuff plates (LH and RH) along with cowl side trim boards (LH and RH), front door opening trims (LH and RH), front pillar garnish corner pieces (LH and RH) and front pillar garnishes (LH and RH) and visor assemblies (LH and RH), visor holder, assist grip cover, assist grip sub-assembly, map light assembly with roof headlining assembly partially lowered. The maintenance team must detach the inner rearview mirror assembly (EC Mirror optional) along with hood-cowl top seal and front wiper arm head cap, front wiper arms (LH and RH) and cowl top ventilator louver (LH and RH). Use caution to cut the exterior windshield moulding properly before removing the rest of the component. A piano wire between the vehicle body and glass must be inserted while protective tape should be placed on the vehicle exterior before attaching handles to both wire ends. Attention should be paid to avoiding paint or ornament damage to the vehicle body while using a plastic layer between piano wire and instrument panel to shield against scratches. Application of marks on glass and vehicle body begins with cutting through adhesive with piano wire until stoppers disengage before suction cup removal of glass. Remove all damaged stoppers, dams and adhesive from the windshield glass while performing a subsequent clean of its edges with white gasoline which should never touch the glass itself. Clean and shape the contact surface for the vehicle body then remove excessive adhesive carefully before using cleaner to eliminate any remaining adhesive residue.

Related Toyota Prius Parts
 Toyota Prius Hood Latch
 Toyota Prius Windshield Washer Pump
 Toyota Prius Wiper Motor
 Toyota Prius Wiper Blade
 Toyota Prius Car Mirror
 Toyota Prius Mirror Actuator
 Toyota Prius Parking Assist Sensor
 Toyota Prius Windshield Washer Fluid Reservoir
 Toyota Prius Windshield Washer Nozzle
 Toyota Prius Windshield Wiper
 Toyota Prius Wiper Arm
 Toyota Prius Wiper Linkage