×
ToyotaParts- Hello
- Login or Register
- Quick Links
- Live Chat
- Track Order
- Parts Availability
- RMA
- Help Center
- Contact Us
- Shop for
- Toyota Parts
- Scion Parts
My Garage
My Account
Cart
OEM Toyota Prius Wiper Motor
Windshield Wiper Motor- Select Vehicle by Model
- Select Vehicle by VIN
Select Vehicle by Model
orMake
Model
Year
Select Vehicle by VIN
For the most accurate results, select vehicle by your VIN (Vehicle Identification Number).
12 Wiper Motors found


Toyota Prius Wiper Motor, Rear Part Number: 85130-47030
$140.17 MSRP: $198.43You Save: $58.26 (30%)Ships in 1-3 Business Days


Toyota Prius Wiper Motor, Rear Part Number: 85130-47010
$157.79 MSRP: $223.37You Save: $65.58 (30%)Ships in 1-2 Business Days


Toyota Prius Wiper Motor, Front Part Number: 85110-47060
$232.41 MSRP: $331.82You Save: $99.41 (30%)Ships in 1-2 Business Days
Toyota Prius Wiper Motor, Rear Part Number: 85130-47021
$179.05 MSRP: $255.64You Save: $76.59 (30%)Ships in 1 Business DayToyota Prius Wiper Motor, Rear Part Number: 85130-47031
$144.40 MSRP: $204.41You Save: $60.01 (30%)Ships in 1-3 Business DaysToyota Prius Wiper Motor, Rear Part Number: 85130-47032
$145.69 MSRP: $206.24You Save: $60.55 (30%)Ships in 1-2 Business Days
Toyota Prius Wiper Motor, Front Part Number: 85110-47290
$156.26 MSRP: $221.21You Save: $64.95 (30%)Ships in 1-3 Business DaysToyota Prius Wiper Motor, Rear Part Number: 85130-47020
$175.42 MSRP: $248.32You Save: $72.90 (30%)Ships in 1-3 Business Days
Toyota Prius Wiper Motor, Front Part Number: 85110-12C90
$179.28 MSRP: $255.97You Save: $76.69 (30%)Ships in 1-2 Business Days
Toyota Prius Wiper Motor, Front Part Number: 85110-47280
$198.27 MSRP: $283.09You Save: $84.82 (30%)Ships in 1-3 Business DaysToyota Prius Motor Assembly, Windshield Wiper, Front Part Number: 85110-47240
$203.05 MSRP: $289.91You Save: $86.86 (30%)Ships in 1-3 Business Days
Toyota Prius Wiper Motor, Front Part Number: 85110-47030
Toyota Prius Wiper Motor
Choose genuine Wiper Motor that pass strict quality control tests. You can trust the top quality and lasting durability. Shopping for OEM Wiper Motor for your Toyota Prius? Our website is your one-stop destination. We stock an extensive selection of genuine Toyota Prius parts. The price is affordable so you can save more. It only takes minutes to browse and find the exact fit. Easily add to cart and check out fast. Our hassle-free return policy will keep you stress-free. We process orders quickly for swift delivery. Your parts will arrive faster, so you can get back on the road sooner.
Toyota Prius Wiper Motor Parts and Q&A
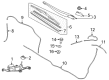
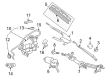
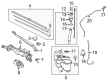
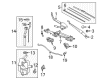
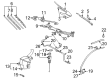
- Q: How to install the windshield wiper motor assembly on Toyota Prius?A:Begin the windshield wiper motor assembly installation by fastening 3 bolts to attach the windshield wiper motor to the windshield wiper link while tightening them to 5.4 Nm (55 kgf-cm, 48 in-lbf). After installing the crank arm alongside its washer and nut users must align the matchmarks then use torque to 17 Nm (175 kgf-cm, 13 ft-lbf) to secure the crank arm. Wipe the crank arm pivot surface with MP grease then assemble the windshield wiper link arm. The windshield wiper motor and link assembly needs 5 bolts for attachment with a torque force of 5.5 Nm (56 kgf-cm, 49 in-lbf) while connecting the connector. First clean the wiper arm serration with a round file and wiper pivot serration with a wire brush before installing the front wiper arm LH with a nut using correct positioning of the front Wiper Blade and final torque to 21 Nm (214 kgf-cm, 15 ft-lbf) while holding down the arm hinge by hand. The front wiper arm with blade assembly RH installation should be completed with two nuts torqued to 21 Nm (214 kgf-cm, 15 ft-lbf) after cleaning both components properly. Then check that wipers work correctly using water or washer fluid while verifying they move without any interference. Attach 8 claws followed by a clip to install the cowl top ventilator louver RH before installing it on the LH side. The installation process requires 8 clips for attaching the hood to cowl top seal. After reconnecting the negative battery terminal, initialization procedures must be completed since system requirements demand this whendisconnecting and reconnecting the negative (-) terminal.
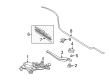
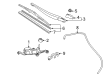
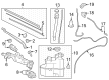
- Q: How to remove the rear wiper motor on Toyota Prius?A:Before starting the wiper motor removal process disconnect the negative battery cable terminal then wait at least 90 seconds so that Air Bag and seat belt pretensioners remain dormant. The first step requires you to remove the rear wiper arm cover which must be followed by disassembling the rear wiper arm assembly through the removal of its nut and wiper arm. The back door lower trim board assembly needs to be removed first. The last step requires disconnecting the connector from the rear wiper motor assembly while also taking out its 3 mounting bolts.


Related Toyota Prius Parts
 Toyota Prius Windshield
 Toyota Prius Windshield Washer Pump
 Toyota Prius Wiper Blade
 Toyota Prius Car Mirror
 Toyota Prius Dash Panel
 Toyota Prius Door Hinge
 Toyota Prius Mirror Actuator
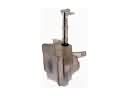 Toyota Prius Windshield Washer Fluid Reservoir
 Toyota Prius Windshield Washer Nozzle
 Toyota Prius Windshield Wiper
 Toyota Prius Wiper Arm
 Toyota Prius Wiper Linkage