×
ToyotaParts- Hello
- Login or Register
- Quick Links
- Live Chat
- Track Order
- Parts Availability
- RMA
- Help Center
- Contact Us
- Shop for
- Toyota Parts
- Scion Parts
My Garage
My Account
Cart
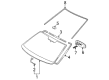
OEM Toyota Sienna Windshield
Glass Windshield- Select Vehicle by Model
- Select Vehicle by VIN
Select Vehicle by Model
orMake
Model
Year
Select Vehicle by VIN
For the most accurate results, select vehicle by your VIN (Vehicle Identification Number).
18 Windshields found


Toyota Sienna Glass, Front Part Number: 56101-AE020
$741.04 MSRP: $1086.00You Save: $344.96 (32%)Ships in 1-3 Business Days
Toyota Sienna Windshield, Front Part Number: 56101-08200
$619.13 MSRP: $907.35You Save: $288.22 (32%)Ships in 1-3 Business Days
Toyota Sienna Windshield, Front Part Number: 56101-08120
$553.53 MSRP: $811.20You Save: $257.67 (32%)Ships in 1-3 Business DaysToyota Sienna Windshield, Front Part Number: 56101-08101
$573.39 MSRP: $840.31You Save: $266.92 (32%)Ships in 1-3 Business DaysToyota Sienna Windshield, Front Part Number: 56101-08150
$562.72 MSRP: $824.67You Save: $261.95 (32%)Ships in 1-3 Business DaysToyota Sienna Windshield, Front Part Number: 56101-08081
$562.72 MSRP: $824.67You Save: $261.95 (32%)Ships in 1-3 Business DaysToyota Sienna Windshield, Front Part Number: 56101-08071
$585.99 MSRP: $858.77You Save: $272.78 (32%)Ships in 1-3 Business Days
Toyota Sienna Windshield, Front Part Number: 56101-08020-83
$586.94 MSRP: $860.17You Save: $273.23 (32%)Ships in 1-3 Business DaysToyota Sienna Windshield, Front Part Number: 56101-08040-83
$647.76 MSRP: $949.29You Save: $301.53 (32%)Ships in 1-3 Business DaysToyota Sienna Windshield, Front Part Number: 56101-08210
$708.34 MSRP: $1038.08You Save: $329.74 (32%)Ships in 1-3 Business DaysToyota Sienna Windshield, Front Part Number: 56101-08240
$724.35 MSRP: $1061.53You Save: $337.18 (32%)Ships in 1-3 Business DaysToyota Sienna Windshield, Front Part Number: 56101-08230
$724.35 MSRP: $1061.53You Save: $337.18 (32%)Ships in 1-3 Business DaysToyota Sienna Windshield, Front Part Number: 56101-08310
$811.29 MSRP: $1188.94You Save: $377.65 (32%)Ships in 1-3 Business DaysToyota Sienna Windshield, Front Part Number: 56101-08300
$811.29 MSRP: $1188.94You Save: $377.65 (32%)Ships in 1-3 Business DaysToyota Sienna Glass, Front Part Number: 56101-AE041
$824.91 MSRP: $1208.91You Save: $384.00 (32%)Ships in 1-3 Business DaysToyota Sienna Windshield, Front Part Number: 56101-08030-83
Toyota Sienna Windshield, Front Part Number: 56101-08010-83
Toyota Sienna Glass, Front Part Number: 56101-AE030
Toyota Sienna Windshield
Choose genuine Windshield that pass strict quality control tests. You can trust the top quality and lasting durability. Shopping for OEM Windshield for your Toyota Sienna? Our website is your one-stop destination. We stock an extensive selection of genuine Toyota Sienna parts. The price is affordable so you can save more. It only takes minutes to browse and find the exact fit. Easily add to cart and check out fast. Our hassle-free return policy will keep you stress-free. We process orders quickly for swift delivery. Your parts will arrive faster, so you can get back on the road sooner.
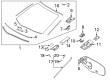
The Windshield installed on Toyota Sienna vehicles reflects the reliability and performance characteristics which define Toyota automotive products. The Windshield for the Sienna serves two critical functions because it ensures maximum visibility while safeguarding occupants from outside conditions to enhance safety with improved driving efficiency. A laminated safety glass construction enables the Windshield to reduce distortions so drivers can maintain clear vision during operation. The Windshield serves all Toyota Sienna models from the second and third generation periods to adapt to multiple owner needs. Maintaining the Sienna Windshield consistently remains vital since minimal damage to its surface can reduce visibility until replacement which typically starts at $110 but goes up to $140. The Toyota Sienna has received multiple reliability awards including the IIHS Top Safety Pick Award which underline the necessity of an exceptional Windshield for safety protection. The aerodynamic design in the automobile Windshield along with its air resistance minimizing capability stands out in the automotive world by boosting fuel efficiency. The Toyota car part serves as both an experience enhancer and a performance and safety statement by the automaker and stands as an essential feature for every model model.
Toyota Sienna Windshield Parts and Q&A
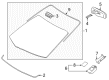
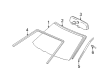
- Q: How to install the windshield glass on Toyota Sienna?A:First apply Primer G to the installation part of both stoppers in windshield glass NO.2 then place two replacement stoppers onto the glass. Install two fresh windshield glass NO.1 stoppers onto the vehicle body parts. Before installation apply Primer G to the adhesive portion of window glass adhesive dam and let it dry before placing a fresh dam around the glass through double-sided tape to spaces free of stoppers. Wipe the glass edge and contact points on the windshield moulding outer upper part with the brush or sponge set to spread Primer G on these areas before the wet time of 3 minutes. Use a knife to remove any rough stripping from the vehicle surface then wipe it clean with a shop rag. Apply a suction cup to put the glass in place to check for equal bubbles along the edge. Mark reference points and take the glass off. Apply Primer M to the visible vehicle surfaces and permit it to dry before using Primer G to coat the glass edges. Load sealer gun with adhesive 08850-00801 or equal substitute and apply it to the glass surface. Hold the glass level using its reference marks while applying low pressure along the rim around the stoppers to check if the installed vehicle body meets proper clearance. Use a scraper to carefully remove any extra adhesive from the front surface after gentle pressing while waiting for the necessary operational time before vehicle use. Proceed to remove the windshield moulding outside LH, install the windshield moulding outside RH, conduct a leak test after the adhesive hardens, seal any leaks with auto glass sealer, and complete the installation of the cowl top ventilator louver sub-assembly, front wiper arms, roof headlining assembly, inner rear view mirror assembly, sun roof opening trim moulding (if applicable), roof console box assembly, visor holder, assist grip sub-assembly, visor assemblies RH and LH, and front pillar garnishes RH and LH, followed by the front door opening trim Weather Strips RH and LH.
- Q: How to remove the windshield glass on Toyota Sienna?A:The windshield glass replacement process begins by taking out the front door opening trim Weather Strip LH and RH followed by the front pillar garnish LH and RH and the visor assembly LH and RH. Before proceeding with the windshield glass removal you must detach the assist grip sub-assembly as well as the visor holder together with the roof console box assembly and sunroof opening trim moulding and inner rear view mirror assembly. Start by taking away the roof headlining assembly followed by the front wiper arm head caps and both front wiper arms that exist on LH and RH sides. Take out the front fender to cowl side seals LH and RH together with the cowl top ventilator louver sub-assembly. The windshield moulding outer upper requires a knife cut with caution to prevent vehicle body damage while disconnecting the deicer connector if present. Narrow piano wire should be used to remove windshield glass by threading it between interior glass and the body of the vehicle before securely tying its ends to wooden blocks. Connect protective tape over the vehicle's exterior body before threading the plastic sheet between the piano wire and safety pad to stop them from getting damaged. Use the piano wire to pull the adhesive and disassemble the stoppers then use a suction cup to pull off the glass while preserving as much adhesive on the vehicle body. The entire windshield glass needs to be cleaned through scraping of defective stoppers and adhesive along with cleaning the external glass surface using white gasoline while maintaining a distance from the glasse surface during the process.


Related Toyota Sienna Parts
 Toyota Sienna Center Console Latch
 Toyota Sienna Windshield Washer Nozzle
 Toyota Sienna Wiper Arm
 Toyota Sienna Car Mirror
 Toyota Sienna Mirror Actuator
 Toyota Sienna Parking Assist Sensor
 Toyota Sienna Windshield Washer Fluid Reservoir
 Toyota Sienna Windshield Washer Pump
 Toyota Sienna Windshield Wiper
 Toyota Sienna Wiper Blade
 Toyota Sienna Wiper Linkage
 Toyota Sienna Wiper Motor