×
ToyotaParts- Hello
- Login or Register
- Quick Links
- Live Chat
- Track Order
- Parts Availability
- RMA
- Help Center
- Contact Us
- Shop for
- Toyota Parts
- Scion Parts
My Garage
My Account
Cart
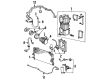
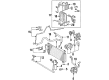
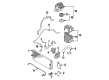
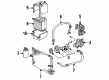
OEM Toyota A/C Clutch
Air Conditioning Clutch- Select Vehicle by Model
- Select Vehicle by VIN
Select Vehicle by Model
orMake
Model
Year
Select Vehicle by VIN
For the most accurate results, select vehicle by your VIN (Vehicle Identification Number).
222 A/C Clutches found

Toyota Compressor Pulley
Part Number: 88412-32030$528.66 MSRP: $774.76You Save: $246.10 (32%)Ships in 1-3 Business DaysProduct Specifications- Other Name: Rotor, Magnet Clutch; A/C Compressor Clutch; Rotor; Rotor Sub-Assembly, Magnet Clutch


Toyota Clutch
Part Number: 88411-20150$275.79 MSRP: $393.76You Save: $117.97 (30%)Ships in 1-3 Business DaysProduct Specifications- Other Name: Stator, Magnet Clutch; A/C Compressor Clutch; Stator Sub-Assembly, Magnet Clutch

Toyota Compressor Pulley
Part Number: 88412-12190$293.03 MSRP: $418.39You Save: $125.36 (30%)Ships in 1-3 Business DaysProduct Specifications- Other Name: Rotor, Magnet Clutch; A/C Compressor Clutch; Rotor; Rotor Sub-Assembly, Magnet Clutch

Toyota Clutch
Part Number: 88410-01020$120.54 MSRP: $170.65You Save: $50.11 (30%)Ships in 1-3 Business DaysProduct Specifications- Other Name: Clutch Assembly, Magnet; A/C Compressor Clutch
- Replaces: 88410-1A020, 88410-01021
Toyota Clutch Drive
Part Number: 88410-12270$123.62 MSRP: $175.00You Save: $51.38 (30%)Ships in 1-3 Business DaysProduct Specifications- Other Name: Clutch Assembly, Magnet; A/C Compressor Clutch; Clutch
Toyota Clutch Drive
Part Number: 88410-12240$133.94 MSRP: $189.61You Save: $55.67 (30%)Ships in 1-3 Business DaysProduct Specifications- Other Name: Clutch Assembly, Magnet; A/C Compressor Clutch; Clutch

Toyota Clutch Coil
Part Number: 88410-20200$123.62 MSRP: $175.00You Save: $51.38 (30%)Ships in 1-3 Business DaysProduct Specifications- Other Name: Clutch Assembly, Magnet; A/C Compressor Clutch; Clutch

Toyota Clutch
Part Number: 88410-14110$138.45 MSRP: $196.00You Save: $57.55 (30%)Ships in 1-3 Business DaysProduct Specifications- Other Name: A/C Compressor Clutch; Clutch Assembly, Magnet
Toyota Clutch
Part Number: 88410-12330$123.62 MSRP: $175.00You Save: $51.38 (30%)Ships in 1-3 Business DaysProduct Specifications- Other Name: Clutch Assembly, Magnet; A/C Compressor Clutch

Toyota Clutch
Part Number: 88410-02030$123.72 MSRP: $175.14You Save: $51.42 (30%)Ships in 1-3 Business DaysProduct Specifications- Other Name: Clutch Assembly, Magnet; A/C Compressor Clutch

Toyota Clutch & Pulley
Part Number: 88410-32200$172.73 MSRP: $227.00You Save: $54.27 (24%)Ships in 1-3 Business DaysProduct Specifications- Other Name: Clutch Assembly, Magnet; A/C Compressor Clutch; Clutch
 Product Specifications
- Other Name: Stator; A/C Compressor Clutch
- Replaces: 88411-32020, 88411-32021

 Product Specifications
- Other Name: Stator, Magnet Clutch; A/C Compressor Clutch
- Replaces: 88411-33010
- Product Specifications
- Other Name: Stator; A/C Compressor Clutch
- Replaces: 88411-32031
 Product Specifications
- Other Name: Clutch; A/C Compressor Clutch; Clutch Assembly, Magnet
- Replaces: 88410-01011
- Product Specifications
- Other Name: A/C Compressor Clutch; Clutch Assembly, Magnet
 Product Specifications
- Other Name: Clutch Assembly, Magnet; A/C Compressor Clutch
- Manufacturer Note: DEALER OPT
- Replaces: 88410-06030
- Product Specifications
- Other Name: Clutch Assembly, Magnet; A/C Compressor Clutch
- Manufacturer Note: W/PS & *BV
- Product Specifications
- Other Name: Clutch Assembly, Magnet; A/C Compressor Clutch; Clutch
 Product Specifications
- Other Name: Clutch Assembly, Magnet; A/C Compressor Clutch; Clutch
- Replaces: 88410-32040
| Page 1 of 12 |Next >
1-20 of 222 Results
Toyota A/C Clutch
OEM parts deliver unmatched quality you can rely on. They pass extensive quality control inspections. Toyota produces them to the official factory specifications. This process helps prevent defects and imperfections. So you can get exceptional lifespan and a flawless fit. Need new OEM Toyota A/C Clutch? You'll love our wide selection of genuine options. Shop in minutes and skip the hunt. Our prices are unbeatable, you'll save time and money. It's easy to shop and find the right piece. Our committed customer service team gives professional help from start to finish. Every part includes a manufacturer's warranty. We ship quickly, your parts will arrive fast at your door.
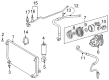
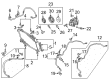
Toyota A/C Clutch is a system that connects the engine to the compressor just in cases when cold air is required by the driver. Toyota expanded to a 1937 startup and a global power by allowing assembly lines to halt on a dime, stamp out flaws instantly, and pursue waste like rabbits fleeing in a field do. Toyota hones that culture with Hybrid Synergy Drive and TNGA platform, reducing centers of gravity, stiffening bodies, and pinching every watt and drop of the car to turn smoother and cut fuel bills. Hybrids such as the Toyota RAV4 Plug-in Hybrid cover more than 40 electric miles and still launch fast, showing efficiency can coexist with pace and can run without glancing up at the charge gauges. Toyota loyalty is due to the factories boring reliability into every bolt, producing cars that shake off potholes, sweltering summers, and long commutes and gulp less and wear longer. A/C Clutch allows the pulley to be seized by the electromagnet when you press the snowflake button, supplying the compressor while the belt continues to rotate. A/C Clutch is subjected to heat and crazy rpm movement, thus the coil is heat resistant and bearing shoulders stay perpendicular to side load, and its air gap is clean which ensures it engages clean or the pulley will simply skate and burn. A/C Clutch signals a problem with chirps and slips, and it signifies damage to the compressor and increased fuel consumption. A/C Clutch replacement restores engagement to a nominal level, reduces drag on the engine during idle operation, and maintains chilling of the cabin when required.
Toyota A/C Clutch Parts and Q&A
- Q: How to service and repair the A/C Clutch on Toyota 4Runner?A:The first step to replace HVAC system refrigerant lines requires that the refrigeration system discharges its current refrigerant. The next step involves replacing the damaged tube or hose after immediately sealing open system openings to block system entry by moisture and dirt. Use a torque wrench to tighten the connections following the specified value but stay below this mark. The refrigeration system requires evacuation followed by refrigerant charging with 500 plus or minus 30 g (17.64 plus or minus 1.06 oz.). The operation of the air conditioning system must be checked after the team uses a gas leak detector to inspect for refrigerant leakage.
- Q: How to service and repair the A/C Clutch on Toyota Tacoma?A:Begin compressor and magnetic clutch repair services after running the engine idle with A/C activated for ten minutes followed by engine stoppage to disconnect the negative (-) terminal cable from the battery. Discharge the system refrigerant before removing engine under cover and unfastening the suction and discharge hoses through 2 bolt removal steps alongside fitment of caps to stop system entry of moisture or dirt. Begin by first removing the compressor through fan shroud detachment followed by drive belt loosening and removing compressor mounting bolts. To remove the compressor bracket use four bolts for the 2RZ-FE and 3RZ-FE engine models but five bolts are required for the installation of the 5VZ-FE engine model. The installation process requires placement of compressor bracket bolts according to specified number before torque application reaches 47 N.m (475 kgf.cm, 34 ft.lbf). The compressor requires four bolts for installation which should be torqued to 25 N.m (250 kgf.cm, 18 ft.lbf) before connector attachment. Reinstall the discharge and suction hoses while torquing 2 bolts to 10 N.m (100 kgf.cm, 7 ft.lbf) after applying compressor oil on fresh O-ring pair for hose sealing. Reinstall the engine under cover after drive belt installation and check. The 5VZ-FE engine PS pump set bolt requires torquing to 43 N.m (440 kgf.cm, 32 ft.lbf) using the other parts. Reconnect the battery negative terminal while evacuating the refrigeration system and fill it with 600 plus or minus 50 g of refrigerant (21.16 plus or minus 1.76 oz). During the last step of the procedure you need to use a gas leak detector to check refrigerant leakage while also verifying joint torque setting before testing A/C functionality.


Related Toyota Parts
 Toyota Cabin Air Filter
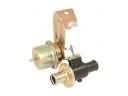 Toyota Heater Control Valve
 Toyota Ambient Temperature Sensor
 Toyota Blend Door Actuator
 Toyota A/C Compressor
 Toyota A/C Compressor Cut-Out Switches
 Toyota A/C Expansion Valve
 Toyota A/C Hose
 Toyota A/C Service Cap
 Toyota A/C System Valve Core
 Toyota Blower Control Switches
 Toyota HVAC Pressure Switch