×
ToyotaParts- Hello
- Login or Register
- Quick Links
- Live Chat
- Track Order
- Parts Availability
- RMA
- Help Center
- Contact Us
- Shop for
- Toyota Parts
- Scion Parts
My Garage
My Account
Cart
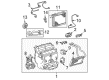
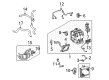
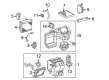
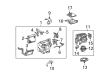
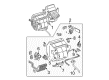
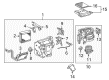
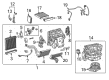
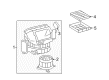
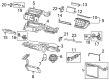
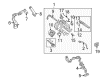
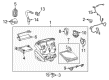
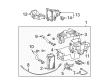
OEM Toyota Blend Door Actuator
Air Blend Door Actuator- Select Vehicle by Model
- Select Vehicle by VIN
Select Vehicle by Model
orMake
Model
Year
Select Vehicle by VIN
For the most accurate results, select vehicle by your VIN (Vehicle Identification Number).
173 Blend Door Actuators found


Toyota Servo, Driver Side Part Number: 87106-0C070
$135.47 MSRP: $191.77You Save: $56.30 (30%)Product Specifications- Other Name: Servo Sub-Assembly, Damper; HVAC Air Inlet Door Actuator, Left; Blend/Heater Blend Door Actuator
- Position: Driver Side


Toyota Actuator, Driver Side Part Number: 87106-07120
$148.04 MSRP: $209.57You Save: $61.53 (30%)Ships in 1-3 Business DaysProduct Specifications- Other Name: Servo Sub-Assembly, Damper; HVAC Air Inlet/Blend Door Actuator, Front/Left; Servo; Damper Servo Sub-Assembly, Air Conditioner Radiator; Servo Sub-Assembly, Damper(For Airmix)
- Position: Driver Side


Toyota Servo Sub-Assembly, Damper(For Recirculation & Fresh), Front Part Number: 87106-07140
$152.50 MSRP: $215.89You Save: $63.39 (30%)Ships in 1-2 Business DaysProduct Specifications- Other Name: Servo Sub-Assembly, Damper; Recirculation; Blower; HVAC Heater Blend Door Actuator
- Position: Front


Toyota Servo Part Number: 87106-35120
$164.96 MSRP: $233.52You Save: $68.56 (30%)Ships in 1-3 Business DaysProduct Specifications- Other Name: Servo Sub-Assembly, Damper; HVAC Air Inlet Door Actuator; HVAC Heater Blend Door Actuator; Servo Sub-Assembly, Damper(For Mode)


Toyota Servo, Front Passenger Side Part Number: 87106-08060
$168.84 MSRP: $239.01You Save: $70.17 (30%)Ships in 1 Business DayProduct Specifications- Other Name: Servo Sub-Assembly, Damper; HVAC Blend Door Actuator, Front, Front Right; HVAC Heater Blend Door Actuator; Servo Sub-Assembly, Damper(For Airmix)
- Position: Front Passenger Side


Toyota Servo, Passenger Side Part Number: 87106-35180
$218.31 MSRP: $311.70You Save: $93.39 (30%)Ships in 1-2 Business DaysProduct Specifications- Other Name: Servo Sub-Assembly, Damper; HVAC Air Inlet Door Actuator, Right; HVAC Heater Blend Door Actuator
- Position: Passenger Side
- Replaces: 87106-35140


Toyota Servo, Front Driver Side Part Number: 87106-08070
$260.02 MSRP: $371.25You Save: $111.23 (30%)Ships in 1-2 Business DaysProduct Specifications- Other Name: Servo Sub-Assembly, Damper; HVAC Blend Door Actuator, Front Left; HVAC Heater Blend Door Actuator; Servo Sub-Assembly, Damper(For Airmix)
- Position: Front Driver Side

Toyota Servo, Front Driver Side Part Number: 87106-0C140
$135.47 MSRP: $191.77You Save: $56.30 (30%)Ships in 1-3 Business DaysProduct Specifications- Other Name: Servo Sub-Assembly, Damper; HVAC Air Inlet Door Actuator, Front, Left; HVAC Blend/Heater Blend Door Actuator; Damper
- Position: Front Driver Side


Toyota Servo Sub-Assembly, Damper(For Recirculation) Part Number: 87106-33270
$135.47 MSRP: $191.77You Save: $56.30 (30%)Ships in 1 Business DayProduct Specifications- Other Name: Servo Sub-Assembly, Damper; HVAC Heater Blend Door Actuator


Toyota Damper Servo Sub-Assembly, Air Conditioner Radiator, Front Part Number: 87106-50550
$141.93 MSRP: $200.92You Save: $58.99 (30%)Ships in 1-3 Business DaysProduct Specifications- Other Name: Servo Sub-Assembly, Damper; Damper Servo Sub-Assembly, Blower; HVAC Heater Blend Door Actuator
- Position: Front


Toyota Servo Sub-Assembly, Damper(For Blower) Part Number: 87106-35150
$169.07 MSRP: $239.34You Save: $70.27 (30%)Ships in 1-2 Business DaysProduct Specifications- Other Name: Servo Sub-Assembly, Damper; HVAC Heater Blend Door Actuator


Toyota Servo, Driver Side Part Number: 87106-35170
$191.28 MSRP: $273.11You Save: $81.83 (30%)Ships in 1-2 Business DaysProduct Specifications- Other Name: Servo Sub-Assembly, Damper; HVAC Air Inlet Door Actuator, Left; HVAC Heater Blend Door Actuator
- Position: Driver Side
- Replaces: 87106-35130


Toyota Servo, Passenger Side Part Number: 87106-0E140
$261.06 MSRP: $372.74You Save: $111.68 (30%)Ships in 1-3 Business DaysProduct Specifications- Other Name: Servo Sub-Assembly, Damper; HVAC Air Inlet, Front; Blend, Right; Defrost Mode; Heater Blend Actuator; Damper Servo Sub-Assembly, Air Conditioner Radiator
- Position: Passenger Side
- Replaces: 87106-07110


Toyota Servo Part Number: 87106-04040
$100.95 MSRP: $141.71You Save: $40.76 (29%)Ships in 1-3 Business DaysProduct Specifications- Other Name: Servo Sub-Assembly, Damper; HVAC Blend Door; HVAC Heater Blend Door Actuator; Damper Servo Sub-Assembly, Air Conditioner Radiator; Servo Sub-Assembly, Damper(For Airmix)


Toyota Servo, Rear Part Number: 87106-0C130
$135.47 MSRP: $191.77You Save: $56.30 (30%)Ships in 1-3 Business DaysProduct Specifications- Other Name: Servo Sub-Assembly, Damper; HVAC Air Control Motor, Rear; Air Inlet Door Actuator, Rear; Blend Door Actuator; Damper Servo Sub-Assembly, Rear Cooling Unit; Servo Sub-Assembly, Damper(For Airmix Rear)
- Position: Rear


Toyota Door Actuator, Driver Side Part Number: 87106-02200
$131.82 MSRP: $186.61You Save: $54.79 (30%)Ships in 1-3 Business DaysProduct Specifications- Other Name: Servo Sub-Assembly, Damper; HVAC Air Inlet Door Actuator, Left; HVAC Blend/Heater Blend Door Actuator; Mode Motor; Actuator; Servo; Damper Servo Sub-Assembly, Air Conditioner Radiator; Servo Sub-Assembly, Damper(For Mode)
- Position: Driver Side
- Replaces: 87106-42100


Toyota Servo Part Number: 87106-04050
$143.34 MSRP: $202.91You Save: $59.57 (30%)Ships in 1-3 Business DaysProduct Specifications- Other Name: Servo Sub-Assembly, Damper; HVAC Blend Door; HVAC Heater Blend Door Actuator; Servo Sub-Assembly, Damper(For Airmix); Servo Sub-Assembly, Damper(For Mode)
- Manufacturer Note: AIR CONDITIONER-WITH


Toyota Damper Servo Sub-Assembly, Air Conditioner Radiator Part Number: 87106-12170
$155.32 MSRP: $219.88You Save: $64.56 (30%)Ships in 1 Business DayProduct Specifications- Other Name: Servo Sub-Assembly, Damper; Servo Sub-Assembly, Damper(For Airmix); HVAC Heater Blend Door Actuator
- Position: Passenger Side


Toyota Servo Part Number: 87106-04030
$164.25 MSRP: $232.52You Save: $68.27 (30%)Product Specifications- Other Name: Servo Sub-Assembly, Damper; HVAC Air Inlet Door Actuator; HVAC Blend Door; HVAC Heater Blend Door Actuator
- Manufacturer Note: NO.2


Toyota Servo Part Number: 87106-35070
$187.55 MSRP: $267.78You Save: $80.23 (30%)Ships in 1-3 Business DaysProduct Specifications- Other Name: Servo Sub-Assembly, Damper; HVAC Air Inlet Door Actuator; HVAC Heater Blend Door Actuator
- Manufacturer Note: NO.2
| Page 1 of 9 |Next >
1-20 of 173 Results
Toyota Blend Door Actuator
OEM parts deliver unmatched quality you can rely on. They pass extensive quality control inspections. Toyota produces them to the official factory specifications. This process helps prevent defects and imperfections. So you can get exceptional lifespan and a flawless fit. Need new OEM Toyota Blend Door Actuator? You'll love our wide selection of genuine options. Shop in minutes and skip the hunt. Our prices are unbeatable, you'll save time and money. It's easy to shop and find the right piece. Our committed customer service team gives professional help from start to finish. Every part includes a manufacturer's warranty. We ship quickly, your parts will arrive fast at your door.
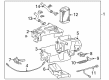
Cabin air temperature is maintained by the Toyota Blend Door Actuator, which diverts hot and cold air. Toyota was the first to apply lean manufacturing that reduces waste and allows assembly lines to correct hiccups before they increase. Toyota refined Hybrid Synergy Drive, introduced plug-in features, and expanded electric range without losing reliability. Toyota developed the versatile TNGA platform, which places the engines lower, enhances handling, and integrates greater crash safety. Toyota maintains loyalty through a combination of low fuel figures with rust and long-mile shrugging bodies. Drivers believe in the brand since it demonstrates that effectiveness, robustness, and daily fun can pull up next to each other without any dramas. The Blend Door Actuator is an internal part that rotates a geared shaft, opening or closing a set of airflow flaps to combine evaporator chill and heater-core warmth in precisely the position you select when you turn the knob. A fitted healthy Blend Door Actuator keeps undesirable engine-bay heat out during summer crawls. In case of a failure of the Blend Door Actuator, vents emit warm air with a blast that kills concentration and welcomes fog on the window. The Blend Door Actuator is made with hardened gears and an electric motor with a low-draw tap, which works perfectly quiet over the years.
Toyota Blend Door Actuator Parts and Q&A
- Q: What is the role of the Blend Door Actuator in the heating and air conditioning system on Toyota Corolla?A:A major part of heating and air conditioning systems operates using the air door actuator which has another name as air inlet control servo motor. This system functions to control airflow into the passenger compartment so cabin condition remains ideal. The successful maintenance of climate control system efficiency depends heavily on correct service and repair of the actuator.
- Q: How to Install the Blend Door Actuator for an Automatic Air Conditioning System on Toyota RAV4?A:The first step in Air Outlet Control Servo Motor installation for the Automatic Air Conditioning System involves following the direction provided in Housing Assembly HVAC service and repair reassembly instructions for installing the air outlet control servo motor. The next procedure requires placement of the air conditioning radiator based on the Housing Assembly HVAC service and repair installation guidelines.


Related Toyota Parts
 Toyota Cabin Air Filter
 Toyota Blower Motor Resistor
 Toyota Heater Control Valve
 Toyota A/C Compressor Clutch
 Toyota A/C Compressor
 Toyota A/C Accumulator
 Toyota A/C Compressor Cut-Out Switches
 Toyota A/C Expansion Valve
 Toyota A/C Service Cap
 Toyota A/C System Valve Core
 Toyota HVAC Pressure Switch
 Toyota HVAC Relay
Browse Toyota Blend Door Actuator by Models
Tacoma 4Runner Camry Tundra Corolla RAV4 Highlander Prius Sienna Land Cruiser FJ Cruiser Sequoia Avalon Celica Supra Yaris Matrix Solara Venza GR86 Echo C-HR Cressida Grand Highlander Prius C Prius Prime bZ4X Corolla Cross Corolla iM Crown Crown Signia GR Corolla Mirai Prius V Yaris iA Prius Plug-In GR Supra Prius AWD-e RAV4 Prime