×
ToyotaParts- Hello
- Login or Register
- Quick Links
- Live Chat
- Track Order
- Parts Availability
- RMA
- Help Center
- Contact Us
- Shop for
- Toyota Parts
- Scion Parts
My Garage
My Account
Cart
OEM Toyota A/C Condenser
Air Conditioning Condenser- Select Vehicle by Model
- Select Vehicle by VIN
Select Vehicle by Model
orMake
Model
Year
Select Vehicle by VIN
For the most accurate results, select vehicle by your VIN (Vehicle Identification Number).
226 A/C Condensers found


Toyota Condenser Assembly Part Number: 88460-35380
$281.80 MSRP: $402.35You Save: $120.55 (30%)Ships in 1-3 Business DaysProduct Specifications- Other Name: A/C Condenser; Condenser; Condenser Assembly, Cooler


Toyota Condenser Assembly Part Number: 884A0-12030
$281.34 MSRP: $401.70You Save: $120.36 (30%)Ships in 1-3 Business DaysProduct Specifications- Other Name: Condenser Assembly, Support; A/C Condenser; Condenser; Condenser Assembly, Cooler
- Replaces: 884A0-02090


Toyota Condenser Assembly Part Number: 884A0-33020
$289.61 MSRP: $413.49You Save: $123.88 (30%)Ships in 1-3 Business DaysProduct Specifications- Other Name: Condenser Assembly, Support; A/C Condenser; Condenser; Condenser Assembly, Cooler
- Manufacturer Note: REFER86-17:PNC86466D


Toyota Condenser Assembly Part Number: 88460-0R030
$347.47 MSRP: $496.11You Save: $148.64 (30%)Ships in 1-3 Business DaysProduct Specifications- Other Name: A/C Condenser; Condenser; Condenser Assembly, Cooler


Toyota Condenser Assembly Part Number: 88460-0E070
$366.41 MSRP: $536.97You Save: $170.56 (32%)Ships in 1-2 Business DaysProduct Specifications- Other Name: A/C Condenser; Condenser; Condenser Assembly, Cooler


Toyota Condenser Assembly Part Number: 88460-60903
$371.05 MSRP: $543.79You Save: $172.74 (32%)Ships in 1-3 Business DaysProduct Specifications- Other Name: Condenser, Packed Wi; A/C Condenser; Condenser; Condenser Assembly, Cooler
- Replaces: 88460-60271, 88460-60272


Toyota Condenser Part Number: 88450-02330
$269.45 MSRP: $384.71You Save: $115.26 (30%)Ships in 1-3 Business DaysProduct Specifications- Other Name: Condenser Assembly, With Receiver; A/C Condenser; Condenser Assembly, W/Receiver


Toyota Condenser Assembly Part Number: 88460-0E051
$310.02 MSRP: $442.64You Save: $132.62 (30%)Ships in 1-3 Business DaysProduct Specifications- Other Name: A/C Condenser; Condenser; Condenser Assembly, Cooler


Toyota Condenser Assembly Part Number: 88460-60400
$310.34 MSRP: $443.10You Save: $132.76 (30%)Ships in 1-3 Business DaysProduct Specifications- Other Name: A/C Condenser; Condenser; Condenser Assembly, Cooler


Toyota Condenser Assembly Part Number: 884A0-06020
$294.73 MSRP: $420.81You Save: $126.08 (30%)Ships in 1-2 Business DaysProduct Specifications- Other Name: Condenser Assembly, Support; A/C Condenser; Condenser; Condenser Assembly, Cooler


Toyota Condenser Assembly Part Number: 88460-AZ016
$147.31 MSRP: $208.20You Save: $60.89 (30%)Ships in 1-3 Business DaysProduct Specifications- Other Name: A/C Condenser


Toyota Condenser Assembly Part Number: 88350-0C010
$1193.67 MSRP: $1749.34You Save: $555.67 (32%)Ships in 1-3 Business DaysProduct Specifications- Other Name: Unit Assembly, Cooler; A/C Condenser; Condenser


Toyota Condenser Part Number: 88460-42090
$128.76 MSRP: $181.97You Save: $53.21 (30%)Ships in 1-3 Business DaysProduct Specifications- Other Name: Condenser Assembly; A/C Condenser; Condenser Assembly, Cooler
- Replaced by: 88460-AZ031


Toyota Condenser Assembly Part Number: 88460-AZ007
$163.98 MSRP: $231.77You Save: $67.79 (30%)Ships in 1-3 Business DaysProduct Specifications- Other Name: A/C Condenser


Toyota Condenser Assembly Part Number: 88460-AZ004
$213.56 MSRP: $304.42You Save: $90.86 (30%)Ships in 1-3 Business DaysProduct Specifications- Other Name: A/C Condenser


Toyota Condenser Part Number: 88460-52130
$248.28 MSRP: $354.50You Save: $106.22 (30%)Ships in 1-3 Business DaysProduct Specifications- Other Name: Condenser Assembly; A/C Condenser; Condenser Assembly, Cooler
- Replaces: 88460-52090


Toyota Condenser Part Number: 88450-47020
$248.87 MSRP: $355.32You Save: $106.45 (30%)Ships in 1-3 Business DaysProduct Specifications- Other Name: Condenser Assembly, With Receiver; A/C Condenser; Condenser Assembly, W/Receiver


Toyota Condenser Part Number: 88460-47180
$251.47 MSRP: $359.03You Save: $107.56 (30%)Ships in 1-2 Business DaysProduct Specifications- Other Name: Condenser Assembly; A/C Condenser; Condenser Assembly, Cooler


Toyota Condenser Part Number: 88460-52170
$257.57 MSRP: $367.75You Save: $110.18 (30%)Ships in 1-3 Business DaysProduct Specifications- Other Name: Condenser Assembly; A/C Condenser; Condenser Assembly, Cooler


Toyota Condenser Assembly Part Number: 88450-12280
$260.25 MSRP: $371.56You Save: $111.31 (30%)Ships in 1-3 Business DaysProduct Specifications- Other Name: Condenser Assembly, With Receiver; A/C Condenser; Condenser; Condenser Assembly, W/Receiver
| Page 1 of 12 |Next >
1-20 of 226 Results
Toyota A/C Condenser
OEM parts deliver unmatched quality you can rely on. They pass extensive quality control inspections. Toyota produces them to the official factory specifications. This process helps prevent defects and imperfections. So you can get exceptional lifespan and a flawless fit. Need new OEM Toyota A/C Condenser? You'll love our wide selection of genuine options. Shop in minutes and skip the hunt. Our prices are unbeatable, you'll save time and money. It's easy to shop and find the right piece. Our committed customer service team gives professional help from start to finish. Every part includes a manufacturer's warranty. We ship quickly, your parts will arrive fast at your door.
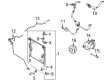
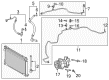
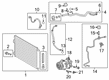
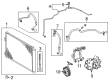
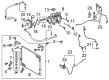
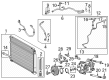
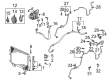
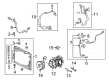
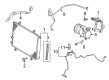
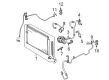
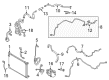
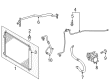
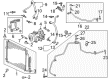
Toyota A/C Condenser converts hot refrigerant gas to cool liquid which keeps cabin temperatures cool. Toyota has created a reputation based on lean manufacturing that reduces wastage and rewards fast problem solving. Pilots such as how Toyota hybrids go as far as two gallons, combining fuel efficiency with a powerful surge of acceleration. The new TNGA system hardens the bodies, reduces the centers of gravity, and improves the cornering behavior of Toyota vehicles. Even the plug-in RAV4 demonstrates that Toyota does not abandon everyday utility to go to long electric range. The durability over decades ensures that values remain high hence wallets relax. The simple controls are lauded by owners, along with the smooth ride that indignantly ignores uneven roads. The spirit of continuous improvement makes the company ethos, which is why updates are implemented in a short period rather than undergo complete redesign. The cycle of small, continuous gains continues to keep showrooms busy and loyalties firm. The A/C Condenser is before the radiator with its aluminum tubes and fins releasing heat to the engine bay as the pressurized refrigerant flows through and loses its energy until vapor collapses into high-pressure liquid that flows into the expansion valve. Since air flow never ceases to creep in traffic or maneuver through highways, the A/C Condenser maintains a steady pressure in the system preventing the compressor from overworking and conserving fuel during hot days. Basic design that remains constant over the generations implies that the A/C Condenser is interchangeable across a wide range of models without any compromises to the cooling requirements. Frequent contact with the grit on the road prompted coating of greater thickness, thus the A/C Condenser is resistant to corrosion and will not leak a drop in miles.
Toyota A/C Condenser Parts and Q&A
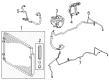
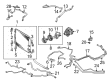
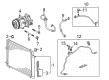
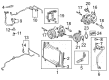
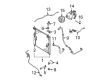
- Q: How to disassemble an A/C condenser on Toyota 4Runner?A:The air conditioning condenser disassembly process starts with hexagon wrench 14 mm (0.55 in.) removal of cooler dryer components including its cap and filter from the modulator. Start by taking the O-ring off the cap followed by employing needle nose pliers to remove the cooler dryer.
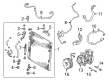
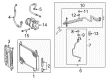
- Q: How to install an A/C Condenser and its related components on Toyota Tacoma?A:The proper installation of the cooler condenser begins by engaging the claw to attach the condenser upper bracket LH which should be followed by the condenser upper bracket RH before installing the condenser lower bracket LH and finally the condenser lower bracket RH. Install the condenser lower brackets on top of the radiator lower supports while applying torque to 9.0 Nm (92 kgf-cm and 80 in-lbf) to each bolt. When working with the air conditioning tube assembly remove all vinyl tape from both the pipe and the cooler condenser assembly connect point. Next apply sufficient RL-897 (or equivalent) compressor oil to the new seal washer and pipe joint fitting surface. Finally secure the seal washer onto the air conditioning tube assembly then join it to the cooler condenser assembly using a bolt at 7.5 Nm (76 kgf-cm, 66 in-lbf). To install the discharge hose sub-assembly remove the attached vinyl tape from both hose ends and the connecting part of the cooler condenser assembly. Then apply sufficient compressor oil (RL-897 or equivalent) to a new seal washer and the fitting surface of the hose joint. Afterward install the seal washer onto the discharge hose sub-assembly and attach it to the cooler condenser assembly with a bolt that requires 7.5 Nm (76 kgf-cm, 66 in-lbf) torque. The radiator assembly installation must begin with 2TR-FE and 1GR-FE engines while the fan shroud installation occurs next prior to finishing with the radiator support to frame seal LH installation for both engine types. After installation of the radiator grille you should connect the cable to the negative terminal with a torque of 3.9 Nm (40 kgf-cm, 35 in-lbf). Finally, add the required amount of engine coolant to both 2TR-FE and 1GR-FE engines. The service should inspect cooling system fluid for 2TR-FE and 1GR-FE engines then add refrigerant followed by engine heating and final refrigerant leak inspection.


Related Toyota Parts
 Toyota Cabin Air Filter
 Toyota Blower Motor
 Toyota Blower Motor Resistor
 Toyota A/C Compressor Clutch
 Toyota Ambient Temperature Sensor
 Toyota Blend Door Actuator
 Toyota Evaporator
 Toyota Heater Core
 Toyota A/C Compressor Cut-Out Switches
 Toyota A/C Expansion Valve
 Toyota A/C Service Cap
 Toyota A/C System Valve Core
Browse Toyota A/C Condenser by Models
Tacoma 4Runner Camry Tundra Corolla RAV4 Highlander Prius Sienna Land Cruiser Pickup FJ Cruiser 86 Sequoia T100 Avalon Celica Supra Yaris Matrix MR2 Solara Venza GR86 Echo C-HR Cressida Grand Highlander Paseo Previa Prius C Prius Prime Corolla Cross Corolla iM Crown Crown Signia GR Corolla Mirai MR2 Spyder Prius V Starlet Tercel Van Yaris iA Prius Plug-In GR Supra Prius AWD-e RAV4 Prime