×
ToyotaParts- Hello
- Login or Register
- Quick Links
- Live Chat
- Track Order
- Parts Availability
- RMA
- Help Center
- Contact Us
- Shop for
- Toyota Parts
- Scion Parts
My Garage
My Account
Cart
OEM Toyota Blower Motor
A/C Heater Blower Motor- Select Vehicle by Model
- Select Vehicle by VIN
Select Vehicle by Model
orMake
Model
Year
Select Vehicle by VIN
For the most accurate results, select vehicle by your VIN (Vehicle Identification Number).
200 Blower Motors found


Toyota Blower Motor, Front Part Number: 87103-0C051
$152.86 MSRP: $216.39You Save: $63.53 (30%)Product Specifications- Other Name: Motor Sub-Assembly, Blower; HVAC Blower Motor Assembly, Front; Blower Assembly; Fan & Motor; Motor Sub-Assembly, Blower W/Fan; HVAC Blower Motor
- Position: Front
- Replaces: 87103-0C050


Toyota Blower Motor Part Number: 87103-0C010
$88.27 MSRP: $123.90You Save: $35.63 (29%)Ships in 1-3 Business DaysProduct Specifications- Other Name: Motor Sub-Assembly, Blower; HVAC Blower Motor Assembly; Blower Assembly; Motor Sub-Assembly, Heater Blower, W/Fan; HVAC Blower Motor


Toyota Blower Motor Part Number: 87103-60400
$154.74 MSRP: $219.05You Save: $64.31 (30%)Ships in 1-3 Business DaysProduct Specifications- Other Name: Motor Sub-Assembly, Blower; HVAC Blower Motor Assembly; Blower Assembly; Fan & Motor; Motor Sub-Assembly, Blower W/Fan; HVAC Blower Motor


Toyota Blower Motor Part Number: 87103-35022
$195.36 MSRP: $278.93You Save: $83.57 (30%)Ships in 1-2 Business DaysProduct Specifications- Other Name: Motor Sub-Assembly, Blower; HVAC Blower Motor Assembly; Blower Assembly; Fan & Motor; Motor Sub-Assembly, Heater Blower, W/Fan; HVAC Blower Motor
- Replaces: 87103-35021, 87103-35020


Toyota Blower Motor Part Number: 87103-0C040
$151.45 MSRP: $214.39You Save: $62.94 (30%)Product Specifications- Other Name: Motor Sub-Assembly, Blower; HVAC Blower Motor; Blower Assembly; Motor Sub-Assembly, Blower W/Fan


Toyota Blower Motor Part Number: 87103-02200
$138.64 MSRP: $196.26You Save: $57.62 (30%)Ships in 1-3 Business DaysProduct Specifications- Other Name: Motor Sub-Assembly, Blower; HVAC Blower Motor Assembly; Blower Assembly; Fan & Motor; Motor Sub-Assembly, Blower W/Fan; HVAC Blower Motor
- Manufacturer Note: AIR CONDITIONER-MANUAL
- Replaces: 87103-02280, 87103-42090


Toyota Motor Sub-Assembly, Blower W/Fan, Front Part Number: 87103-0E040
$150.39 MSRP: $212.89You Save: $62.50 (30%)Ships in 1-3 Business DaysProduct Specifications- Other Name: Motor Sub-Assembly, Blower; HVAC Blower Motor; Blower Motor
- Position: Front
- Replaces: 87103-48080, 87103-07040


Toyota Blower Motor, Front Part Number: 87103-60481
$176.95 MSRP: $252.65You Save: $75.70 (30%)Product Specifications- Other Name: Motor Sub-Assembly, Blower; HVAC Blower Motor Assembly, Front; HVAC Blower Motor, Front; Fan & Motor; Motor Sub-Assembly, Blower W/Fan
- Position: Front
- Replaces: 87103-60480, 87103-60390


Toyota Blower Motor, Rear Part Number: 87103-0C061
$151.21 MSRP: $214.06You Save: $62.85 (30%)Ships in 1-3 Business DaysProduct Specifications- Other Name: Motor Sub-Assembly, Blower; HVAC Blower Motor Assembly, Rear; Blower Assembly; Motor Sub-Assembly, Blower W/Fan(For Rear); HVAC Blower Motor
- Position: Rear
- Replaces: 87103-0C060


Toyota Blower Motor Part Number: 87103-35070
$178.58 MSRP: $254.97You Save: $76.39 (30%)Ships in 1-3 Business DaysProduct Specifications- Other Name: Motor Sub-Assembly, Blower; HVAC Blower Motor Assembly; Blower Assembly; Fan & Motor; Motor Sub-Assembly, Blower W/Fan; HVAC Blower Motor


Toyota Blower Motor Part Number: 87103-04050
$53.17 MSRP: $74.00You Save: $20.83 (29%)Product Specifications- Other Name: Motor Sub-Assembly, Blower; HVAC Blower Motor Assembly; Motor Sub-Assembly, Blower W/Fan


Toyota Blower Motor Part Number: 87103-42020
$184.99 MSRP: $264.12You Save: $79.13 (30%)Ships in 1-2 Business DaysProduct Specifications- Other Name: Motor Sub-Assembly, Blower; HVAC Blower Motor Assembly; Blower Assembly; Fan & Motor; Motor; Motor Sub-Assembly, Heater Blower, W/Fan; HVAC Blower Motor
- Replaces: 87103-17020, 87103-89101, 87103-04021


Toyota Blower Motor, Front Part Number: 87103-0E090
$205.03 MSRP: $292.73You Save: $87.70 (30%)Ships in 1-2 Business DaysProduct Specifications- Other Name: Motor Sub-Assembly, Blower; HVAC Blower Motor Assembly, Front; Fan & Motor; Motor Sub-Assembly, Blower W/Fan
- Position: Front
- Replaces: 87103-58080


Toyota Blower Motor, Upper Part Number: SU003-02079
$130.75 MSRP: $172.14You Save: $41.39 (25%)Ships in 1-3 Business DaysProduct Specifications- Other Name: Motor Assembly; HVAC Blower Motor Housing, Upper; HVAC Blower Motor; Motor Sub-Assembly, Blower W/Fan
- Position: Upper


Toyota Blower Motor Part Number: 87103-04044
$129.94 MSRP: $183.95You Save: $54.01 (30%)Product Specifications- Other Name: Motor Sub-Assembly, Blower; HVAC Blower Motor; Blower Assembly; Motor Sub-Assembly, Blower W/Fan
- Replaces: 87103-04040, 87103-04041, 87103-04042, 87103-04043


Toyota Blower Motor Part Number: 87103-42101
$163.55 MSRP: $231.52You Save: $67.97 (30%)Ships in 1 Business DayProduct Specifications- Other Name: Motor Sub-Assembly, Blower; HVAC Blower Motor Assembly; Blower Assembly; Fan & Motor; Motor Sub-Assembly, Blower W/Fan; HVAC Blower Motor
- Replaces: 87103-42100


Toyota Blower Motor, Front Part Number: 87103-0C022
$179.63 MSRP: $256.48You Save: $76.85 (30%)Product Specifications- Other Name: Motor Sub-Assembly, Blower; HVAC Blower Motor Assembly; HVAC Blower Motor, Front; Blower Assembly; Motor Sub-Assembly, Heater Blower, W/Fan; HVAC Blower Motor
- Position: Front
- Replaces: 87103-0C020


Toyota Blower Motor Part Number: 87103-0R010
$163.55 MSRP: $231.52You Save: $67.97 (30%)Ships in 1-3 Business DaysProduct Specifications- Other Name: Motor Sub-Assembly, Blower; HVAC Blower Motor Assembly; Blower Assembly; Motor Sub-Assembly, Blower W/Fan; HVAC Blower Motor


Toyota Blower Motor Part Number: 87103-06021
$197.34 MSRP: $281.76You Save: $84.42 (30%)Ships in 1-3 Business DaysProduct Specifications- Other Name: Motor Sub-Assembly, Blower; HVAC Blower Motor Assembly; Blower Assembly; Fan & Motor; Motor Sub-Assembly, Blower W/Fan; HVAC Blower Motor
- Replaces: 87103-06020


Toyota Blower Motor, Front Part Number: 87103-60250
$190.70 MSRP: $272.27You Save: $81.57 (30%)Ships in 1-2 Business DaysProduct Specifications- Other Name: Motor Sub-Assembly, Blower; HVAC Blower Motor Assembly, Front; Fan & Motor; Motor Sub-Assembly, Heater Blower, W/Fan
- Position: Front
- Replaces: 87103-50050
| Page 1 of 10 |Next >
1-20 of 200 Results
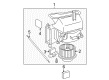
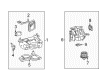
Toyota Blower Motor
OEM parts deliver unmatched quality you can rely on. They pass extensive quality control inspections. Toyota produces them to the official factory specifications. This process helps prevent defects and imperfections. So you can get exceptional lifespan and a flawless fit. Need new OEM Toyota Blower Motor? You'll love our wide selection of genuine options. Shop in minutes and skip the hunt. Our prices are unbeatable, you'll save time and money. It's easy to shop and find the right piece. Our committed customer service team gives professional help from start to finish. Every part includes a manufacturer's warranty. We ship quickly, your parts will arrive fast at your door.
Toyota Blower Motor is a force that blows air rapidly, making cabins comfortable in any weather. Toyota started in 1937 but still acts like an unquenchable start-up, cutting down waste and rewarding fast solutions. Efficiency can be increased without sacrificing driving pleasure because Toyota has tuned its Hybrid Synergy Drive on an annual basis. Toyota released the TNGA platform to reduce centers of gravity, enhance crash safety, and sharpen steerage. The company in 2024 inserted a larger battery into the RAV4 Plug-in Hybrid, extracting 42 electric miles out of it until the gas engine starts paying attention. Toyota maintains a high level of trust through its support of durability by providing visible and lasting warranties that cannot be overtaken by the recent technologies. Drivers all around the world can see cars that come to work every morning and consume fuel during long commuting routes. Uniformity is more loyalty creating than glittering slogans. The Blower Motor is located within the HVAC box and turns a fan each time a person turns the dash knob. When the Blower Motor is operating full tilt, it blows the warmed-up or cooled air out all the vents. A healthy Blower Motor is responsive immediately; therefore, foggy glass cleans in no time and no sweat puddles. In case of failure of wiring or the control module, the Blower Motor can shut down and the stale air will not be removed. Speed settings can be applied with light breezes on cool days or hurricane speeds on the mornings of a deep winter. Use it in combination with a clean cabin filter and it keeps the airflow smooth and dust free.
Toyota Blower Motor Parts and Q&A
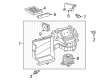
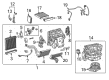
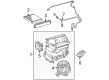
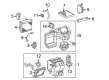
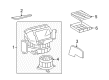
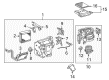
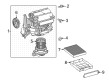
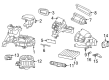
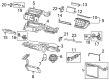
- Q: How to service and repair the blower motor on Toyota 4Runner?A:The cleaning process of the blower motor requires users to first release the 2 claw fittings from the clean air filter sub-assembly. First disconnect the air filter cover plate by taking out its air refiner element before you can proceed with plate removal. You can remove the blower damper servo sub-assembly by detaching its 3 screws followed by separating the blower motor control through the removal of its 2 screws. To finish the procedure unfasten the 3 screws which secure the blower with fan motor sub-assembly.
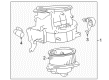
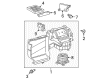
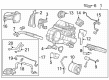
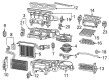
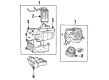
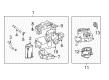
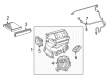
- Q: How to service and repair the blower motor on Toyota Tacoma?A:The repair or servicing process for the blower motor starts with removing the glove compartment door and its reinforcement alongside the lower No.2 finish panel and No.4 heater to register duct and front door scuff plate RH and cowl side trim RH and cooling unit. You must disconnect the connector from both the blower motor as well as the air inlet damper control cable from the blower motor. The heater control assembly installation instructions should be followed for installing the control cable. Next follow the steps to eliminate the nut and bolt as well as the blower unit. You should remove the glove compartment door before disconnecting the connector then unscrewing the three motor fasteners which secure the motor. Installation processes follow the exact opposite sequence of un-installation steps for the blower unit as well as the blower motor.


Related Toyota Parts
 Toyota Cabin Air Filter
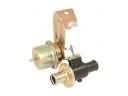 Toyota Heater Control Valve
 Toyota Ambient Temperature Sensor
 Toyota Blend Door Actuator
 Toyota A/C Compressor
 Toyota A/C Compressor Cut-Out Switches
 Toyota A/C Expansion Valve
 Toyota A/C Hose
 Toyota A/C Service Cap
 Toyota A/C System Valve Core
 Toyota Blower Control Switches
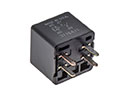 Toyota HVAC Relay
Browse Toyota Blower Motor by Models
Tacoma 4Runner Camry Tundra Corolla RAV4 Highlander Prius Sienna Land Cruiser Pickup FJ Cruiser 86 Sequoia T100 Avalon Celica Supra Yaris Matrix MR2 Solara Venza GR86 Echo C-HR Cressida Grand Highlander Paseo Previa Prius C Prius Prime bZ4X Corolla Cross Corolla iM Crown Crown Signia GR Corolla Mirai MR2 Spyder Prius V Starlet Tercel Van Yaris iA Prius Plug-In GR Supra Prius AWD-e RAV4 Prime