×
ToyotaParts- Hello
- Login or Register
- Quick Links
- Live Chat
- Track Order
- Parts Availability
- RMA
- Help Center
- Contact Us
- Shop for
- Toyota Parts
- Scion Parts
My Garage
My Account
Cart
OEM Toyota FJ Cruiser Blower Motor
A/C Heater Blower Motor- Select Vehicle by Model
- Select Vehicle by VIN
Select Vehicle by Model
orMake
Model
Year
Select Vehicle by VIN
For the most accurate results, select vehicle by your VIN (Vehicle Identification Number).
1 Blower Motor found


Toyota FJ Cruiser Blower Motor Part Number: 87103-35100
$161.90 MSRP: $229.19You Save: $67.29 (30%)Ships in 1-2 Business Days
Toyota FJ Cruiser Blower Motor
Choose genuine Blower Motor that pass strict quality control tests. You can trust the top quality and lasting durability. Shopping for OEM Blower Motor for your Toyota FJ Cruiser? Our website is your one-stop destination. We stock an extensive selection of genuine Toyota FJ Cruiser parts. The price is affordable so you can save more. It only takes minutes to browse and find the exact fit. Easily add to cart and check out fast. Our hassle-free return policy will keep you stress-free. We process orders quickly for swift delivery. Your parts will arrive faster, so you can get back on the road sooner.
The Toyota FJ Cruiser Blower Motor is a component that plays a big role in heating and cooling systems in a car as it helps to distribute heated or cool air inside the car. The Toyota FJ Cruiser Blower Motor is very famous because of the durability and efficiency of the vehicle it has an on/off switch where drivers can regulate the temperature. Among the models supported by this blower motor are the general FJ Cruiser models and different versions of it, which means that the part can be useful for both buyers with a passion to their vehicles and simple users. Apart from increasing the comfort level of the car, its proper functioning is significant to safety as it includes proper dispersing of ice and mist by proper defrosting and ventilating system respectively. The Blower Motor for Toyota FJ Cruiser is exceptionally built to withstand demands that.daily Cross Country use poses coming from off-road performances thus demonstrating Toyota's quality and durability. There is always a need for a consistent check on the blower motor and its frequent maintenance because of the possibility of breakdowns that can hinder air control, which would enable proper performance irrespective of the weather conditions prevailing at any given time. The design of the FJ Cruiser is also a plus in the line of vehicles appealing to buyers by its attractive design and solid off-road look accompanied by practical features such as the blower motor. The Toyota FJ Cruiser comes fitted with a potent 4.0-liter V6 engine with good five-speed transmission blower motor and this vehicle stands out to be one of the optimal to drive on the road and off the roads because of its efficiency, security, and comfort.
Toyota FJ Cruiser Blower Motor Parts and Q&A
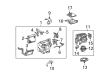
- Q: How to Safely Remove a Blower Motor for Service and Repair on Toyota FJ Cruiser?A:The removal process for the blower motor starts with disconnecting the cable from the negative battery terminal then waiting 90 seconds to stop Air Bag deployment. You must first discharge the refrigeration system refrigerant before draining the engine coolant. The cleaning process requires separating the roof antenna pole sub-assembly together with windshield wiper arm covers and both left and right front wiper arm and blade units. Begin by taking out the front fender side panel upper sections from both sides together with the antenna ornament and cowl top ventilator louver assemblies installed on both sides. First position the front wheels straight ahead and then disconnect the cooler refrigerant suction pipe A with cooler refrigerant liquid pipe A and heater inlet water hose as well as heater water outlet hose A. Proceed with removing the lower No. 3 and No. 2 steering wheel covers alongside the steering pad and steering wheel assembly together with the lower and upper steering column covers and combination switch assembly and front door scuff plates on both sides. You must both remove the front floor footrest and footrest clip while also taking out cowl side trim boards from both sides and front door opening trim Weather Strips. Take out the assist grip plug and assembly, front pillar garnishes on both sides, instrument panel garnishes on both sides, integration control and panel assembly, radio receiver assembly, parking brake hole cover sub-assembly, shift lever knob sub-assemblies for manual transmission and 4WD, console upper rear panel sub-assembly, box bottom mat, front console box, console upper panel No. 1 garnish, instrument lower cover sub-assembly, No. 1 instrument panel register assembly, separate the hood lock control lever sub-assembly, and remove the instrument panel finish plate, lower instrument panel finish panel sub-assembly LH, lower instrument panel LH, instrument cluster finish panel, combination meter assembly, glove compartment door assembly, instrument panel lower finish panel sub-assembly RH, No. 2 instrument panel register assembly, No. 2 instrument panel speaker panel sub-assembly, No. 1 instrument panel speaker panel sub-assembly, and front No. 2 speaker assembly. Remove the assist grip retainers on both sides, disconnect the passenger Air Bag connector, and remove the instrument panel sub-assembly, instrument panel finish panel end LH, No. 1 heater to register duct, No. 2 heater to register duct, rear No. 1 and No. 2 air ducts, No. 1 and No. 2 air ducts, No. 1 instrument panel brace mounting bracket, ECM, steering column hole cover, separate the steering intermediate shaft assembly, remove the steering column assembly, instrument panel side bracket, separate the main body ECU (driver side J/B), remove the cooler unit drain hose, instrument panel reinforcement, and finally, remove the blower unit assembly by taking out the 2 screws and extracting the blower unit as illustrated.

Related Toyota FJ Cruiser Parts
 Toyota FJ Cruiser Cabin Air Filter
 Toyota FJ Cruiser A/C Accumulator
 Toyota FJ Cruiser A/C Compressor
 Toyota FJ Cruiser A/C Compressor Clutch
 Toyota FJ Cruiser A/C Condenser
 Toyota FJ Cruiser A/C Expansion Valve
 Toyota FJ Cruiser A/C Hose
 Toyota FJ Cruiser Ambient Temperature Sensor
 Toyota FJ Cruiser Blower Control Switches
 Toyota FJ Cruiser Blower Motor Resistor
 Toyota FJ Cruiser Evaporator
 Toyota FJ Cruiser Heater Core