×
ToyotaParts- Hello
- Login or Register
- Quick Links
- Live Chat
- Track Order
- Parts Availability
- RMA
- Help Center
- Contact Us
- Shop for
- Toyota Parts
- Scion Parts
My Garage
My Account
Cart
OEM Toyota A/C Expansion Valve
Air Conditioning Expansion Valve- Select Vehicle by Model
- Select Vehicle by VIN
Select Vehicle by Model
orMake
Model
Year
Select Vehicle by VIN
For the most accurate results, select vehicle by your VIN (Vehicle Identification Number).
89 A/C Expansion Valves found


Toyota Expansion Valve Part Number: 88515-22240
$90.05 MSRP: $126.40You Save: $36.35 (29%)Product Specifications- Other Name: Valve, Expansion, No; A/C Expansion Valve
- Replaces: 88515-06020, 88515-20120, 88515-20100, 88515-04030


Toyota Expansion Valve, Front Part Number: 88515-07030
$77.25 MSRP: $108.44You Save: $31.19 (29%)Ships in 1-2 Business DaysProduct Specifications- Other Name: Valve, Expansion, No; A/C Expansion Valve, Front; Valve, Cooler Expansion; A/C Expansion Valve
- Position: Front


Toyota Expansion Valve Part Number: 88515-60190
$71.80 MSRP: $100.78You Save: $28.98 (29%)Ships in 1-2 Business DaysProduct Specifications- Other Name: Valve, Expansion, No; A/C Expansion Valve; Valve, Cooler Expansion
- Replaces: 88515-35020


Toyota Expansion Valve Part Number: 88515-60060
$178.00 MSRP: $254.14You Save: $76.14 (30%)Ships in 1-3 Business DaysProduct Specifications- Other Name: Valve, Expansion, No; A/C Expansion Valve, Rear; Valve, Rear Cooling Unit Expansion; A/C Expansion Valve


Toyota Expansion Valve Part Number: 88515-30800
$75.83 MSRP: $106.44You Save: $30.61 (29%)Ships in 1-3 Business DaysProduct Specifications- Other Name: Valve, Expansion, No; A/C Expansion Valve; Valve, Cooler Expansion


Toyota Expansion Valve Part Number: 88515-47040
$73.46 MSRP: $103.11You Save: $29.65 (29%)Ships in 1-2 Business DaysProduct Specifications- Other Name: Valve, Expansion, No; A/C Expansion Valve; Valve, Cooler Expansion


Toyota Valve, Cooler Expansion, W/Packing, Front Part Number: 88515-08140
$72.51 MSRP: $101.78You Save: $29.27 (29%)Ships in 1-3 Business DaysProduct Specifications- Other Name: Valve, Expansion, No; A/C Expansion Valve
- Position: Front
- Replaces: 88515-08130


Toyota Expansion Valve, Front Part Number: 88515-02530
$72.87 MSRP: $102.28You Save: $29.41 (29%)Ships in 1-3 Business DaysProduct Specifications- Other Name: Valve, Expansion, No; A/C Expansion Valve, Front; Valve, Cooler Expansion; A/C Expansion Valve
- Position: Front
- Replaces: 88515-68010


Toyota Valve, Cooler Expansion, Front Part Number: 88515-50190
$75.24 MSRP: $105.61You Save: $30.37 (29%)Ships in 1-3 Business DaysProduct Specifications- Other Name: Valve, Expansion, No; A/C Expansion Valve
- Position: Front


Toyota Expansion Valve Part Number: 88515-26070
$74.64 MSRP: $104.77You Save: $30.13 (29%)Ships in 1-3 Business DaysProduct Specifications- Other Name: Valve, Expansion, No; A/C Expansion Valve; Valve, Cooler Expansion
- Replaces: 88515-02140


Toyota Valve, Cooler Expansion, Front Part Number: 88515-33020
$77.25 MSRP: $108.44You Save: $31.19 (29%)Ships in 1-3 Business DaysProduct Specifications- Other Name: Valve, Expansion, No; A/C Expansion Valve
- Position: Front


Toyota Expansion Valve Part Number: 88515-F4020
$78.32 MSRP: $109.93You Save: $31.61 (29%)Ships in 1-3 Business DaysProduct Specifications- Other Name: Valve, Expansion, No; A/C Expansion Valve; Valve, Cooler Expansion


Toyota Valve, Cooler Expansion, Front Part Number: 88515-60120
$89.69 MSRP: $125.90You Save: $36.21 (29%)Ships in 1-3 Business DaysProduct Specifications- Other Name: Valve, Expansion, No; A/C Expansion Valve
- Position: Front


Toyota Expansion Valve, Front Part Number: 88515-07040
$89.81 MSRP: $126.06You Save: $36.25 (29%)Ships in 1-3 Business DaysProduct Specifications- Other Name: Valve, Expansion, No; A/C Expansion Valve, Front; Valve, Cooler Expansion; A/C Expansion Valve
- Position: Front
- Replaces: 88515-07020, 88515-16060, 88515-08070, 88515-0C050, 88515-28160, 88515-02100


Toyota Expansion Valve Part Number: 88515-42080
$90.05 MSRP: $126.40You Save: $36.35 (29%)Ships in 1-3 Business DaysProduct Specifications- Other Name: Valve, Expansion, No; A/C Expansion Valve; Valve, Cooler Expansion
- Manufacturer Note: MAKER OPTION
- Replaces: 88515-42070


Toyota Expansion Valve Part Number: 88515-16031-83
$48.51 MSRP: $67.51You Save: $19.00 (29%)Product Specifications- Other Name: Valve, Expansion; A/C Expansion Valve
- Replaces: 88515-20040, 88515-10050, 88515-16030, 88515-20070, 88515-16031, 88515-14020


Toyota Valve, Cooler Expansion Part Number: 88515-16040
$62.67 MSRP: $87.98You Save: $25.31 (29%)Ships in 1-3 Business DaysProduct Specifications- Other Name: Valve, Expansion, No; A/C Expansion Valve
- Manufacturer Note: PUERTORICO SPEC
- Replaces: 88515-03010


Toyota Expansion Valve, Front Part Number: 88515-87004
$63.86 MSRP: $89.64You Save: $25.78 (29%)Product Specifications- Other Name: Valve, Expansion, No; A/C Expansion Valve; Valve, Cooler Expansion
- Position: Front

Toyota Expansion Valve Part Number: 88515-60160
$174.36 MSRP: $246.83You Save: $72.47 (30%)Product Specifications- Other Name: Valve, Expansion, No; A/C Expansion Valve, Rear; Valve, Rear Cooling Unit Expansion; A/C Expansion Valve


Toyota Expansion Valve Part Number: 88515-34010
$62.56 MSRP: $87.81You Save: $25.25 (29%)Product Specifications- Other Name: Valve, Expansion, No; A/C Expansion Valve; Valve, Cooler Expansion
- Replaces: 88515-04020
| Page 1 of 5 |Next >
1-20 of 89 Results
Toyota A/C Expansion Valve
OEM parts deliver unmatched quality you can rely on. They pass extensive quality control inspections. Toyota produces them to the official factory specifications. This process helps prevent defects and imperfections. So you can get exceptional lifespan and a flawless fit. Need new OEM Toyota A/C Expansion Valve? You'll love our wide selection of genuine options. Shop in minutes and skip the hunt. Our prices are unbeatable, you'll save time and money. It's easy to shop and find the right piece. Our committed customer service team gives professional help from start to finish. Every part includes a manufacturer's warranty. We ship quickly, your parts will arrive fast at your door.
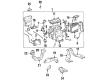
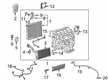
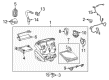
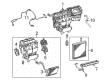
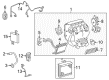
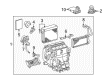
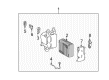
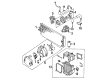
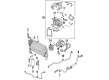
The Toyota A/C Expansion Valve is applied to measure the refrigerant with high precision to maintain cool and stable cabin air. Toyota expanded from a Japanese startup founded in 1937 into a multinational automaker by pursuing efficiency at all levels, reducing waste on the assembly line, empowering employees to identify and resolve hiccups immediately, and transforming lessons into lean systems replicated across the world. Toyota launched its Hybrid Synergy Drive and continues to test it, which means that drivers will be able to choose sedans or SUVs that burn fuel but still accelerate on highways without losing functionality. TNGA is a platform designed by Toyota to reduce its weight, increase its crush zones, and provide steering with a more planted sense throughout its entire range, such that city corners and mountain switchbacks feel predictable. Toyota is currently topping that foundation with plug-in technology such as the recent RAV4 with 42 electric miles, proving that tenacity can keep pace with contemporary battery power. Between the evaporator and the condenser is the A/C Expansion Valve, which throttles the liquid refrigerant into a low-pressure mist capable of absorbing cabin heat within a short period of time. Having sensors detect a decrease in evaporator temperature, the A/C Expansion Valve will cut the flow to prevent coil freeze and wasted energy. In scorching idling or high RPM pulls, the A/C Expansion Valve is opened further so that the compressor will not feel the need to work hard at the vents. A piston or needle style A/C Expansion Valve can be interchanged between different model years, but the objective remains the same, which is to maintain the same level of comfort and longevity of the components by balancing the flow of refrigerant to demand.
Toyota A/C Expansion Valve Parts and Q&A
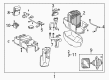
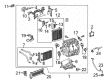
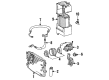
- Q: How to service and repair the A/C Expansion Valve in a refrigeration system on Toyota Camry?A:Service and repair of expansion valves requires first removing fridge refrigerant before separating liquid tubes and suction pipes from the A/C device. The expansion valve must be removed first by loosening the piping clamp followed by gentle packing pry-out and bolt removal from the evaporator with a hexagon wrench. Start by lubricating four new O-rings of the expansion valve with compressor oil before installing the liquid tube and suction tube to the device. When installing new packing on the expansion valve you should first cut off and peel back the packing paper while making sure the paper remains visible through the tube side hole and then set the packing without excess tape extending past the expansion valve edge. Apply compressor oil to 2 new O-rings and attached them to the expansion valve before tightening the 2 bolts to 5.4 Nm and 55 kg.cm and 48 in.lb. Realignment of the blower unit should be followed by glove compartment placement before connecting liquid and suction tubes to the A/C unit followed by air evacuation from the refrigeration system then add 800 plus or minus 50 g (28.22 plus or minus 1.76 oz.) of refrigerant. Use gas leak detection equipment to search for refrigerant escape from the system after which you should verify that all junctions maintain proper torque values.
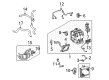
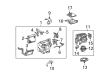
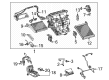
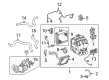
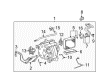
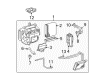
- Q: How to service and repair the rear A/C expansion valve on Toyota Sequoia?A:When servicing or repairing the rear A/C expansion valve it requires a process of discharging refrigerant from the refrigeration system followed by evacuating all air then charging the system with 1050 plus or minus 50 g (37.03 plus or minus 1.76 oz.) of refrigerant while leak inspections are performed. Engine coolant drain from the radiator marks a necessary step but complete removal of coolant is not required. Service and repair of the rear A/C expansion valve requires removal of the rear seat outer belt floor anchors in addition to the backdoor scuff plate and rear door scuff plate RH. Also remove upper back door garnish, rear window side garnish RH, rear quarter trim panel RH and quarter pillar garnish RH. The system maintenance process involves discarding the liquid and suction tubes by unfastening the 2 bolts followed by securing the open connections using caps as protection against moisture or dust intrusion. The procedure requires lubricating two new O-rings with compressor oil before their installation. Remove the rear A/C unit through the process of detaching the 3 clips and cover and removing the 2 air ducts and disconnecting both connectors and wire harness clamps. The process for expansion valve repair requires the removal of 4 screws and 2 brackets while prying out packings before using a 5.0 mm hexagon wrench to take out the 2 bolts (torque: 5.4 N.m). Then proceed by removing 3 additional bolts. First lift the A/C unit to detach the tube with accessory and then remove the holder along with disconnection of the heat sensing tube. The technician should first lubricate two new O-rings with compressor oil before installing them. Afterward the technician can remove the expansion valve by loosing the 2 nuts (Nut A torque: 13 N.m; Nut B torque: 22 N.m). Construct the parts back in the reverse manner of disassembly.


Related Toyota Parts
 Toyota Blower Motor Resistor
 Toyota A/C Compressor Clutch
 Toyota Ambient Temperature Sensor
 Toyota Blend Door Actuator
 Toyota Heater Core
 Toyota A/C Compressor
 Toyota A/C Compressor Cut-Out Switches
 Toyota A/C Condenser
 Toyota A/C Hose
 Toyota A/C Service Cap
 Toyota A/C System Valve Core
 Toyota Blower Control Switches
Browse Toyota A/C Expansion Valve by Models
Tacoma 4Runner Camry Tundra Corolla RAV4 Highlander Prius Sienna Land Cruiser Pickup FJ Cruiser 86 Sequoia T100 Avalon Celica Supra Yaris Matrix MR2 Solara Venza GR86 Echo C-HR Cressida Grand Highlander Paseo Previa Prius C Prius Prime bZ4X Corolla Cross Corolla iM Crown Crown Signia GR Corolla Mirai MR2 Spyder Prius V Tercel Van Yaris iA Prius Plug-In GR Supra Prius AWD-e RAV4 Prime