×
ToyotaParts- Hello
- Login or Register
- Quick Links
- Live Chat
- Track Order
- Parts Availability
- RMA
- Help Center
- Contact Us
- Shop for
- Toyota Parts
- Scion Parts
My Garage
My Account
Cart
OEM Toyota Sequoia A/C Expansion Valve
Air Conditioning Expansion Valve- Select Vehicle by Model
- Select Vehicle by VIN
Select Vehicle by Model
orMake
Model
Year
Select Vehicle by VIN
For the most accurate results, select vehicle by your VIN (Vehicle Identification Number).
8 A/C Expansion Valves found

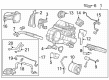
Toyota Sequoia Valve, Rear Cooling Unit Expansion Part Number: 88515-60320
$292.64 MSRP: $417.82You Save: $125.18 (30%)Ships in 1-3 Business Days
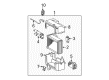
Toyota Sequoia Expansion Valve, Front Part Number: 88515-0C070
$61.73 MSRP: $86.65You Save: $24.92 (29%)Ships in 1-3 Business Days
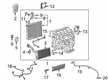
Toyota Sequoia Expansion Valve Part Number: 88515-08080
$63.15 MSRP: $88.64You Save: $25.49 (29%)Ships in 1-3 Business Days
Toyota Sequoia Valve, Cooler Expansion, Front Part Number: 88515-0E160
$71.56 MSRP: $100.45You Save: $28.89 (29%)Ships in 1-3 Business Days
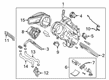
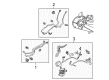
Toyota Sequoia Expansion Valve, Rear Part Number: 88515-0C150
$72.15 MSRP: $101.28You Save: $29.13 (29%)Ships in 1-3 Business Days
Toyota Sequoia Expansion Valve, Front Part Number: 88515-0C120
$71.80 MSRP: $100.78You Save: $28.98 (29%)Ships in 1-3 Business Days
Toyota Sequoia Expansion Valve, Front Part Number: 88515-64010
$73.10 MSRP: $102.62You Save: $29.52 (29%)Ships in 1-3 Business Days
Toyota Sequoia Expansion Valve, Rear Part Number: 88515-0C160
$78.67 MSRP: $110.43You Save: $31.76 (29%)Ships in 1-3 Business Days
Toyota Sequoia A/C Expansion Valve
Choose genuine A/C Expansion Valve that pass strict quality control tests. You can trust the top quality and lasting durability. Shopping for OEM A/C Expansion Valve for your Toyota Sequoia? Our website is your one-stop destination. We stock an extensive selection of genuine Toyota Sequoia parts. The price is affordable so you can save more. It only takes minutes to browse and find the exact fit. Easily add to cart and check out fast. Our hassle-free return policy will keep you stress-free. We process orders quickly for swift delivery. Your parts will arrive faster, so you can get back on the road sooner.
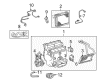
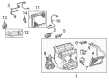
A/C Expansion Valve is an essential part of Toyota Sequoia vehicles that improves the vehicles' air conditioning system and reputation for reliability. This is the component that checks the circulation of refrigerant to provide efficient and steady cooling capacity then in turn increase the general efficiency of the climate control system. This expansion valve replaced the previous A/C Accumulator, and it was created especially for Toyota Sequoia models since its launch in 2000, meaning that the particular part fits all generations of Sequoia. Consequently, Toyota needs adaptability and quality performance as a primary feature, for the Sequoia the result is good as it takes one of the positions in the full-size SUV market. A/C Expansion Valve also gives a significant contribution on the cooling ability of the vehicle and also an important part of the safety features to avoid system failure and consequent overheating. Additional options of A/C Expansion Valve are in the means of mechanisms utilized on the refrigerant flow, making the vehicle more efficient and dependable. Therefore, the A/C Expansion Valve is an example of a durable product that features the brand's expertise and commitment to delivering only the optimal A/C components in the auto market. Therefore, owners of the Toyota Sequoia are assured of their vehicles' excellent climate control capability, ensuring that the vehicles' interiors are habitable at all times. All in all, I can conclude that A/C Expansion Valve is an essential component of the car to guarantee the further stability of the automobile and reliability of its A/C system, thus making the Toyota Sequoia one of the favorites among buyers.
Toyota Sequoia A/C Expansion Valve Parts and Q&A
- Q: How to service and repair the rear A/C expansion valve on Toyota Sequoia?A:The servicing and repair process for the rear A/C expansion valve requires first evacuating refrigerant from the system and then charging it with 1050 plus or minus50 g (37.03 plus or minus1.76 oz.) of refrigerant while leak inspection takes place. Maintenance staff should drain all engine coolant from the Radiator system yet preserve enough fluid. First remove the back seat outer belt floor anchors together with the backdoor scuff plate and the rear door scuff plate on the right-hand side followed by the upper back door garnish and the rear window side garnish on the right-hand side and the rear quarter trim panel on the right-hand side and finally the quarter pillar garnish on the right-hand side. Disconnect and seal the liquid and suction tubes by removing 2 bolts from each fitting respectively to avoid moisture or dirt contamination. Oiling the two new compressor O-rings serves as a necessary step before installing them. The procedure includes removing three air duct clips and the duct cover before eliminating both additional air ducts and unclamping wire harness connectors. To access the expansion valve begin by removing four screws combined with two brackets along with carefully removing the packings until using a 5.0 mm hexagon wrench to unscrew two bolts at 5.4 N-m torque followed by detaching three more bolts. First elevate the unit to disconnect tubing accessories through separating the accessory from the tube. Then unfasten the holder and cut off the heat sensing tube connection. The technician should use compressor oil to waterproof two new O-rings before installation so that they can tighten nut A to 13 Nm and nut B to 22 Nm to extract the expansion valve. To reinstall the system perform operations in the opposite sequence of dismantling.

Related Toyota Sequoia Parts
 Toyota Sequoia Cabin Air Filter
 Toyota Sequoia Blend Door Actuator
 Toyota Sequoia Blower Motor
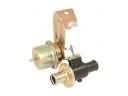 Toyota Sequoia Heater Control Valve
 Toyota Sequoia A/C Accumulator
 Toyota Sequoia A/C Compressor
 Toyota Sequoia A/C Compressor Clutch
 Toyota Sequoia A/C Compressor Cut-Out Switches
 Toyota Sequoia A/C Service Cap
 Toyota Sequoia A/C System Valve Core
 Toyota Sequoia Blower Motor Resistor
 Toyota Sequoia HVAC Pressure Switch