×
ToyotaParts- Hello
- Login or Register
- Quick Links
- Live Chat
- Track Order
- Parts Availability
- RMA
- Help Center
- Contact Us
- Shop for
- Toyota Parts
- Scion Parts
My Garage
My Account
Cart
OEM Toyota Sequoia Radiator
Cooling Radiator- Select Vehicle by Model
- Select Vehicle by VIN
Select Vehicle by Model
orMake
Model
Year
Select Vehicle by VIN
For the most accurate results, select vehicle by your VIN (Vehicle Identification Number).
10 Radiators found


Toyota Sequoia Radiator Assembly Part Number: 16410-AZ012
$164.29 MSRP: $232.20You Save: $67.91 (30%)Ships in 1-3 Business Days

Toyota Sequoia Radiator Assembly, Front Part Number: 16400-0S040
$274.58 MSRP: $392.04You Save: $117.46 (30%)Ships in 1-3 Business Days


Toyota Sequoia Radiator Assembly Part Number: 16400-0S010
$299.29 MSRP: $427.32You Save: $128.03 (30%)Ships in 1-3 Business Days

Toyota Sequoia Radiator Assembly Part Number: 16400-0F060
$339.42 MSRP: $484.62You Save: $145.20 (30%)Ships in 1-3 Business Days
Toyota Sequoia Auxiliary Radiator, Passenger Side Part Number: 16550-70040
$291.47 MSRP: $416.16You Save: $124.69 (30%)Ships in 1-3 Business DaysToyota Sequoia Auxiliary Radiator, Driver Side Part Number: 16550-70050
$291.47 MSRP: $416.16You Save: $124.69 (30%)Ships in 1-3 Business Days
Toyota Sequoia Radiator Assembly Part Number: 16400-F4010
$306.62 MSRP: $437.78You Save: $131.16 (30%)Ships in 1-3 Business Days
Toyota Sequoia Auxiliary Cooler Part Number: G9010-34010
$441.05 MSRP: $646.37You Save: $205.32 (32%)Ships in 1-3 Business Days
Toyota Sequoia Radiator Assembly Part Number: 16410-AZ005
$215.47 MSRP: $307.15You Save: $91.68 (30%)Toyota Sequoia Radiator Assembly Part Number: 16410-YZZAU
Toyota Sequoia Radiator
Choose genuine Radiator that pass strict quality control tests. You can trust the top quality and lasting durability. Shopping for OEM Radiator for your Toyota Sequoia? Our website is your one-stop destination. We stock an extensive selection of genuine Toyota Sequoia parts. The price is affordable so you can save more. It only takes minutes to browse and find the exact fit. Easily add to cart and check out fast. Our hassle-free return policy will keep you stress-free. We process orders quickly for swift delivery. Your parts will arrive faster, so you can get back on the road sooner.
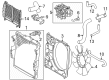
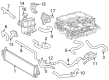
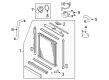
The Toyota Sequoia Radiator operates in conjunction with other parts of the car and plays the role of cooling down the engine coolant by using a heat exchanger system. Sequoia Radiators are usually designed with a core of fins and tubes and inlet and outlet water tanks and; Normally, their cores and tanks would be of aluminum but copper/brass radiators are also used. Located at the front of the automobile to gain optimal exposure to air flow, the radiator effectively transfers heat out of the engine for greatest system proficiency. Performance radiators are an improvement over factory units which incorporate light weight aluminum construction along with increased design features to increase the efficiency of the material and the flow of the cooling liquid. These radiators have more numbers of tubes and fins to escalate the coolant flow and exposure of the finned surface area to the air for better heat exchange and cooling of engines. Organized for direct fit, it is easy to install while for the universal radiators, it fits any automotive applications for drag racing circle track and more. In conclusion, Toyota Sequoia Radiators are highly significant aspects in all vehicles as they help control excessive heat, therefore enhancing the engine's working conditions.
Toyota Sequoia Radiator Parts and Q&A
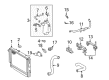
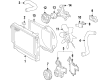
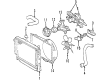
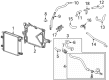
- Q: How to install the radiator and its components on Toyota Sequoia?A:The first step for radiator installation is attaching the radiator drain cock plug to the assembly. The outlet radiator hose requires installation on the radiator assembly. Place the radiator bracket hooks into the holes on the radiator support then fasten the radiator with 4 bolts which should tighten to 18 Nm (184 kgf-cm, 13 ft-lbf). Fasten the No. 1 radiator to the support seal by using three installation clips before connecting an outlet hose. Vehicle owners who need the trailer towing system should install the fan pulley to the Water Pump followed by setting the fan shroud with the fluid coupling fan between the radiator and engine while being cautious to avoid damaging the radiator core and finally securing the fluid coupling fan to the water pump with 4 nuts using hand tightening. The radiator requires installation of the shroud claws followed by shroud bolt tightening to 6.5 Nm (66 kgf-cm, 58 in-lbf) while passing the two hoses through flexible hose clamp for reservoir hose connection. Tighten the 4 nuts of the fluid coupling fan to 29 Nm (296 kgf-cm, 21 ft-lbf) after installing the fan and generator V-belt. The installation process for vehicles without trailer towing system follows the same sequence where you install the fan shroud and connect the reservoir hose while placing the fan and generator V-belt followed by fluid coupling fan nut tightening. The inlet radiator hose installation should be followed by air cleaner hose assembly attachment and additionally the oil cooler assembly needs to be installed on vehicles with trailer towing capabilities. The radiator side deflector RH should be installed using 6 clips followed by the LH deflector installation with 6 clips along with the wire harness clamp. Follow the installation procedure for the front bumper cover then add engine coolant and inspect both for coolant leakage and automatic transmission fluid leakage. Place the throttle body cover sub-assembly followed by installation of the No. 1 engine under cover.
- Q: How to remove the radiator on Toyota Sequoia?A:The first step consists of uninstalling the No. 1 engine under cover and subsequent draining of the engine coolant. Your next task should be to detach the front bumper cover from the vehicle body. First detach the 6 clips from the radiator side deflector LH before disconnecting the wire harness clamp then proceed to take off the radiator side deflector RH only when no trailer towing system exists on the vehicle. You should next eliminate the throttle body cover sub-assembly together with the air cleaner hose assembly. Start by removing the inlet radiator hose of the vehicle before proceeding to detached the claw to open the No. 1 flexible hose clamp and disconnecting the reservoir hose on vehicles with a trailer towing system. Continue by removing the 2 bolts holding the fan shroud and taking off the 4 nuts of the fluid coupling fan along with the fan shroud and fluid coupling fan while avoiding any damage to the radiator core. Vehicles that lack trailer towing systems must perform the fan shroud removal procedures exactly the same but exclude extracting the oil cooler assembly. Begin by disconnecting the outlet radiator hose then removing 3 clips and No. 1 radiator to support seal until the radiator assembly can be removed by uninstalling its 4 bolts. Afterward remove the outlet radiator hose from the radiator assembly then extract the radiator drain cock plug from the same assembly.


Related Toyota Sequoia Parts
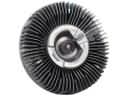 Toyota Sequoia Fan Clutch
 Toyota Sequoia Thermostat
 Toyota Sequoia Water Pump
 Toyota Sequoia Coolant Reservoir
 Toyota Sequoia Cooling Fan Assembly
 Toyota Sequoia Fan Blade
 Toyota Sequoia Fan Shroud
 Toyota Sequoia Fuel Line Clamps
 Toyota Sequoia Radiator Cap
 Toyota Sequoia Thermostat Gasket
 Toyota Sequoia Thermostat Housing
 Toyota Sequoia Water Hose