×
ToyotaParts- Hello
- Login or Register
- Quick Links
- Live Chat
- Track Order
- Parts Availability
- RMA
- Help Center
- Contact Us
- Shop for
- Toyota Parts
- Scion Parts
My Garage
My Account
Cart
OEM Toyota Evaporator
A/C Evaporator Core- Select Vehicle by Model
- Select Vehicle by VIN
Select Vehicle by Model
orMake
Model
Year
Select Vehicle by VIN
For the most accurate results, select vehicle by your VIN (Vehicle Identification Number).
231 Evaporators found


Toyota Evaporator Core, Front Part Number: 88501-48311
$231.01 MSRP: $329.83You Save: $98.82 (30%)Ships in 1-2 Business DaysProduct Specifications- Other Name: Evaporator Sub-Assembly; A/C Evaporator Core, Front; A/C Evaporator Core Repair Kit; Evaporator Sub-Assembly, Cooler; A/C Evaporator Core; A/C Evaporator; Evaporator
- Position: Front
- Replaces: 88501-33200, 88501-33120, 88501-07040, 88501-33190, 88501-06080, 88501-28400, 88501-06112, 88501-48310, 88501-06110


Toyota Evaporator Core Part Number: 88511-04020
$74.64 MSRP: $104.77You Save: $30.13 (29%)Product Specifications- Other Name: Core, Evaporator; A/C Evaporator Core; A/C Evaporator Core Repair Kit; A/C Evaporator; Evaporator


Toyota Evaporator Core Part Number: 88501-60421
$369.89 MSRP: $542.07You Save: $172.18 (32%)Ships in 1-3 Business DaysProduct Specifications- Other Name: Evaporator Sub-Assembly; A/C Evaporator Core; A/C Evaporator Core Repair Kit; Evaporator Sub-Assembly, Cooler; A/C Evaporator; Evaporator
- Replaces: 88501-60420


Toyota Evaporator Assembly Part Number: 88510-04190
$1439.96 MSRP: $2110.28You Save: $670.32 (32%)Product Specifications- Other Name: Unit Assembly, Cooling; A/C Evaporator Core and Case Assembly; Unit Assembly, Cooler; A/C Evaporator


Toyota Evaporator Core, Front Part Number: 88501-0C071
$230.08 MSRP: $328.49You Save: $98.41 (30%)Ships in 1 Business DayProduct Specifications- Other Name: Evaporator Sub-Assembly; A/C Evaporator Core, Front; A/C Evaporator Core Repair Kit; Evaporator Sub-Assembly, Cooler; A/C Evaporator Core; A/C Evaporator; Evaporator
- Position: Front
- Replaces: 88501-0C070


Toyota Evaporator Sub-Assembly (Rear) Part Number: 88501-28360
$252.68 MSRP: $360.77You Save: $108.09 (30%)Ships in 1-2 Business DaysProduct Specifications- Other Name: Evaporator Sub-Assembly; A/C Evaporator Core Repair Kit; A/C Evaporator Core; A/C Evaporator
- Position: Rear


Toyota Evaporator Core Part Number: 88501-06410
$264.91 MSRP: $378.23You Save: $113.32 (30%)Ships in 1-3 Business DaysProduct Specifications- Other Name: Evaporator Sub-Assembly; A/C Evaporator Core; A/C Evaporator Core Repair Kit; Evaporator Sub-Assembly, Cooler; A/C Evaporator
- Replaces: 88501-33360


Toyota Evaporator Core Part Number: 88501-72020
$265.96 MSRP: $379.73You Save: $113.77 (30%)Ships in 1-3 Business DaysProduct Specifications- Other Name: Evaporator Sub-Assembly; A/C Evaporator Core; A/C Evaporator Core Repair Kit; Evaporator Sub-Assembly, Cooler; A/C Evaporator; Evaporator


Toyota Evaporator Core Part Number: 88501-47051
$274.00 MSRP: $391.20You Save: $117.20 (30%)Ships in 1-3 Business DaysProduct Specifications- Other Name: Evaporator Sub-Assembly; A/C Evaporator Core; A/C Evaporator Core Repair Kit; Evaporator Sub-Assembly, Cooler; A/C Evaporator; Evaporator
- Replaces: 88501-47050


Toyota Evaporator Core Part Number: 88501-35151
$267.36 MSRP: $381.72You Save: $114.36 (30%)Ships in 1-3 Business DaysProduct Specifications- Other Name: Evaporator Sub-Assembly; A/C Evaporator Core; A/C Evaporator Core Repair Kit; Evaporator Sub-Assembly, Cooler; A/C Evaporator; Evaporator
- Replaces: 88501-35150, 88501-60430


Toyota Evaporator Core Part Number: 88501-04030
$274.93 MSRP: $392.54You Save: $117.61 (30%)Ships in 1-3 Business DaysProduct Specifications- Other Name: Evaporator Sub-Assembly; A/C Evaporator Core; A/C Evaporator Core Repair Kit; Evaporator Sub-Assembly, Cooler; A/C Evaporator; Evaporator
- Manufacturer Note: DEALER OPTION


Toyota Evaporator Core, Rear Part Number: 88501-60150
$286.69 MSRP: $409.34You Save: $122.65 (30%)Ships in 1-3 Business DaysProduct Specifications- Other Name: Evaporator Sub-Assembly; A/C Evaporator Core, Rear; A/C Evaporator Core Repair Kit; Evaporator Sub-Assembly (Rear); A/C Evaporator Core; A/C Evaporator; Evaporator
- Position: Rear


Toyota Evaporator Sub-Assembly Part Number: 88501-35160
$285.53 MSRP: $407.67You Save: $122.14 (30%)Ships in 1-3 Business DaysProduct Specifications- Other Name: EVAPORATOR SUB-ASSY; A/C Evaporator Core Repair Kit; A/C Evaporator Core; A/C Evaporator
- Replaces: 88501-35120, 88501-35100, 88501-35140, 88501-35130


Toyota Evaporator Core Part Number: 88501-02180
$291.01 MSRP: $415.49You Save: $124.48 (30%)Ships in 1-3 Business DaysProduct Specifications- Other Name: Evaporator Sub-Assembly; A/C Evaporator Core; A/C Evaporator Core Repair Kit; Evaporator Sub-Assembly, Cooler; A/C Evaporator; Evaporator


Toyota Evaporator Core Part Number: 88501-35050
$294.97 MSRP: $421.15You Save: $126.18 (30%)Ships in 1-2 Business DaysProduct Specifications- Other Name: Evaporator Sub-Assembly; A/C Evaporator Core; A/C Evaporator Core Repair Kit; Evaporator Sub-Assembly, Cooler; A/C Evaporator; Evaporator


Toyota Evaporator Core Part Number: 88501-42080
$305.45 MSRP: $436.12You Save: $130.67 (30%)Ships in 1-3 Business DaysProduct Specifications- Other Name: Evaporator Sub-Assembly; A/C Evaporator Core; A/C Evaporator Core Repair Kit; Evaporator, Air Conditioning; Evaporator Sub-Assembly, Cooler; A/C Evaporator; Evaporator
- Manufacturer Note: MAKER OPTION


Toyota Evaporator Core Part Number: 88501-07020
$308.01 MSRP: $439.77You Save: $131.76 (30%)Ships in 1-3 Business DaysProduct Specifications- Other Name: Evaporator Sub-Assembly; A/C Evaporator Core; A/C Evaporator Core Repair Kit; Evaporator Sub-Assembly, Cooler; A/C Evaporator; Evaporator


Toyota Evaporator Core Part Number: 88501-48030
$309.30 MSRP: $441.61You Save: $132.31 (30%)Ships in 1-3 Business DaysProduct Specifications- Other Name: Evaporator Sub-Assembly; A/C Evaporator Core; A/C Evaporator Core Repair Kit; Evaporator Sub-Assembly, Cooler; A/C Evaporator; Evaporator


Toyota Evaporator Core Part Number: 88501-02222
$240.68 MSRP: $343.64You Save: $102.96 (30%)Product Specifications- Other Name: Evaporator Sub-Assembly; A/C Evaporator Core; A/C Evaporator Core Repair Kit; Evaporator Sub-Assembly, Cooler; A/C Evaporator; Evaporator
- Replaces: 88501-02221


Toyota Evaporator Core Part Number: 88501-52103
$241.84 MSRP: $345.30You Save: $103.46 (30%)Product Specifications- Other Name: Evaporator Sub-Assembly; A/C Evaporator Core; A/C Evaporator Core Repair Kit; Evaporator Sub-Assembly, Cooler; A/C Evaporator; Evaporator
- Replaces: 88501-52100, 88501-52091, 88501-52101, 88501-52102, 88501-52090
| Page 1 of 12 |Next >
1-20 of 231 Results
Toyota Evaporator
OEM parts deliver unmatched quality you can rely on. They pass extensive quality control inspections. Toyota produces them to the official factory specifications. This process helps prevent defects and imperfections. So you can get exceptional lifespan and a flawless fit. Need new OEM Toyota Evaporator? You'll love our wide selection of genuine options. Shop in minutes and skip the hunt. Our prices are unbeatable, you'll save time and money. It's easy to shop and find the right piece. Our committed customer service team gives professional help from start to finish. Every part includes a manufacturer's warranty. We ship quickly, your parts will arrive fast at your door.
Toyota Evaporator removes heat quickly hence the cabins do not require a lot of energy to keep cool. By continuing to embrace lean production that has reduced waste, enabling fast problem-solving on the production line and transferring those benefits into vehicles that remain dependable over the years and use less fuel courtesy of an ever-changing Hybrid Synergy Drive design that is offered on the runabout-sized and the hulking SUV alike even as factories worldwide keep quality levels lean despite massive annual outputs, Toyota has gained worldwide loyalty. Toyota continues to launch new platforms such as TNGA, reducing centers of gravity, sharpening handling, and crash padding, and recent plug-in hybrids extend electric range so commuters can creep through traffic almost undetected and drivers get the feeling of moving forward without strapping untested experimental hardware to their car or charging it with luxury prices that even four-decade-long families can comfortably pay without much consideration. Within the current Toyota cabin, the Evaporator is installed deep into the dash with the Evaporator taking chilled liquid refrigerant, expanding it into vapor and pulling heat out of the air in the cabin, pushing the chillier flow through vents and making the passengers feel relief instantly even during summer under the heat of the asphalt. Drivers only see the Evaporator because of what it achieves, but the unit is built based on closely packed aluminum fins that resist corrosion, intelligent pressure drop that prevents energy wastage and compact design that releases legroom, making the Evaporator a silent overachiever that is helping Toyota sustain its reputation of telling the truth, to which it can be trusted.
Toyota Evaporator Parts and Q&A
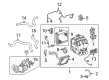
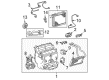
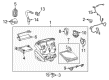
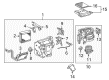
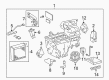
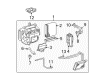
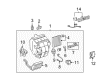
- Q: How to service and repair the front A/C evaporator core on Toyota Land Cruiser?A:For servicing and repairing the front A/C evaporator core you must first discharge refrigerant from the refrigeration system followed by vacuuming air then filling it with the specified refrigerant amounts: Single A/C requires 650 plus or minus 50 g (22.93 plus or minus 1.76 oz.) while Dual A/C needs 1,050 plus or minus 50 g (37.03 plus or minus 1.76 oz.). Begin by disconnecting both the suction tube and liquid tube from the front cooling unit after which you must take out the instrument panel. You should disconnect the connector and remove the two screws securing the relay for antenna removal. First disconnect both evaporator connection wires and clamp before removing eight screws together with the No.1 cooler cover to afterwards pull out the evaporator. You should perform installation by reversing the steps from removal.
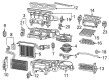
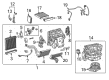
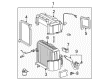
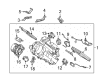
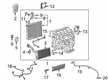
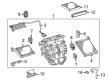
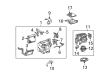
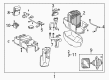
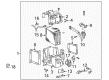
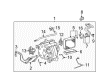
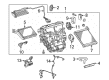
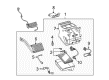
- Q: How to service and repair the rear evaporator core on Toyota Sequoia?A:Service technicians must begin with refrigerant discharging from the refrigeration system and then the system must be evacuated followed by a refrigerant charge using the specified amount of 1050-50 g (37.03-1.76 oz.) for Dual A/C and then the drainage of engine coolant from the radiator while leaving some coolant in place. The procedure begins by taking out the rear seat outer belt floor anchors followed by backdoor scuff plate extraction and subsequent removal of the rear door scuff plate on the right-hand side and upper back door garnish and rear window side garnish on the right-hand side. The technician should disconnect the liquid and suction tubes by removing 2 bolts before capping open fittings to prevent moisture or dirt. Installation requires lubricating 2 new O-rings with compressor oil ahead of time. Begin by removing the 3 clips and cover and then removing both air ducts from the rear A/C unit before disconnecting the connectors and wire harness clamps. To remove the expansion valve you need to eliminate the 4 screws, detach the 2 brackets, pry away the packings then eliminate the 2 bolts by using a 5.0 mm hexagon wrench (torque: 5.4 N.m (55 kgf.cm, 48 in..lbf)) plus remove the 3 bolts and lift the A/C unit to detach the tube and accessory and take the holder from its place and disconnect the heat sensing tube by loosening the 2 nuts then remove the expansion valve (Nut A torque: 13 N.m (135 kgf.cm, 10 in..l Add compressor oil to 2 new O-rings before installing them to the expansion valve and proceed with the reinstallation from the reverse order of disassembly.


Related Toyota Parts
 Toyota Cabin Air Filter
 Toyota Blower Motor
 Toyota Blower Motor Resistor
 Toyota A/C Compressor Clutch
 Toyota A/C Compressor
 Toyota A/C Compressor Cut-Out Switches
 Toyota A/C Condenser
 Toyota A/C Expansion Valve
 Toyota A/C Service Cap
 Toyota Blower Control Switches
 Toyota HVAC Pressure Switch
 Toyota HVAC Relay
Browse Toyota Evaporator by Models
Tacoma 4Runner Camry Tundra Corolla RAV4 Highlander Prius Sienna Land Cruiser Pickup FJ Cruiser 86 Sequoia T100 Avalon Celica Supra Yaris Matrix MR2 Solara Venza GR86 Echo C-HR Cressida Grand Highlander Paseo Previa Prius C Prius Prime bZ4X Corolla Cross Corolla iM Crown Crown Signia GR Corolla Mirai MR2 Spyder Prius V Starlet Tercel Van Yaris iA Prius Plug-In GR Supra Prius AWD-e RAV4 Prime