×
ToyotaParts- Hello
- Login or Register
- Quick Links
- Live Chat
- Track Order
- Parts Availability
- RMA
- Help Center
- Contact Us
- Shop for
- Toyota Parts
- Scion Parts
My Garage
My Account
Cart
OEM Toyota A/C Accumulator
Accumulator- Select Vehicle by Model
- Select Vehicle by VIN
Select Vehicle by Model
orMake
Model
Year
Select Vehicle by VIN
For the most accurate results, select vehicle by your VIN (Vehicle Identification Number).
38 A/C Accumulators found


Toyota Tank, Receiver Air Conditioner Part Number: 88471-34010
$34.40 MSRP: $47.89You Save: $13.49 (29%)Ships in 1-3 Business DaysProduct Specifications- Other Name: Tank, Receiver; Drier Desiccant Element; A/C Receiver Drier; A/C Accumulator
- Manufacturer Note: DEALER OPT


Toyota Dehydrator Part Number: 88474-12010
$100.71 MSRP: $141.37You Save: $40.66 (29%)Ships in 1-3 Business DaysProduct Specifications- Other Name: Dryer, Cooler; A/C Receiver Drier; Drier Desiccant Element; A/C Accumulator; Drier


Toyota Tank, Receiver Air Conditioner Part Number: 88471-20050
$56.39 MSRP: $78.49You Save: $22.10 (29%)Ships in 1-2 Business DaysProduct Specifications- Other Name: Tank, Receiver; Drier Desiccant Element; A/C Receiver Drier
- Replaces: 88471-04020, 88471-06020


Toyota Accumulator Part Number: 88470-47020
$3295.69 MSRP: $4829.87You Save: $1534.18 (32%)Ships in 1-3 Business DaysProduct Specifications- Other Name: Accumulator Assembly; A/C Receiver Drier; A/C Accumulator; Accumulator & Accessory Assembly


Toyota Dryer, Cooler Part Number: 88474-12030
$132.31 MSRP: $187.29You Save: $54.98 (30%)Ships in 1-3 Business DaysProduct Specifications- Other Name: Drier Desiccant Element; A/C Receiver Drier; A/C Accumulator


Toyota Tank, Receiver Part Number: 88471-16050
$54.00 MSRP: $75.17You Save: $21.17 (29%)Product Specifications- Other Name: TANK,RECEIVER; Drier Desiccant Element; A/C Receiver Drier; A/C Accumulator
- Replaces: 88471-04010, 88471-16040, 88471-50010, 88471-06010


Toyota Dehydrator Part Number: 88474-47010
$75.12 MSRP: $105.44You Save: $30.32 (29%)Ships in 1-3 Business DaysProduct Specifications- Other Name: Dryer, Cooler; A/C Receiver Drier; Drier Desiccant Element; Dryer, Air Conditioning; A/C Accumulator; Accumulator; Drier


Toyota Dehydrator Part Number: 88471-50020
$42.89 MSRP: $59.70You Save: $16.81 (29%)Ships in 1-3 Business DaysProduct Specifications- Other Name: Tank, Receiver; Drier Desiccant Element; Dryer, Air Conditioning; A/C Receiver Drier; A/C Accumulator; Drier; Receiver & Dryer Assembly, Cooler


Toyota Dehydrator Part Number: 88471-12060
$52.35 MSRP: $72.87You Save: $20.52 (29%)Ships in 1-3 Business DaysProduct Specifications- Other Name: Tank, Receiver; Drier Desiccant Element; A/C Receiver Drier; A/C Accumulator; Drier
- Replaces: 88471-02010, 88471-12020


Toyota Dehydrator Part Number: 88470-14010
$53.40 MSRP: $74.33You Save: $20.93 (29%)Ships in 1-3 Business DaysProduct Specifications- Other Name: Receiver Assembly; Drier Desiccant Element; A/C Receiver Drier; A/C Accumulator; Drier; Receiver & Dryer Assembly, Cooler
- Replaces: 88470-12070, 88470-12061, 88470-14010-B, 88470-01010, 88470-12050, 88471-12050

Toyota Dryer, Cooler Part Number: 88474-12020
$90.29 MSRP: $126.73You Save: $36.44 (29%)Ships in 1-3 Business DaysProduct Specifications- Other Name: Drier Desiccant Element; A/C Receiver Drier; A/C Accumulator

Toyota Accumulator Assembly Part Number: 88470-47050
$2487.57 MSRP: $3645.57You Save: $1158.00 (32%)Toyota Accumulator Part Number: 88470-47021
$3295.69 MSRP: $4829.87You Save: $1534.18 (32%)Ships in 1-3 Business DaysProduct Specifications- Other Name: Accumulator Assembly; A/C Receiver Drier; A/C Accumulator; Accumulator & Accessory Assembly

Toyota Dryer, Cooler Part Number: 88474-47030
$140.99 MSRP: $199.59You Save: $58.60 (30%)Ships in 1-2 Business DaysProduct Specifications- Other Name: Drier Desiccant Element; A/C Receiver Drier; A/C Accumulator

Toyota Accumulator Assembly Part Number: 88470-42100
$258.50 MSRP: $369.08You Save: $110.58 (30%)Ships in 1-3 Business DaysProduct Specifications- Other Name: Drier Desiccant Element; A/C Receiver Drier; A/C Accumulator


Toyota Drier Dessicant Bag Part Number: 88474-17010
$95.38 MSRP: $133.88You Save: $38.50 (29%)Ships in 1-2 Business DaysProduct Specifications- Other Name: Dryer, Cooler; A/C Receiver Drier; Drier Desiccant Element; Dryer, Air Conditioning; A/C Accumulator; Dehydrator; Drier
- Replaces: 88474-08030


Toyota Drier Part Number: 88470-20070
Product Specifications- Other Name: Receiver Assembly; Drier Desiccant Element; A/C Receiver Drier; A/C Accumulator; Receiver & Dryer Assembly, Cooler


Toyota Dehydrator Part Number: 88471-95401
Product Specifications- Other Name: Tank, Receiver; Drier Desiccant Element; A/C Receiver Drier; A/C Accumulator; Drier; Receiver & Dryer Assembly, Cooler

Toyota Dehydrator Part Number: 88471-16010
Product Specifications- Other Name: Tank, Receiver; Drier Desiccant Element; A/C Receiver Drier; A/C Accumulator; Drier; Receiver & Dryer Assembly, Cooler; Tank, Receiver Air Conditioner
- Replaces: 88470-16010

Toyota Tank Part Number: 88470-42110
$35.48 MSRP: $49.39You Save: $13.91 (29%)Product Specifications- Other Name: Receiver Assembly; Tank, Receiver
| Page 1 of 2 |Next >
1-20 of 38 Results
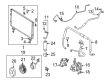
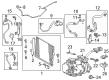
Toyota A/C Accumulator
OEM parts deliver unmatched quality you can rely on. They pass extensive quality control inspections. Toyota produces them to the official factory specifications. This process helps prevent defects and imperfections. So you can get exceptional lifespan and a flawless fit. Need new OEM Toyota A/C Accumulator? You'll love our wide selection of genuine options. Shop in minutes and skip the hunt. Our prices are unbeatable, you'll save time and money. It's easy to shop and find the right piece. Our committed customer service team gives professional help from start to finish. Every part includes a manufacturer's warranty. We ship quickly, your parts will arrive fast at your door.
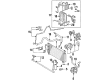
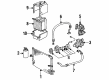
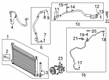
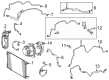
Toyota A/C Accumulator protects the compressor by entrapping moisture and debris before it starts destroying it. Toyota manufactures vehicles through lean techniques that reduce wastage and give employees the power to eliminate flaws immediately. The approach, which was conceived in 1937, continues to spearhead upgrades such as an expanded Hybrid Synergy Drive. The recent plug-in systems give drivers a taste of fast kickbacks and reduced fuel visits. TNGA platform extends to body styles, reduces body center of gravity, and enhances crash strength without an increase in mass. In the case of the plug-in RAV4 of 2024 with an electric range of 42 miles, there is still full cargo capacity. Trustworthiness makes the shopper become a faithful owner all over the world. There is an A/C Accumulator placed in between the evaporator and the suction side of the Toyota compressor. It isolates liquid refrigerant, retains excess oil, and captures desiccant such that only vapor is pumped back. Since the A/C Accumulator traps water and grit, the compressor avoids scoring and heat spikes. Pressure is stabilized with a clean A/C Accumulator that allows the Toyota cabins to cool in a few seconds on sweltering days. Long-term preventive maintenance of Toyota cooling loops: replacing a saturated A/C Accumulator before it is clogged with debris.
Toyota A/C Accumulator Parts and Q&A
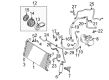
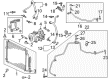
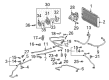
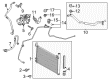
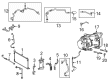
- Q: How to install the A/C Accumulator and associated components on Toyota Camry?A:Begin by connecting the cooler dryer through pliers to the modulator before adding sufficient amounts of ND-OIL 8 or equivalent compressor oil to O-ring and cap fitting surfaces. A straight hexagon wrench 14 mm should be used to install the cap to the cooler condenser core at 2.9 Nm (30 kgf-cm, 26 in-lbf) torque. The installation begins by attaching the cooler condenser assembly with 4 bolts achieving 5.0 Nm (51 kgf-cm, 44 in-lbf) torque while you should add 40 cc (1.4 fl. oz.) of ND-8 or equivalent compressor oil to the new condenser when required. To install the O-ring on the cooler refrigerant discharge pipe first remove the vinyl tape then apply compressor oil to its new O-ring and fitting surface before tightening it to 9.8 Nm (100 kgf-cm, 87 in-lbf). The air conditioning tube assembly requires compressor oil on a new O-ring followed by bolt torquing to 9.8 Nm (100 kgf-cm, 87 in-lbf). The hood lock support sub-assembly must be installed together with a bolt reaching 7.5 Nm (77 kgf-cm, 66 in-lbf). The next installation steps should involve the radiator support upper and both the front bumper assembly with or without fog light as well as the air cleaner inlet for all 2GR-FE and 2AZ-FE engines. The process concludes by adding refrigerant to the system followed by engine warming up and leak inspections and preparation of fog light aiming procedures.
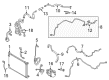
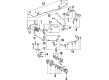
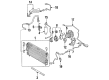
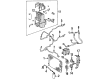
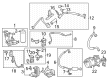
- Q: How to service and repair the A/C Accumulator on Toyota Tacoma?A:A proper A/C Accumulator repair method entails first removing refrigerant from the refrigeration system followed by evacuation and system charging with 600 plus or minus 50 g (21.16 plus or minus 1.76 oz.) of refrigerant before leak inspection. The liquid tube between A/C accumulator and cooling unit needs to be disconnected through bolt removal while maintaining 6.0 Nm (60 kg.cm, 52 in.lb) torque setting before the open fittings receive caps for protecting against dirt and moisture contamination. Install the tube by lubricating a new O-ring with compressor oil. After loosening the condenser's nut to disconnect the liquid tube and reaching a torque of 14 Nm (140 kg.cm, 10 ft.lb) you need to remove the two bolts to disconnect both tubes at 6.0 Nm (60 kg.cm, 52 in.lb) before capping the open fittings with compressor oil lubrication of three new O-rings. Locate the holder bolt then pull the A/C accumulator upward after removing it from the holder. The process of A/C accumulator replacement requires a 20 cc (0.71 fl.oz.) addition of ND-OIL 8 or equivalent compressor oil. The final procedure consists of reversing the steps used during removal.


Related Toyota Parts
 Toyota Cabin Air Filter
 Toyota Blower Motor
 Toyota Heater Control Valve
 Toyota A/C Compressor Clutch
 Toyota Ambient Temperature Sensor
 Toyota Blend Door Actuator
 Toyota Evaporator
 Toyota A/C Compressor Cut-Out Switches
 Toyota A/C Expansion Valve
 Toyota A/C Hose
 Toyota A/C Service Cap
 Toyota A/C System Valve Core
Browse Toyota A/C Accumulator by Models
Tacoma 4Runner Camry Tundra Corolla RAV4 Highlander Prius Sienna Land Cruiser Pickup FJ Cruiser Sequoia T100 Avalon Celica Supra Yaris Matrix MR2 Solara Venza Echo C-HR Cressida Grand Highlander Paseo Previa Prius C Prius Prime bZ4X Corolla Cross Corolla iM Crown GR Corolla Mirai MR2 Spyder Prius V Starlet Tercel Van Yaris iA Prius Plug-In Prius AWD-e RAV4 Prime