×
ToyotaParts- Hello
- Login or Register
- Quick Links
- Live Chat
- Track Order
- Parts Availability
- RMA
- Help Center
- Contact Us
- Shop for
- Toyota Parts
- Scion Parts
My Garage
My Account
Cart
OEM Toyota Camry A/C Accumulator
Accumulator- Select Vehicle by Model
- Select Vehicle by VIN
Select Vehicle by Model
orMake
Model
Year
Select Vehicle by VIN
For the most accurate results, select vehicle by your VIN (Vehicle Identification Number).
13 A/C Accumulators found


Toyota Camry Tank, Receiver Air Conditioner Part Number: 88471-34010
$34.40 MSRP: $47.89You Save: $13.49 (29%)Ships in 1-3 Business Days


Toyota Camry Tank, Receiver Air Conditioner Part Number: 88471-20050
$56.39 MSRP: $78.49You Save: $22.10 (29%)Ships in 1-2 Business Days

Toyota Camry Tank, Receiver Part Number: 88471-16050
$54.00 MSRP: $75.17You Save: $21.17 (29%)


Toyota Camry Dehydrator Part Number: 88474-47010
$75.12 MSRP: $105.44You Save: $30.32 (29%)Ships in 1-3 Business Days


Toyota Camry Dehydrator Part Number: 88470-14010
$53.40 MSRP: $74.33You Save: $20.93 (29%)Ships in 1-3 Business Days
Toyota Camry Dryer, Cooler Part Number: 88474-12020
$90.29 MSRP: $126.73You Save: $36.44 (29%)Ships in 1-3 Business Days
Toyota Camry Drier Dessicant Bag Part Number: 88474-06020
$87.62 MSRP: $122.99You Save: $35.37 (29%)Ships in 1-3 Business Days
Toyota Camry Drier Dessicant Bag Part Number: 88474-47020
$107.35 MSRP: $150.68You Save: $43.33 (29%)Ships in 1 Business Day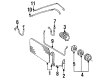
Toyota Camry Dehydrator Part Number: 88470-33010
$104.96 MSRP: $147.33You Save: $42.37 (29%)Ships in 1-3 Business Days


Toyota Camry Drier Dessicant Bag Part Number: 88474-17010
$95.38 MSRP: $133.88You Save: $38.50 (29%)Ships in 1-2 Business Days
Toyota Camry Dehydrator Part Number: 88470-32020

Toyota Camry Tank, Receiver Part Number: 88471-12040
Toyota Camry Dehydrator Part Number: 88470-33020
Toyota Camry A/C Accumulator
Choose genuine A/C Accumulator that pass strict quality control tests. You can trust the top quality and lasting durability. Shopping for OEM A/C Accumulator for your Toyota Camry? Our website is your one-stop destination. We stock an extensive selection of genuine Toyota Camry parts. The price is affordable so you can save more. It only takes minutes to browse and find the exact fit. Easily add to cart and check out fast. Our hassle-free return policy will keep you stress-free. We process orders quickly for swift delivery. Your parts will arrive faster, so you can get back on the road sooner.
Toyota Camry A/C Accumulator Parts and Q&A
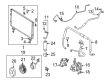
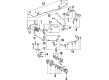
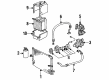
- Q: How to service and repair the A/C Accumulator on Toyota Camry?A:Service and repair work on the A/C Accumulator require first discharging the refrigerant from the refrigeration system following evacuation procedure with final refrigerant charge at 800 plus or minus 50 g (28.22 plus or minus 1.76 oz.) while inspecting for leaks. The service begins by disconnecting the two liquid tubes from the A/C accumulator by removing both tubes and two bolts while using 5.4 N.m torque (55 kgf.cm and 48 in.lbf). The open system fittings must get capped without delay then two new O-rings need lubrication with compressor oil before tube installation. The removal process requires unclipping the holder bolt followed by pulling down the A/C accumulator while adding 20 cc (0.71 fl.oz.) of ND-OIL 8 or similar compressor oil when exchanging the A/C accumulator. The final step involves removing both holder bolts and threaded part from each other. The installation process must follow the exact opposite steps of the removal process.
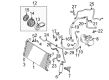
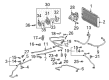
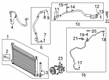
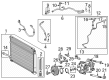
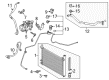
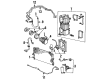
- Q: How to install the A/C Accumulator and related components on Toyota Camry?A:For installation of the cooler dryer utilize pliers to connect it to the modulator followed by applying adequate ND-OIL 8 or equivalent compressor oil to both O-ring and cap fitting surfaces. After applying 2.9 Nm (30 kgf-cm, 26 in-lbf) with a 14mm straight hexagon wrench to the cap of the cooler condenser core it can be installed onto the condenser core. The next step involves assembling the cooler condenser unit by fastening four bolts while setting the torque to 5.0 Nm (51 kgf-cm, 44 in-lbf). During new condenser installation, you must add 40 cc (1.4 fl. oz.) of ND-8 or equivalent compressor oil to the condenser. The assembly of the cooler refrigerant discharge pipe starts by removing vinyl tape and applying equivalent compressor oil to install a new O-ring and fitting elements then torque to 9.8 Nm (100 kgf-cm, 87 in-lbf). Perform a second installation procedure on the air conditioning tube assembly while adding new O-rings which need compressor oil application followed by 9.8 Nm torque measurement (100 kgf-cm, 87 in-lbf). Follow the installation procedure of the hood lock support sub-assembly by torquing it to 7.5 Nm (77 kgf-cm, 66 in-lbf). Install the radiator support upper part together with the front bumper assembly (with or without fog light) along with the air cleaner inlet assembly or sub-assembly depending on the engine type between 2GR-FE or 2AZ-FE. Complete the process by charging the system with refrigerant followed by engine warming then leak detection and preparation for fog light aiming when installed.


Related Toyota Camry Parts
 Toyota Camry Blower Motor
 Toyota Camry Blend Door Actuator
 Toyota Camry A/C Compressor
 Toyota Camry Evaporator
 Toyota Camry A/C Compressor Cut-Out Switches
 Toyota Camry A/C Expansion Valve
 Toyota Camry A/C Hose
 Toyota Camry A/C Service Cap
 Toyota Camry A/C Switch
 Toyota Camry A/C System Valve Core
 Toyota Camry Ambient Temperature Sensor
 Toyota Camry HVAC Pressure Switch