×
ToyotaParts- Hello
- Login or Register
- Quick Links
- Live Chat
- Track Order
- Parts Availability
- RMA
- Help Center
- Contact Us
- Shop for
- Toyota Parts
- Scion Parts
My Garage
My Account
Cart
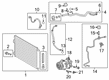
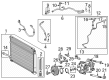
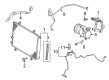
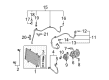
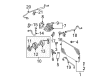
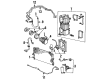
OEM Toyota Camry A/C Condenser
Air Conditioning Condenser- Select Vehicle by Model
- Select Vehicle by VIN
Select Vehicle by Model
orMake
Model
Year
Select Vehicle by VIN
For the most accurate results, select vehicle by your VIN (Vehicle Identification Number).
24 A/C Condensers found


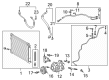
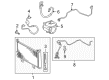
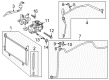
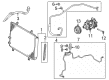
Toyota Camry Condenser Assembly Part Number: 884A0-33020
$289.61 MSRP: $413.49You Save: $123.88 (30%)Ships in 1-3 Business Days


Toyota Camry Condenser Assembly Part Number: 884A0-06020
$294.73 MSRP: $420.81You Save: $126.08 (30%)Ships in 1-2 Business Days


Toyota Camry Condenser Assembly Part Number: 88460-AZ004
$213.56 MSRP: $304.42You Save: $90.86 (30%)Ships in 1-3 Business Days


Toyota Camry Condenser Part Number: 88460-06070
$282.45 MSRP: $403.29You Save: $120.84 (30%)Ships in 1-3 Business Days
Toyota Camry Condenser Assembly Part Number: 88460-06210
$346.22 MSRP: $507.40You Save: $161.18 (32%)Ships in 1-3 Business Days
Toyota Camry Condenser Assembly Part Number: 884A0-06030
$295.32 MSRP: $421.64You Save: $126.32 (30%)Ships in 1-3 Business DaysToyota Camry Condenser Assembly Part Number: 88460-AZ001
$139.60 MSRP: $197.31You Save: $57.71 (30%)
Toyota Camry Condenser Assembly Part Number: 88460-AZ035
$184.70 MSRP: $263.28You Save: $78.58 (30%)Ships in 1-3 Business Days
Toyota Camry Condenser Assembly Part Number: 88460-33130
$226.48 MSRP: $323.36You Save: $96.88 (30%)Ships in 1-2 Business DaysToyota Camry Condenser Assembly Part Number: 88460-33120
$253.96 MSRP: $362.58You Save: $108.62 (30%)Ships in 1-3 Business DaysToyota Camry Condenser Assembly Part Number: 884A0-0R040
$266.47 MSRP: $380.46You Save: $113.99 (30%)Ships in 1-3 Business Days
Toyota Camry Condenser Assembly Part Number: 88460-06230
$284.83 MSRP: $406.68You Save: $121.85 (30%)Ships in 1-2 Business Days
Toyota Camry Condenser Part Number: 88460-06050
$314.32 MSRP: $448.77You Save: $134.45 (30%)Ships in 1-3 Business Days

Toyota Camry Condenser Assembly Part Number: 88460-06060
$316.05 MSRP: $451.25You Save: $135.20 (30%)Ships in 1-3 Business DaysToyota Camry Condenser Part Number: 88460-AZ003
$115.40 MSRP: $161.70You Save: $46.30 (29%)Ships in 1-3 Business DaysToyota Camry Condenser Assembly Part Number: 88460-06061
$319.90 MSRP: $456.75You Save: $136.85 (30%)
Toyota Camry Condenser Part Number: 88460-32030
Toyota Camry Condenser Part Number: 88460-32010

Toyota Camry Condenser Part Number: 88460-32070

Toyota Camry Shroud Part Number: 88460-32090
| Page 1 of 2 |Next >
1-20 of 24 Results
Toyota Camry A/C Condenser
Choose genuine A/C Condenser that pass strict quality control tests. You can trust the top quality and lasting durability. Shopping for OEM A/C Condenser for your Toyota Camry? Our website is your one-stop destination. We stock an extensive selection of genuine Toyota Camry parts. The price is affordable so you can save more. It only takes minutes to browse and find the exact fit. Easily add to cart and check out fast. Our hassle-free return policy will keep you stress-free. We process orders quickly for swift delivery. Your parts will arrive faster, so you can get back on the road sooner.
Toyota Camry A/C Condenser Parts and Q&A
- Q: How to install an A/C Condenser on Toyota Camry?A:Start the condenser installation process by using pliers to attach the cooler dryer to the modulator before applying ND-OIL 11 or equivalent compressor oil at a sufficient amount on the O-ring and cap fittings surface. The installation of the cap to the cooler condenser core requires a torque of 2.9 Nm (30 kgf-cm, 26 in-lbf) through use of a 14 mm straight hexagon wrench. The assembly process of the cooler condenser requires two bolts which need a torque setting of 5.0 Nm (51 kgf-cm) or 44 in-lbf. When installing a new condenser you must add 40 cc (1.4 fl. oz.) of ND-OIL 11 or equivalent compressor oil. Install the cooler refrigerant discharge pipe by first removing the vinyl tape followed by adding compressor oil to a new O-ring and the fitting surface then torquing the O-ring to 9.8 Nm (100 kgf-cm, 87 in-lbf). To install the liquid tube sub-assembly remove vinyl tape then apply compressor oil to a new O-ring, mount the O-ring followed by screwing the assembly onto the cooler condenser after torquing it to 9.8 Nm (100 kgf-cm, 87 in-lbf). Transition to the following installation sequence by adding the Radiator system followed by radiator support upper and air cleaner inlet. Before testing for leaks, you must add the inverter's coolant then check for any leakage. Afterwards, you should recharge the system with refrigerant during engine running tests which eventually help detect additional leaks. The procedure ends with installing the front bumper energy absorber followed by the front bumper assembly.
- Q: How to remove the A/C Condenser on Toyota Camry?A:The first step to remove the HVAC condenser requires recovering refrigerant from the refrigeration system. The V-bank cover sub-assembly (for 2GR-FE) should be removed first followed by the cool air intake duct seal (for 2GR-FE) and air cleaner cap sub-assembly (for 2AZ-FE and 2GR-FE). Follow the next step to remove the air cleaner inlet assembly (for 2AZ-FE), then remove the air cleaner inlet sub-assembly (for 2GR-FE) before proceeding to remove the No. 1 air cleaner inlet (for 2GR-FE). Begin by taking off the front bumper assembly (excluding or including the fog lights according to specification). Afterward remove the radiator support upper. To proceed with the removal, unscrew the bolt from the hood lock support sub-assembly. Disconnect the air conditioner tube through assembly removal while taking off the bolt which leads to the removal of the condenser assembly. The O-ring must also be removed from the air conditioning tube assembly before sealing all openings with vinyl tape to block moisture and foreign matter intrusions. The procedure continues by disconnecting the cooler refrigerant discharge pipe which includes removing the bolt with the pipe from the condenser while using O-ring replacement and securing all openings with vinyl tape. The completion of condenser assembly removal requires 4 bolt extraction and condenser removal before using a 14 mm straight hexagon wrench to detach the modulator cap and finally using pliers to remove the cooler dryer.

Related Toyota Camry Parts
 Toyota Camry Blend Door Actuator
 Toyota Camry A/C Compressor
 Toyota Camry Evaporator
 Toyota Camry Heater Core
 Toyota Camry A/C Compressor Clutch
 Toyota Camry A/C Compressor Cut-Out Switches
 Toyota Camry A/C Hose
 Toyota Camry A/C Service Cap
 Toyota Camry A/C Switch
 Toyota Camry A/C System Valve Core
 Toyota Camry Ambient Temperature Sensor
 Toyota Camry HVAC Pressure Switch