×
ToyotaParts- Hello
- Login or Register
- Quick Links
- Live Chat
- Track Order
- Parts Availability
- RMA
- Help Center
- Contact Us
- Shop for
- Toyota Parts
- Scion Parts
My Garage
My Account
Cart
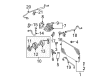
OEM Toyota Camry A/C Compressor
Air Conditioning Compressor- Select Vehicle by Model
- Select Vehicle by VIN
Select Vehicle by Model
orMake
Model
Year
Select Vehicle by VIN
For the most accurate results, select vehicle by your VIN (Vehicle Identification Number).
26 A/C Compressors found


Toyota Camry Compressor Assembly Part Number: 88310-0R014
$617.32 MSRP: $908.90You Save: $291.58 (33%)Ships in 1-3 Business Days

Toyota Camry Compressor Assembly Part Number: 88310-06390
$648.31 MSRP: $954.54You Save: $306.23 (33%)Ships in 1 Business Day


Toyota Camry Compressor Part Number: 88310-33330
$522.20 MSRP: $711.08You Save: $188.88 (27%)Ships in 1-3 Business Days
Toyota Camry Compressor Assembly Part Number: 88370-33051
$1055.78 MSRP: $1515.35You Save: $459.57 (31%)Ships in 1-3 Business DaysToyota Camry Compressor Assembly Part Number: 88310-06240
$557.16 MSRP: $762.25You Save: $205.09 (27%)Ships in 1-2 Business DaysToyota Camry Compressor Assembly, W/Pulley Part Number: 88310-06570
$605.28 MSRP: $894.27You Save: $288.99 (33%)Ships in 1-3 Business Days
Toyota Camry Compressor Assembly Part Number: 88320-33200-84
$425.90 MSRP: $625.40You Save: $199.50 (32%)Ships in 1-3 Business Days

Toyota Camry Compressor Part Number: 88320-06080
$262.23 MSRP: $374.40You Save: $112.17 (30%)Ships in 1-3 Business Days
Toyota Camry Compressor Part Number: 88320-07040-84
$348.77 MSRP: $512.15You Save: $163.38 (32%)Ships in 1-3 Business DaysToyota Camry Compressor Part Number: 88320-48080-84
$368.78 MSRP: $541.54You Save: $172.76 (32%)Ships in 1-3 Business Days
Toyota Camry Compressor Assembly Part Number: 88370-30021
$1095.59 MSRP: $1608.02You Save: $512.43 (32%)Ships in 1-3 Business Days
Toyota Camry Compressor Assembly, W/Motor Part Number: 88370-33020
$1096.16 MSRP: $1608.86You Save: $512.70 (32%)Ships in 1-3 Business DaysToyota Camry Reman Compressor Assembly Part Number: 88320-33160-84
$249.16 MSRP: $356.44You Save: $107.28 (31%)Ships in 1-3 Business Days

Toyota Camry Compressor, Reman A Part Number: 88320-33120-84
$324.95 MSRP: $464.89You Save: $139.94 (31%)Ships in 1-3 Business Days
Toyota Camry Compressor Part Number: 88320-33100-84
$324.95 MSRP: $464.89You Save: $139.94 (31%)Ships in 1-3 Business Days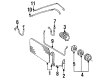
Toyota Camry Compressor Part Number: 88320-33060-84
$324.95 MSRP: $464.89You Save: $139.94 (31%)Ships in 1-3 Business Days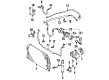
Toyota Camry Compressor Part Number: 88320-33030-84
$324.95 MSRP: $464.89You Save: $139.94 (31%)Ships in 1-3 Business DaysToyota Camry Compressor Part Number: 88320-33010-84
$324.95 MSRP: $464.89You Save: $139.94 (31%)Ships in 1-3 Business DaysToyota Camry Compressor Part Number: 88320-07090-84
$324.95 MSRP: $464.89You Save: $139.94 (31%)Ships in 1-3 Business Days
Toyota Camry Compressor Part Number: 88320-48330
$347.41 MSRP: $484.37You Save: $136.96 (29%)Ships in 1 Business Day
| Page 1 of 2 |Next >
1-20 of 26 Results
Toyota Camry A/C Compressor
Choose genuine A/C Compressor that pass strict quality control tests. You can trust the top quality and lasting durability. Shopping for OEM A/C Compressor for your Toyota Camry? Our website is your one-stop destination. We stock an extensive selection of genuine Toyota Camry parts. The price is affordable so you can save more. It only takes minutes to browse and find the exact fit. Easily add to cart and check out fast. Our hassle-free return policy will keep you stress-free. We process orders quickly for swift delivery. Your parts will arrive faster, so you can get back on the road sooner.
Toyota Camry A/C Compressor Parts and Q&A
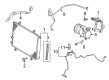
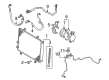
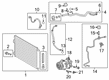
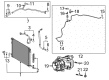
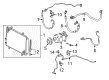
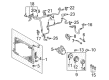
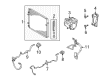
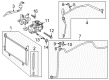
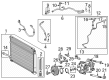
- Q: How to remove the A/C Compressor from the HVAC system on Toyota Camry?A:The first step for removing the electric inverter compressor from HVAC requires total recovery of refrigerant from refrigeration equipment followed by proper coolant drainage. You must first disconnect the negative terminal battery before removing the service plug grip. Your next action requires removal of both the No. 2 engine room side RH cover and the connector cover assembly. Measure the terminal voltage before putting on the connector cover assembly combined with No. 2 engine room side RH cover. To disconnect the radiator hose outlet use pliers and slide the claws to detach the hose. The bolt should be removed first before taking the No. 1 cooler refrigerant suction hose from the compressor and pulley then extracting the O-ring from the hose. The disconnected parts require vinyl tape application at their openings to stop both moisture and foreign materials from entering. The procedure must be repeated for the No. 1 cooler refrigerant discharge hose following removal of its bolt and O-ring and subsequent sealing of both ends. The electric inverter compressor removal procedure begins with disconnecting connector (A) and releasing green lock (B) before disconnecting connector (C) while taping the connections for insulation. The electric inverter compressor installation requires the removal of its securing bolts along with two bolts on the electric inverter air filter unit.
- Q: How to install the A/C Compressor and pulley on Toyota Camry?A:The installation of the 2AZ-FE engine's air conditioning compressor and pulley requires helium discharge from the service valve to adjust oil level followed by draining specified oil amounts from designated vents while using ND-OIL 8 or equivalent as the compressor oil. The new compressor along with magnetic clutch demands 160 + 15 cc (5.4 + 0.51 fl. oz.) of standard oil but you need to calculate any leftover oil from components for proper refrigeration performance. You must install the compressor and pulley after fitting the engine wire harness bracket while tightening four bolts to 25 Nm (255 kgf-cm, 18 ft-lbf) torque values that use the detailed tightening procedure. Install the No. 1 cooler refrigerant suction hose by removing the vinyl tape then applying compressor oil to a new O-ring and fitting surface before fastening it with a bolt at 9.8 Nm (100 kgf-cm, 87 in-lbf). Applicatoin of correct oil followed by the specified torque must be done for both the No. 1 cooler refrigerant discharge hoses. The piping clamp should be installed to both hoses before installing the generator assembly and V-ribbed belt and front fender apron seal RH and finally attaching the radiator hose outlet equipped with its clip. The battery negative terminal connection process must be finished before engine coolant addition and leak inspection takes place to avoid overheating the compressor when charging with refrigerant with the A/C system off. Installing the engine under cover RH and front wheel RH completes the procedure by following refrigerant charging then warming the engine for leak detection.


Related Toyota Camry Parts
 Toyota Camry Blower Motor
 Toyota Camry Blend Door Actuator
 Toyota Camry A/C Condenser
 Toyota Camry Heater Core
 Toyota Camry A/C Compressor Clutch
 Toyota Camry A/C Compressor Cut-Out Switches
 Toyota Camry A/C Hose
 Toyota Camry A/C Service Cap
 Toyota Camry A/C Switch
 Toyota Camry A/C System Valve Core
 Toyota Camry Ambient Temperature Sensor
 Toyota Camry HVAC Pressure Switch