×
ToyotaParts- Hello
- Login or Register
- Quick Links
- Live Chat
- Track Order
- Parts Availability
- RMA
- Help Center
- Contact Us
- Shop for
- Toyota Parts
- Scion Parts
My Garage
My Account
Cart
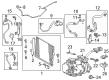
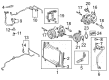
OEM Toyota Tundra A/C Accumulator
Accumulator- Select Vehicle by Model
- Select Vehicle by VIN
Select Vehicle by Model
orMake
Model
Year
Select Vehicle by VIN
For the most accurate results, select vehicle by your VIN (Vehicle Identification Number).
5 A/C Accumulators found


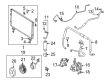
Toyota Tundra Tank, Receiver Air Conditioner Part Number: 88471-34010
$34.40 MSRP: $47.89You Save: $13.49 (29%)Ships in 1-3 Business Days

Toyota Tundra Dehydrator Part Number: 88474-12010
$100.71 MSRP: $141.37You Save: $40.66 (29%)Ships in 1-3 Business Days


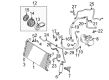
Toyota Tundra Tank, Receiver Air Conditioner Part Number: 88471-20050
$56.39 MSRP: $78.49You Save: $22.10 (29%)Ships in 1-2 Business Days
Toyota Tundra Drier Part Number: 88474-08010
$82.94 MSRP: $116.42You Save: $33.48 (29%)Ships in 1 Business Day


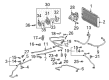
Toyota Tundra Drier Dessicant Bag Part Number: 88474-17010
$95.38 MSRP: $133.88You Save: $38.50 (29%)Ships in 1-2 Business Days
Toyota Tundra A/C Accumulator
Choose genuine A/C Accumulator that pass strict quality control tests. You can trust the top quality and lasting durability. Shopping for OEM A/C Accumulator for your Toyota Tundra? Our website is your one-stop destination. We stock an extensive selection of genuine Toyota Tundra parts. The price is affordable so you can save more. It only takes minutes to browse and find the exact fit. Easily add to cart and check out fast. Our hassle-free return policy will keep you stress-free. We process orders quickly for swift delivery. Your parts will arrive faster, so you can get back on the road sooner.
In so many ways, it is very important for drivers of Toyota Tundra vehicles to appreciate the importance of the A/C Accumulator in enhancing the performance efficiency of the A/C systems. This is a cylindrical member and is mounted at the optimal place between the evaporator and the compressor for remove moisture, oil and debris. The A/C Accumulator filters out such contaminants which, if left in the system would damage the equipment or cause it to work inefficiently. Although the above list does not describe the various types or styles of A/C Accumulators that may be installed in the different Tundra versions, their main objective is the same. Its placement and construction are a significant factor as regards the protection of the A/C system The accumulator is a critical component of the cars air conditioning system.
Toyota Tundra A/C Accumulator Parts and Q&A
- Q: How to install the A/C Accumulator and connect the necessary components on Toyota Tundra?A:Begin cooler dryer installation by first performing the surface treatment of new O-ring and accessing cap with ND-OIL 8 or equivalent compressor oil. The installation process starts by inserting the O-ring onto the cap. Installet the cap onto the modulator with a torque of 2.9 Nm (30 kgf-cm, 26 in-lbf) through the use of a 14 mm socket hexagon wrench. You should install the cooler condenser assembly with 2 bolts that need to be tightened to 9.8 Nm (100 kgf-cm, 87 in-lbf). For connecting the air conditioning tube and accessory assembly, remove the vinyl tape from the pipe and the cooler condenser, apply ND-OIL 8 or equivalent compressor oil to a new O-ring and the fitting surface of the pipe joint, install the O-ring on the air conditioning tube and accessory, and connect them to the cooler condenser with 2 bolts, also at a torque of 9.8 Nm (100 kgf-cm, 7 ft-lbf), while avoiding contact between tools and the pipe and holding the pipe near the connector during tightening. The discharge hose requires vinyl tape removal followed by application of compressor oil on a fresh O-ring installation and subsequent attachment to the cooler condenser using a bolt torqued to 9.8 Nm (100 kgf-cm, 7 ft-lbf). The process requires no tool contact with the pipe and maintaining the pipe near the connector. The Radiator assembly should be installed per engine type selection which includes 1GR-FE, 2UZ-FE, 3UR-FE and 3UR-FBE. The installation of the front bumper cover starts with the Steel Type or Resin Type procedures. The negative battery terminal reception order should be followed with the cable attachment and additional system initialization may be needed in specific cases. Engage the refrigerant charge process while warming the engine to completion followed by detecting refrigerant gas leaks and testing the SRS warning light through diagnostic trouble codes.
- Q: How to service and repair the A/C Accumulator on Toyota Tundra?A:The first step in servicing and repairing the A/C Accumulator involves discharging the refrigerant from the refrigeration system after evacuating air and then charging the system with exact amounts of 600 plus or minus 50 g (21.16 plus or minus 1.76 oz.) for Access Cab and Standard Cab. You must disconnect the liquid tubes from the A/C accumulator by removing its two bolts while torquing them to 5.4 N.m precisely (55 kgf.cm, 48 in.lbf) before you immediately place caps on the open fittings to stop moisture and dirt from entering the system. A technician should use compressor oil to prepare two new O-rings before inserting them onto the tubes. The holder bolt requires removal to access the downward pull of the A/C accumulator yet the oil addition (20 cc) of ND-OIL 8 or equal to the compressor should be performed before new A/C accumulator installation. Remove the bolt and holder before reversing the previous steps to reinstall the components.


Related Toyota Tundra Parts
 Toyota Tundra A/C Compressor Clutch
 Toyota Tundra Blend Door Actuator
 Toyota Tundra Blower Motor Resistor
 Toyota Tundra Heater Core
 Toyota Tundra A/C Compressor
 Toyota Tundra A/C Compressor Cut-Out Switches
 Toyota Tundra A/C Condenser
 Toyota Tundra A/C Expansion Valve
 Toyota Tundra A/C Hose
 Toyota Tundra A/C Service Cap
 Toyota Tundra A/C System Valve Core
 Toyota Tundra Ambient Temperature Sensor