×
ToyotaParts- Hello
- Login or Register
- Quick Links
- Live Chat
- Track Order
- Parts Availability
- RMA
- Help Center
- Contact Us
- Shop for
- Toyota Parts
- Scion Parts
My Garage
My Account
Cart
OEM Toyota MR2 Spyder A/C Condenser
Air Conditioning Condenser- Select Vehicle by Model
- Select Vehicle by VIN
Select Vehicle by Model
orMake
Model
Year
Select Vehicle by VIN
For the most accurate results, select vehicle by your VIN (Vehicle Identification Number).
2 A/C Condensers found

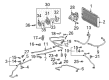
Toyota MR2 Spyder Condenser Part Number: 88460-17140
Toyota MR2 Spyder Condenser Part Number: 88460-17130
Toyota MR2 Spyder A/C Condenser
Choose genuine A/C Condenser that pass strict quality control tests. You can trust the top quality and lasting durability. Shopping for OEM A/C Condenser for your Toyota MR2 Spyder? Our website is your one-stop destination. We stock an extensive selection of genuine Toyota MR2 Spyder parts. The price is affordable so you can save more. It only takes minutes to browse and find the exact fit. Easily add to cart and check out fast. Our hassle-free return policy will keep you stress-free. We process orders quickly for swift delivery. Your parts will arrive faster, so you can get back on the road sooner.
It is therefore evident that the Toyota MR2 Spyder A/C Condenser is part of this car engineering marvel that fulfills Toyota's extravagant ignition of reliability and performance in their cars. Being a major heat exchanger, the A/C Condenser plays a vital role in cooling the gaseous refrigerant and converting it to liquid form before it gets to the accumulator for further regulation of air conditioning. This component is located directly before the radiator in order to adjust its position and allow for better cooling, a factor critical to passengers' comfort in the Toyota MR2 Spyder. Desinged for the MR2 Spyder produced between 1999 and 2007, the A/C Condenser maintains the same structure with emphasis on the efficient heat exchange necessary for the vehicle's climate control. The subject of the presente, the Toyota MR2 Spyder, a lightweight and high-rotation-turn model, would especially gain high efficiency from the A/C Condenser while the risk of a car engine overheat is always hazardous to all vehicles. Main peculiarities of the A/C Condenser are it has a high degree of protection due to its construction and it has an innovative design of airflow in the automotive market. Since Toyota MR2 Spyder A/C Condenser has been established to be extra-durable and high on performance, car lovers are assured of getting full value for their money especially for the amazing convertible sports car they always desired.
Toyota MR2 Spyder A/C Condenser Parts and Q&A
- Q: How to service and repair the A/C Condenser on Toyota MR2 Spyder?A:A proper HVAC condenser service starts with removing both the luggage compartment trim box cover and tool box assembly. The refrigeration system should first discharge its refrigerant while the Radiator assembly requires unbolting of 2 nuts and 2 bolts and 2 spare wheel carrier extensions before proceeding with 4 bolts and 2 radiator upper supports. You should pull up the right side of the radiator before removing the bush at the bottom from the existing concave and moving it towards the back. Remove both the liquid tube and discharge tube from the RH and LH radiator grilles after taking out 4 screws followed by removing 2 bolts while immediately covering the open fittings to avoid moisture entry. Users need to eliminate two bolts before rotating the condenser and then pulling it upward at a slant while maintaining both components undamaged. The installation process starts with tilting the new condenser before inserting half of it while turning as required to finally position it temporarily before the radiator but with careful protection of both components. You should use 2 bolts to secure the condenser while applying 8.8 Nm torque strength equivalent to 90 kg.cm, 78 in.lb. To install the liquid and discharge tubes workers must remove the cap before coating 2 fresh O-rings with compressor oil and screwing them in place with 2 bolts tightened to 9.8 Nm (100 kg.cm, 87 in.lb). To replace a condenser, you must add ND-OIL 8 or equivalent compressor oil in an amount of 40 cc (1.4 fl.oz.) to the compressor. Use 4 screws to install both outside radiator grills starting with the right-hand side first. To assemble the radiator, first raise the right front side while inserting the bushing at the bottom concave before moving it forward to install the 2 radiator supports and 2 spare wheel extensions with 2 bolts and 2 nuts requiring 8 Nm (82 kg.cm, 70 in.lb) torque. The last step includes evacuating air from the refrigeration system followed by charging it with 500 plus or minus 30 g (17.64 plus or minus 1.06 oz.) of refrigerant before performing remaining steps such as inspection for leaks and reinstallation of the tool box assembly and luggage compartment trim box cover.
- Q: How to remove and install an A/C Condenser in a refrigeration system on Toyota MR2 Spyder?A:The first step to remove the condenser requires removal of the luggage compartment trim box cover and tool box assembly alongside refrigerant discharge from the refrigeration system. The removal process starts with disconnecting the Radiator assembly through unfastening 2 nuts as well as 2 bolts and 2 spare wheel carrier extensions before moving onto removing the 4 bolts and 2 radiator upper supports. Start by lifting the radiator right side while extracting the bush from its bottom side concave before moving the bush backwards. The removal process starts by taking out the liquid tube and discharge tube by unfastening 4 screws on the RH and LH radiator grilles, then removing 2 bolts from both tubes and ensuring immediate capped fittings to prevent system moisture infiltration. Remove the condenser with two bolts while turning it before pulling up half of it and then pulling it up at an angle while being cautious to avoid damaging both components. Installation requires tilting the condenser followed by entering half of it while rotating it into position before setting it in front of the radiator. Use 2 bolts to secure the condenser while torquing them to 8.8 N.m (90 kgf.cm, 78 in.lbf). The next step involves removing the caps from both the liquid and discharge tubes while you oil two new O-rings. Then install these tubes with two bolts receiving a torque of 9.8 N.m (100 kgf.cm, 87 in.lbf). When replacing the condenser the technician should add 40 cc (1.4 fl.oz.) of ND-OIL 8 or an equivalent compressor oil to the compressor system. Secure the 4 screws into the RH and LH radiator grills in their installation position. To install the radiator assembly start by lifting the right side before attaching the bottom-side bush to the concave surface while moving the assembly forward and adding 2 radiator supports and 2 spare wheel extensions through 4 bolts and 2 nuts before torquing all fasteners to 8 N.m (82 kgf.cm, 70 in.lbf). The system needs charging by using an air evacuation process to prepare it for a refrigerant intake of 500 plus or minus 30 g (17.64 plus or minus 1.06 oz.) while checking for leaks. Conclude the installation with assembly of the tool box while fitting the luggage compartment trim box cover.

Related Toyota MR2 Spyder Parts
 Toyota MR2 Spyder A/C Accumulator
 Toyota MR2 Spyder A/C Compressor
 Toyota MR2 Spyder A/C Compressor Clutch
 Toyota MR2 Spyder A/C Compressor Cut-Out Switches
 Toyota MR2 Spyder A/C Expansion Valve
 Toyota MR2 Spyder A/C Hose
 Toyota MR2 Spyder A/C Service Cap
 Toyota MR2 Spyder A/C Switch
 Toyota MR2 Spyder A/C System Valve Core
 Toyota MR2 Spyder Ambient Temperature Sensor
 Toyota MR2 Spyder Evaporator
 Toyota MR2 Spyder HVAC Pressure Switch