×
ToyotaParts- Hello
- Login or Register
- Quick Links
- Live Chat
- Track Order
- Parts Availability
- RMA
- Help Center
- Contact Us
- Shop for
- Toyota Parts
- Scion Parts
My Garage
My Account
Cart
OEM Toyota MR2 Spyder A/C Switch
Air Conditioning Switch- Select Vehicle by Model
- Select Vehicle by VIN
Select Vehicle by Model
orMake
Model
Year
Select Vehicle by VIN
For the most accurate results, select vehicle by your VIN (Vehicle Identification Number).
2 A/C Switches found

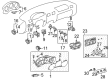
Toyota MR2 Spyder Knob Part Number: 55905-17090
$14.21 MSRP: $19.78You Save: $5.57 (29%)
Toyota MR2 Spyder Button Part Number: 55905-17070
Toyota MR2 Spyder A/C Switch
Choose genuine A/C Switch that pass strict quality control tests. You can trust the top quality and lasting durability. Shopping for OEM A/C Switch for your Toyota MR2 Spyder? Our website is your one-stop destination. We stock an extensive selection of genuine Toyota MR2 Spyder parts. The price is affordable so you can save more. It only takes minutes to browse and find the exact fit. Easily add to cart and check out fast. Our hassle-free return policy will keep you stress-free. We process orders quickly for swift delivery. Your parts will arrive faster, so you can get back on the road sooner.
One of the many vital parts of an automobile is the Toyota MR2 Spyder A/C Switch that asserts the brand's dependability and efficiency. This is an A/C switch intended for the Toyota MR2 Spyder cars manufactured between 1999 and 2007 and shows control over the car's climate regulation system while catering to the comfort of the passengers. With its integration to the climate control module, users can simply turn the Toyota MR2 Spyder A/C Switch and use buttons and dials in order to control temperature. This goes a long way into improving the feel behind the wheel and also on the general performance of the climate control feature of the car. Toyota MR2 Spyder is sometimes noted for its lightweight and performance-oriented handling; therefore, having a part like the A/C Switch, which would ensure that the air conditioning system of the vehicle would run efficiently, increasing safety and comfort during the drive. The A/C Switch being compatible with most of the MR2 Spyder Models makes it unique in the automotive market regarding durability and simple functionality. Another level of convenience is added by such options as the automatic temperature control, and the responsive control of the blower motor for even better driving experience which is a part of Toyota MR2 Spyder A/C Switch features. In conclusion, with the Toyota MR2 Spyder A/C Switch, Toyota expressed once more its engineering prowess, to make sure that drivers can fully appreciate what is considered the optimal sports car in the market.
Toyota MR2 Spyder A/C Switch Parts and Q&A
- Q: How to service and repair the A/C Switch on Toyota MR2 Spyder?A:First service the Heater Control Assembly by removing the center cluster finish panel after taking off the 4 knobs and 2 screws and using a screwdriver to detach the panel while taping the screwdriver tip first. Divert the power supply from the clock connector while removing the panel. Carefully remove the glove compartment door and fully detach all heater control cables before they can be bent. First disconnect the heater control assembly after removing its 4 screws and taking out the 2 connectors. Attach the heater control assembly connectors and pass the air conditioning control cables through according to illustration before using the four screws for assembly installation. You should connect the clock connector on the center cluster finish panel before securing it with 2 screws and putting back the 4 knobs. Establish the connection of heater control cables through the "RECIRC" position on the air inlet control lever while setting the temperature control dial at "MAX. COOL." After installing the air inlet damper control lever run the cables through to "RECIRC" position and stand the heater control panel in "MAX. COOL" before dialing the mode control to "FACE." To adjust the air inlet damper control cable start by positioning the "RECIRC" mark on the lever followed by attaching the inner cable to the pin then clamping and gently stretching the outer cable according to directions. To adjust the air mix damper control cable users must set the lever to "MAX. COOL". The employee secures the outer cable following its specified tension direction before releasing the clamp. To finish the maintenance adjust the mode control cable through connecting the control cable to the "FACE" position of the link followed by clamping. Finish up the process through glove compartment door replacement.

Related Toyota MR2 Spyder Parts
 Toyota MR2 Spyder A/C Accumulator
 Toyota MR2 Spyder A/C Compressor
 Toyota MR2 Spyder A/C Compressor Clutch
 Toyota MR2 Spyder A/C Compressor Cut-Out Switches
 Toyota MR2 Spyder A/C Condenser
 Toyota MR2 Spyder A/C Expansion Valve
 Toyota MR2 Spyder A/C Service Cap
 Toyota MR2 Spyder A/C System Valve Core
 Toyota MR2 Spyder Blower Control Switches
 Toyota MR2 Spyder Blower Motor Resistor
 Toyota MR2 Spyder Heater Core
 Toyota MR2 Spyder HVAC Pressure Switch