×
ToyotaParts- Hello
- Login or Register
- Quick Links
- Live Chat
- Track Order
- Parts Availability
- RMA
- Help Center
- Contact Us
- Shop for
- Toyota Parts
- Scion Parts
My Garage
My Account
Cart
OEM Toyota MR2 Spyder Radiator
Cooling Radiator- Select Vehicle by Model
- Select Vehicle by VIN
Select Vehicle by Model
orMake
Model
Year
Select Vehicle by VIN
For the most accurate results, select vehicle by your VIN (Vehicle Identification Number).
1 Radiator found


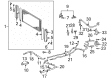
Toyota MR2 Spyder Radiator Assembly Part Number: 16400-22110
$289.43 MSRP: $413.24You Save: $123.81 (30%)
Toyota MR2 Spyder Radiator
Choose genuine Radiator that pass strict quality control tests. You can trust the top quality and lasting durability. Shopping for OEM Radiator for your Toyota MR2 Spyder? Our website is your one-stop destination. We stock an extensive selection of genuine Toyota MR2 Spyder parts. The price is affordable so you can save more. It only takes minutes to browse and find the exact fit. Easily add to cart and check out fast. Our hassle-free return policy will keep you stress-free. We process orders quickly for swift delivery. Your parts will arrive faster, so you can get back on the road sooner.
The Toyota MR2 Spyder Radiator is an part component of the car manufacturing cooling system, receive high rating for their reliability and performance. As a car radiator the primary function of this component is to dissipate heat from the engine coolant; it works as a heat exchanger to maintain the appropriate temperature for the Toyota MR2 Spyder's engine. Generally made from lightweight alu originals and strong plastic or aluminum containers in the MR2 Spyder Radiator; the parts are special designed to provide coolant flow enhancement and heat transfer characteristics. This is particularly important with the Toyota MR2 Spyder which is recognized for its high level of fun to drive factor. Designed for the vehicles manufactured from 1999 up to 2007, the radiator allows improving the car's performance and safety in terms of overheating during various types of dynamic use. This Toyota MR2 Spyder Radiator comes in direct-fit applications, meaning that they don't interfere with the factory design. Its performance-oriented versions may have even larger tubes and a higher fin density - enhancing the cooling capacity even more. All these efforts of Toyota not only enhance the functionality of the Toyota MR2 Spyder but also increases the car's reliability as well. As an exemplar engineering marvel compatible with various models of the MR2 Spyder line, the product exemplifies the Toyota tradition's focus on quality and performance.
Toyota MR2 Spyder Radiator Parts and Q&A
- Q: How to remove and reinstall a radiator on Toyota MR2 Spyder?A:Starting the radiator replacement requires draining engine coolant then removing the tool box followed by the luggage compartment trim box cover. Start by removing the radiator assembly which requires the elimination of 2 bolts and 2 nuts and 2 spare wheel carrier extensions and disconnecting the 2 electric cooling fan connectors and disconnecting the 2 radiator hoses followed by taking out 4 bolts and 2 radiator upper supports then dissolving the 2 radiator lower support bushings. The electric cooling fan needs to be detached from the radiator by removing its 2 bolts. To start disassembling use Special Service Tool: 09230-01010 by placing the claw onto the overhaul handle while adjusting stopper bolts to obtain dimension "B" at 0.2 - 0.3 mm (0.008 - 0.012 inch). Use the tool to unclean lock plates before gently tapping the radiator bracket and tank while also removing O-ring parts. Inspection of the lock plate must be followed by damage repair using pliers while noting that the radiator can have its seals replaced twice before necessary replacement. New O-rings and tanks need installation during reassembly while avoiding foreign objects in the lock plate groove and keeping the O-ring untwisted for proper assembly. A soft-faced hammer should be used to tap the lock plate until all gaps disappear. Follow these steps to assemble Special Service Tool: 09230-01010, 09231-14010 by adjusting the stopper bolt to reach 8.4 mm (0.331 inch) dimension. Use the tool to caulk the lock plate while verifying that the lock plate height falls between 7.4 to 7.8 mm (0.2913 to 0.3071 inch). Add a new O-ring before installing the drain plug onto its housing. Testing commences through drain plug tightening followed by installation of coolant reservoir together with toolkit Special Service Tool: 09230-01010 to seal the inlet and outlet pipes which are tested with 177 kPa pressure (1.8 kgf/cm2, 26 psi) radiator cap instrument while the radiator rests under water to detect possible leaks. For installation, attach the electric cooling fan to the radiator with 2 bolts, torquing to 5 Nm (51 kgf-cm, 44 inch lbs.), then install the radiator assembly by placing it in the body, installing the 2 radiator lower support bushings, securing the 2 radiator upper supports with 4 bolts torqued to 12.5 Nm (128 kgf-cm, 9 ft. lbs.), connecting the 2 radiator hoses, connecting the 2 electric cooling fan connectors, and installing the 2 spare wheel carrier extensions with 2 bolts and 2 nuts torqued to 8 Nm (82 kgf-cm, 70 inch lbs.). The technical procedure ends by adding cooling fluid while installing the luggage compartment trim box cover and tool box before checking for engine fluid leaks and reconfirming the correct coolant level.

Related Toyota MR2 Spyder Parts
 Toyota MR2 Spyder Coolant Reservoir
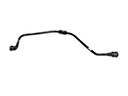 Toyota MR2 Spyder Coolant Reservoir Hose
 Toyota MR2 Spyder Cooling Fan Assembly
 Toyota MR2 Spyder Fan Blade
 Toyota MR2 Spyder Fan Shroud
 Toyota MR2 Spyder Oil Drain Plug Gasket
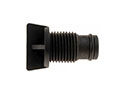 Toyota MR2 Spyder Radiator Drain Plug
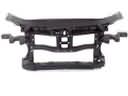 Toyota MR2 Spyder Radiator Support
 Toyota MR2 Spyder Thermostat
 Toyota MR2 Spyder Thermostat Gasket
 Toyota MR2 Spyder Thermostat Housing
 Toyota MR2 Spyder Water Hose