×
ToyotaParts- Hello
- Login or Register
- Quick Links
- Live Chat
- Track Order
- Parts Availability
- RMA
- Help Center
- Contact Us
- Shop for
- Toyota Parts
- Scion Parts
My Garage
My Account
Cart
OEM Toyota Tacoma A/C Condenser
Air Conditioning Condenser- Select Vehicle by Model
- Select Vehicle by VIN
Select Vehicle by Model
orMake
Model
Year
Select Vehicle by VIN
For the most accurate results, select vehicle by your VIN (Vehicle Identification Number).
9 A/C Condensers found


Toyota Tacoma Condenser Part Number: 88460-04211
$269.45 MSRP: $384.73You Save: $115.28 (30%)Ships in 1-3 Business Days
Toyota Tacoma Condenser Part Number: 88460-04210
$271.79 MSRP: $388.06You Save: $116.27 (30%)Ships in 1-3 Business Days

Toyota Tacoma Condenser Part Number: 88461-04030
$283.33 MSRP: $404.52You Save: $121.19 (30%)Ships in 1-2 Business Days
Toyota Tacoma Condenser Part Number: 88450-04012
$299.08 MSRP: $427.02You Save: $127.94 (30%)Ships in 1 Business Day
Toyota Tacoma Condenser Assembly, Support Part Number: 884A0-AK020
$285.10 MSRP: $407.05You Save: $121.95 (30%)Ships in 1-2 Business Days
Toyota Tacoma Condenser Assembly, Cooler Part Number: 884A0-AK010
$287.52 MSRP: $410.44You Save: $122.92 (30%)Ships in 1-2 Business Days
Toyota Tacoma Condenser Part Number: 88460-04201
$275.56 MSRP: $393.43You Save: $117.87 (30%)Ships in 1-3 Business Days
Toyota Tacoma Condenser Part Number: 88460-04090
Toyota Tacoma Condenser Part Number: 88461-04020
Toyota Tacoma A/C Condenser
Choose genuine A/C Condenser that pass strict quality control tests. You can trust the top quality and lasting durability. Shopping for OEM A/C Condenser for your Toyota Tacoma? Our website is your one-stop destination. We stock an extensive selection of genuine Toyota Tacoma parts. The price is affordable so you can save more. It only takes minutes to browse and find the exact fit. Easily add to cart and check out fast. Our hassle-free return policy will keep you stress-free. We process orders quickly for swift delivery. Your parts will arrive faster, so you can get back on the road sooner.
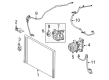
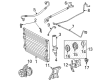
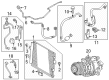
The A/C Condenser in Toyota Tacoma vehicles is one of the main actors of the air conditioning and can be classified as heat exchangers. Its main function is to condense the gaseous refrigerant so as to liquefy it and make it transfer to the accumulator. This is a critical process for the general refrigeration cycle and breakdown in the A/C Condenser will affect the entire cooling system. Generally made up of a number of tubes, the A/C Condenser is mounted in front of the radiator with a view to enhancing the flow of air and cooling process. Even when it comes to Types and Styles of A/C Condensers used in different models of Tacoma, the driving principle does not change across the generations because of the similar inherent mechanical and thermal properties of the hardware. Silent evidence suggests that the performance of the A/C Condenser forms the basis of the operations of the climate control on the vehicle.
Toyota Tacoma A/C Condenser Parts and Q&A
- Q: How to service and repair the A/C Condenser on Toyota Tacoma?A:The service and maintenance process of an HVAC condenser starts by removing refrigerant from the refrigeration system followed by evacuation then system charging with 600 plus or minus 50 g (21.16 plus or minus 1.76 oz.) of refrigerant before leak inspection. Begin by taking out the radiator grille, horns together with the hood lock set bolts and center brace from the system. Twist off the two receiver bolts while disconnecting both liquid tubes before you tighten them to 6.0 N.m (60 kgf.cm, 52 in.lbf). Secure the exposed fittings with caps to stop moisture and dirt from intruding into the system. Apply compressor oil to two new O-rings before placing them inside the tubes followed by untightening both nuts to extract the liquid tubes when fastening them to 14 N.m (140 kgf.cm, 10 ft.lbf) then secure open fittings again. The condenser hose requires removal through the combination of a piping clamp set bolt and bolt holding the hose together with the torque set to 10 N.m (100 kgf.cm, 7 ft.lbf). Both open ports need capping for the purpose. The process of removing the condenser requires users to start by dislodging the liquid tube clamping bolt followed by removing both condenser mounting bolts before extracting the condenser. When replacing the condenser the addition of 40 - 50 cc (1.4 - 1.7 fl.oz.) of ND-OIL 8 or equivalent compressor oil to the new condenser should be performed. The installation procedure includes the same steps in reverse to the steps of removal.
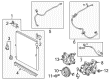
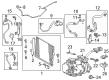
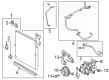
- Q: How to install an A/C Condenser and its related components on Toyota Tacoma?A:The cooler condenser installation process requires initial attachment of the claw before inserting the condenser upper bracket LH followed by RH then LH and ending with RH brackets. Use 2 bolts to attach the condenser lower brackets onto the Radiator lower supports by torquing them to 9.0 Nm (92 kgf-cm, 80 in-lbf). To install the air conditioning tube assembly first remove attached vinyl tape from the pipe and the connecting part of the cooler condenser assembly then apply sufficient compressor oil (RL-897 or equivalent) to a new seal washer and the pipe joint surface, finally install the seal washer onto the pipe and secure it to the cooler condenser assembly with a bolt which requires torque at 7.5 Nm (76 kgf-cm, 66 in-lbf). Detach the vinyl tape from the discharge hose at both ends of the assembly before applying sufficient compressor oil (RL-897 or equivalent) to a designated new washer and the hose joint surface. Secure the washer to the discharge hose sub-assembly while using a bolt torqued to 7.5 Nm (76 kgf-cm, 66 in-lbf). The radiator installation for both 2TR-FE and 1GR-FE engines should be followed by the fan shroud installation for both engines types before installing the radiator support to frame seal LH for both engine types. After installing the radiator grille you must connect the cable to the negative battery terminal using a torque of 3.9 Nm (40 kgf-cm, 35 in-lbf) then you must add engine coolant to both 2TR-FE and 1GR-FE check for leaks on each engine and complete the procedure by warming up the engine and checking for refrigerant leaks.


Related Toyota Tacoma Parts
 Toyota Tacoma Cabin Air Filter
 Toyota Tacoma A/C Compressor
 Toyota Tacoma Blower Motor
 Toyota Tacoma Blower Motor Resistor
 Toyota Tacoma A/C Compressor Clutch
 Toyota Tacoma Ambient Temperature Sensor
 Toyota Tacoma Blend Door Actuator
 Toyota Tacoma Evaporator
 Toyota Tacoma A/C Accumulator
 Toyota Tacoma A/C Hose
 Toyota Tacoma A/C System Valve Core
 Toyota Tacoma HVAC Pressure Switch