×
ToyotaParts- Hello
- Login or Register
- Quick Links
- Live Chat
- Track Order
- Parts Availability
- RMA
- Help Center
- Contact Us
- Shop for
- Toyota Parts
- Scion Parts
My Garage
My Account
Cart
OEM Toyota Seat Belt
Seat Safety Belt- Select Vehicle by Model
- Select Vehicle by VIN
Select Vehicle by Model
orMake
Model
Year
Select Vehicle by VIN
For the most accurate results, select vehicle by your VIN (Vehicle Identification Number).
3543 Seat Belts found


Toyota Buckle, Gray/Fawn, Driver Side GRAY Part Number: 73240-AA050-B1
$30.58 MSRP: $42.57You Save: $11.99 (29%)Ships in 1-3 Business DaysProduct Specifications- Other Name: Belt Assembly, Front Seat; Seat Belt Receptacle, Left; Latch; Belt Assembly, Front Seat Inner, Driver Side
- Manufacturer Note: DK.GRAY,TRIM1#
- Position: Driver Side
- Replaces: 73240-AA050-B0, 73240-AA050-E0


Toyota Buckle, Driver Side GREY Part Number: 73240-02030-B1
$27.83 MSRP: $38.74You Save: $10.91 (29%)Ships in 1-2 Business DaysProduct Specifications- Other Name: Belt Assembly, Front Seat; Seat Belt Receptacle, Left; Latch; Belt Assembly, Front Seat Inner, Driver Side
- Manufacturer Note: DK.GRAY,TRIM1#
- Position: Driver Side
- Replaces: 73240-02030-B0, 73240-02030-E0


Toyota Lap & Shoulder Belt, Gray, Driver Side Part Number: 73220-0C120-B0
$232.76 MSRP: $332.32You Save: $99.56 (30%)Ships in 1-3 Business DaysProduct Specifications- Other Name: Belt Assembly, Front Seat; Seat Belt Lap and Shoulder Belt, Front Left; Retractor Assembly; Belt Assembly, Front Seat Outer, Driver Side
- Manufacturer Note: GRAY,TRIM1#
- Position: Driver Side


Toyota Lap & Shoulder Belt, Gray, Driver Side Part Number: 73220-02461-B0
$218.66 MSRP: $312.20You Save: $93.54 (30%)Ships in 1-3 Business DaysProduct Specifications- Other Name: Belt Assembly, Front Seat; Seat Belt Lap and Shoulder Belt, Front Left; Belt & Retractor; Belt Assembly, Front Seat Outer, Driver Side
- Manufacturer Note: GRAY,TRIM1#
- Position: Driver Side
- Replaces: 73220-02460-B0


Toyota Buckle, Black, Passenger Side BLK Part Number: 73230-02020-C0
$34.17 MSRP: $47.56You Save: $13.39 (29%)Product Specifications- Other Name: Belt Assembly, Front Seat; Seat Belt Receptacle, Front, Front Right; Latch; Belt Assembly, Front Seat Inner, Passenger Side
- Manufacturer Note: BLACK,TRIM2#
- Position: Passenger Side
- Replaces: 73230-02020-B0, 73230-02020-E0


Toyota Buckle End, Blue/Gray, Driver Side TAN Part Number: 73230-0C050-E0
$42.41 MSRP: $59.03You Save: $16.62 (29%)Ships in 1-2 Business DaysProduct Specifications- Other Name: Belt Assembly, Front Seat; Seat Belt Receptacle, Front Left, Front Right; Buckle; Latch; Belt Assembly, Front Seat Inner, Driver Side
- Position: Driver Side
- Replaces: 73230-0C050-B3, 73230-0C050-B2, 73230-0C050-B0, 73230-0C050-B1, 73230-0C050-B4, 73230-0C050-E1


Toyota Buckle End, Blue/Gray, Passenger Side TAN Part Number: 73230-0C040-E0
$42.41 MSRP: $59.03You Save: $16.62 (29%)Ships in 1-3 Business DaysProduct Specifications- Other Name: Belt Assembly, Front Seat; Seat Belt Receptacle, Front Right; Buckle; Latch; Belt Assembly, Front Seat Inner, Passenger Side
- Manufacturer Note: MD.OAK,TRIM4#
- Position: Passenger Side
- Replaces: 73230-0C040-B3, 73230-0C040-B2, 73230-0C040-B4, 73230-0C040-B1, 73230-0C040-E1, 73230-0C040-B0


Toyota Lap Belt Assembly, Driver Side Part Number: 73480-35010-B0
$53.52 MSRP: $74.50You Save: $20.98 (29%)Ships in 1-3 Business DaysProduct Specifications- Other Name: Belt Assembly, Rear Seat I; Seat Belt, Left; Latch; Belt Assembly, Rear Seat Inner W/Center, Driver Side
- Position: Driver Side

Toyota Buckle, Driver Side Part Number: 73240-02020-E0
$68.48 MSRP: $96.13You Save: $27.65 (29%)Ships in 1-2 Business DaysProduct Specifications- Other Name: Belt Assembly, Front Seat; Seat Belt Receptacle, Left; Latch; Belt Assembly, Front Seat Inner, Driver Side
- Manufacturer Note: MD.NEUTRAL BONE,TRIM4#
- Position: Driver Side


Toyota Lap & Shoulder Belt, Passenger Side Part Number: 73210-35841-C0
$144.28 MSRP: $204.24You Save: $59.96 (30%)Ships in 1-3 Business DaysProduct Specifications- Other Name: Belt Assembly, Front Seat; Seat Belt Lap and Shoulder Belt, Front Right; Belt & Retractor; Belt Assembly, Front Seat Outer, Passenger Side
- Manufacturer Note: BLACK,TRIM1#
- Position: Passenger Side
- Replaces: 73210-35840-C0


Toyota Lap & Shoulder Belt, Black, Passenger Side Part Number: 73210-06342-C0
$216.68 MSRP: $309.37You Save: $92.69 (30%)Ships in 1-3 Business DaysProduct Specifications- Other Name: Belt Assembly, Front Seat; Seat Belt Lap and Shoulder Belt, Front Right; Belt & Retractor; Belt Assembly, Front Seat Outer, Passenger Side
- Position: Passenger Side
- Replaces: 73210-06341-C0, 73210-06340-C0


Toyota Lap & Shoulder Belt, Black, Driver Side Part Number: 73220-06390-C3
$218.66 MSRP: $312.20You Save: $93.54 (30%)Ships in 1-3 Business DaysProduct Specifications- Other Name: Belt Assembly, Front Seat; Seat Belt Lap and Shoulder Belt, Front Left; Belt & Retractor; Belt Assembly, Front Seat Outer, Driver Side
- Position: Driver Side
- Replaces: 73220-06390-C1


Toyota Buckle End, Gray, Inner Driver Side Part Number: 73390-0C010-B0
$25.44 MSRP: $35.41You Save: $9.97 (29%)Ships in 1-3 Business DaysProduct Specifications- Other Name: Belt Assembly, Rear Seat; Seat Belt Receptacle, Rear Left Outer; Latch; Belt Assembly, Rear Seat, Inner Driver Side
- Manufacturer Note: GRAY,TRIM1#
- Position: Inner Driver Side


Toyota Buckle, Blue Gray, Front TAN Part Number: 73230-08010-E0
$27.59 MSRP: $38.41You Save: $10.82 (29%)Product Specifications- Other Name: Belt Assembly, Front Seat; Seat Belt Receptacle, Front; Latch; Belt Assembly, Front Seat Inner, Passenger Side; Belt Assembly, Front Seat Inner, Driver Side
- Manufacturer Note: MD.OAK,TRIM4#
- Position: Front
- Replaces: 73230-08010-B0


Toyota Buckle End, Gray, Driver Side Part Number: 73230-48250-B0
$60.19 MSRP: $84.48You Save: $24.29 (29%)Product Specifications- Other Name: Belt Assembly, Front Seat; Seat Belt Receptacle, Front Left; Latch; Belt Assembly, Front Seat Inner, Driver Side
- Position: Driver Side


Toyota Lap & Shoulder Belt, Gray, Outer Driver Side Part Number: 73370-0E070-B0
$139.81 MSRP: $197.92You Save: $58.11 (30%)Ships in 1-3 Business DaysProduct Specifications- Other Name: Belt Assembly, Rear Seat; Seat Belt Lap and Shoulder Belt, Center Left; Belt & Retractor; Belt Assembly, Rear Seat, Outer Driver Side
- Manufacturer Note: GRAY,TRIM1#
- Position: Outer Driver Side


Toyota Lap & Shoulder Belt, Gray, Outer Passenger Side Part Number: 73360-60325-B2
$183.01 MSRP: $261.30You Save: $78.29 (30%)Ships in 1-3 Business DaysProduct Specifications- Other Name: Belt Assembly, Rear Seat; Seat Belt Lap and Shoulder Belt, Center Right; Belt & Retractor; Belt Assembly, Rear Seat, Outer Passenger Side
- Manufacturer Note: GRAY,TRIM1#
- Position: Outer Passenger Side
- Replaces: 73360-60323-B2


Toyota Lap & Shoulder Belt, Black, Passenger Side Part Number: 73210-0C150-C1
$216.68 MSRP: $309.37You Save: $92.69 (30%)Ships in 1-3 Business DaysProduct Specifications- Other Name: Belt Assembly, Front Seat; Seat Belt Lap and Shoulder Belt, Front Right; Retractor Assembly; Outer Belt Assembly; Belt Assembly, Front Seat Outer, Passenger Side
- Position: Passenger Side


Toyota Lap & Shoulder Belt, Outer Passenger Side Part Number: 73360-0R040-C0
$142.16 MSRP: $201.25You Save: $59.09 (30%)Ships in 1-2 Business DaysProduct Specifications- Other Name: Belt Assembly, Rear Seat; Seat Belt Lap and Shoulder Belt, Rear Right; Belt & Retractor; Belt Assembly, Rear Seat, Outer Passenger Side
- Position: Outer Passenger Side


Toyota Buckle, Front Part Number: 73230-42050-B1
$26.04 MSRP: $36.25You Save: $10.21 (29%)Ships in 1-2 Business DaysProduct Specifications- Other Name: Belt Assembly, Front Seat; Seat Belt Receptacle, Front; Latch; Belt Assembly, Front Seat Inner, Passenger Side; Belt Assembly, Front Seat Inner, Driver Side
- Manufacturer Note: SHADOW GRAY,TRIM1#
- Position: Front
| Page 1 of 178 |Next >
1-20 of 3543 Results
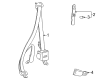
Toyota Seat Belt
OEM parts deliver unmatched quality you can rely on. They pass extensive quality control inspections. Toyota produces them to the official factory specifications. This process helps prevent defects and imperfections. So you can get exceptional lifespan and a flawless fit. Need new OEM Toyota Seat Belt? You'll love our wide selection of genuine options. Shop in minutes and skip the hunt. Our prices are unbeatable, you'll save time and money. It's easy to shop and find the right piece. Our committed customer service team gives professional help from start to finish. Every part includes a manufacturer's warranty. We ship quickly, your parts will arrive fast at your door.
Toyota Seat Belt locks in quickly and securely to ensure that everyone is seated when trouble hits. This was the mindset that has brought Toyota its traction globally, as it goes out in search of waste and values quick fixes. The lean factories of the company reduce downtime and channel the saved time into the construction of vehicles that outlive trends. New hybrids are launched on the TNGA framework with refined handling, tougher bodies and figures that humiliate other gas-only competitors. Toyota delivers each SUV, hatch, or sedan that it sells, proving that efficiency does not have to ride on reliability without being penalized on its price tag. Drivers have faith in Toyota since 10-year-old Corollas and Land Cruisers will start up on cold mornings and absorb potholes without making a spectacle. The new Seat Belt in the line is a combination of 28 kN of webbing strength and a trigger-happy retractor that tightens once the moment sensors detect deceleration to keep bodies in place within all Toyota airbags. The Seat Belt takes the impact off the chest, helps eliminate head whip, and lets the driver be in the clear to rebound. It has a clicking tongue, a low buckle and the webbing slides so well that teens do use the Seat Belt without complaint. Reviewers of the track-day also like the fact that the Seat Belt keeps them in place via the g-forces to make steering contributions precise and pedals predictable.
Toyota Seat Belt Parts and Q&A
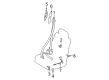
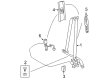
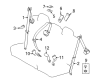
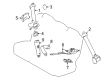
- Q: How to Install the Rear Center Seat Inner Seat Belt Assembly on Toyota 4Runner?A:Initiate the rear center seat inner belt assembly installation for rear No. 1 seat by first mounting the inner part of the rear seat belt assembly center. Mount the rear No. 1 seat cushion assembly on the right-hand side before you proceed to install the rear No. 1 seat assembly on the same side. Fasten the belt through the nut then tighten it to 42 Nm with a torque application using 430 kgf-cm or 31 ft-lbf.
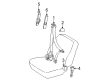
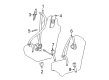
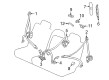
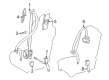
- Q: How to install the front Seat Belt assembly for the Access Cab on Toyota Tacoma?A:The first step for an Access Cab front seat outer belt assembly installation is to install the front shoulder belt anchor adjuster assembly through the body hole with 2 claws before torquing the bolt to 42 Nm (430 kgf-cm, 31 ft-lbf). Verify that the retractor locks properly at 45 degrees or above because locking at 15 degrees or less ensures failure of the device. Do not break down the retractor unit until no replacement of the front seat outer belt becomes necessary. The lower stay of the retractor should hook onto the 2 body hooks followed by tightening bolt A to 8.5 Nm (85 kgf-cm, 75 in-lbf) and bolt B to 42 Nm (430 kgf-cm, 31 ft-lbf). Moisten the pretensioner connector after which attach the shoulder anchor using 42 Nm (430 kgf-cm, 31 ft-lbf) torque and confirm smooth shoulder anchor rotation. Check the floor anchor of the front seat outer belt by using the bolt and inspect the ELR lock functionality when the belt is installed and quickly pulled out; if the performance deviates from specifications, replace the front seat outer belt. Begin by removing the bolt and floor anchor and then add the access panel inside handle sub-assembly and the rear door trim board sub-assembly while engaging nine clips and installing the clip. After screwing the access panel inside handle bezel you should close the cover and secure the door pull handle with the screw. Attach the lap belt outer anchor cover after you put in place the access panel rear Weather Strip. Attach the cable to the negative battery terminal while tightening it to 3.9 Nm (40 kgf-cm, 35 in-lbf) and verify the SRS warning light operation.


Related Toyota Parts
 Toyota Airbag
 Toyota Fuse
 Toyota Clock Spring
 Toyota Knock Sensor
 Toyota MAP Sensor
 Toyota Air Bag Sensor
 Toyota Door Jamb Switch
 Toyota Headlight Relay
 Toyota Oil Pressure Gauge
 Toyota Turn Signal Switch
 Toyota Air Bag Control Module
 Toyota Relay Block
Browse Toyota Seat Belt by Models
Tacoma 4Runner Camry Tundra Corolla RAV4 Highlander Prius Sienna Land Cruiser Pickup FJ Cruiser 86 Sequoia T100 Avalon Celica Supra Yaris Matrix MR2 Solara Venza GR86 Echo C-HR Cressida Grand Highlander Paseo Previa Prius C Prius Prime bZ4X Corolla Cross Corolla iM Crown Crown Signia GR Corolla Mirai MR2 Spyder Prius V Tercel Yaris iA Prius Plug-In GR Supra Prius AWD-e RAV4 Prime