×
ToyotaParts- Hello
- Login or Register
- Quick Links
- Live Chat
- Track Order
- Parts Availability
- RMA
- Help Center
- Contact Us
- Shop for
- Toyota Parts
- Scion Parts
My Garage
My Account
Cart
OEM Toyota Engine Control Module
Engine Control Computer- Select Vehicle by Model
- Select Vehicle by VIN
Select Vehicle by Model
orMake
Model
Year
Select Vehicle by VIN
For the most accurate results, select vehicle by your VIN (Vehicle Identification Number).
1562 Engine Control Modules found


Toyota ECM Part Number: 89661-0T081
$783.71 MSRP: $1148.53You Save: $364.82 (32%)Ships in 1-3 Business DaysProduct Specifications- Other Name: Computer, Engine Control; Engine Control Module
- Replaces: 89661-0T080, 89661-0T020


Toyota ECM Part Number: 89661-07451-84
$456.29 MSRP: $672.56You Save: $216.27 (33%)Product Specifications- Other Name: Avalon Reman Ecu; Engine Control Module
- Replaces: 89661-07450, 89661-07451


Toyota ECM Part Number: 89661-0C662-84
$470.54 MSRP: $693.65You Save: $223.11 (33%)Ships in 1-3 Business DaysProduct Specifications- Other Name: Tundra Reman Ecu; Engine Control Module
- Replaces: 89661-0C660, 89661-0C662


Toyota ECM Part Number: 89661-0C422-84
$594.73 MSRP: $877.55You Save: $282.82 (33%)Ships in 1-3 Business DaysProduct Specifications- Other Name: Reman Ecu; Engine Control Module
- Replaces: 89661-0C421-84, 89661-0C421


Toyota ECM Part Number: 89661-07312-84
$643.47 MSRP: $949.72You Save: $306.25 (33%)Ships in 1-3 Business DaysProduct Specifications- Other Name: Computer, Engine Control; Engine Control Module
- Replaces: 89661-07311-84, 89661-07261, 89661-07311, 89661-07262


Toyota ECM Part Number: 89661-02K53
$347.87 MSRP: $509.80You Save: $161.93 (32%)Ships in 1-3 Business DaysProduct Specifications- Other Name: Computer, Engine Control; Engine Control Module
- Replaces: 89661-02K54, 89661-02D12, 89661-02K50, 89661-02D11, 89661-02K51, 89661-02K52


Toyota ECM Part Number: 89661-02K43
$393.27 MSRP: $576.34You Save: $183.07 (32%)Ships in 1-3 Business DaysProduct Specifications- Other Name: Computer, Engine Control; Engine Control Module
- Replaces: 89661-02K42, 89661-02D52, 89661-02D51, 89661-02K40, 89661-02K41, 89661-02K44


Toyota ECM Part Number: 89661-04F70
$382.94 MSRP: $561.20You Save: $178.26 (32%)Ships in 1-3 Business DaysProduct Specifications- Other Name: Computer, Engine Control; Engine Control Module


Toyota ECM Part Number: 89661-02R02
$400.87 MSRP: $587.48You Save: $186.61 (32%)Ships in 1-3 Business DaysProduct Specifications- Other Name: Computer, Engine Control; Engine Control Module
- Replaces: 89661-02R00, 89661-02R01


Toyota ECM Part Number: 89661-02K23
$414.15 MSRP: $606.94You Save: $192.79 (32%)Product Specifications- Other Name: Computer, Engine Control; Engine Control Module
- Replaces: 89661-02K21, 89661-02D02, 89661-02K20, 89661-02D01, 89661-02K22


Toyota ECM Part Number: 89661-04740
$656.75 MSRP: $962.48You Save: $305.73 (32%)Ships in 1-3 Business DaysProduct Specifications- Other Name: Computer, Engine Control; Engine Control Module

Toyota ECM Part Number: 89661-04E20
$740.12 MSRP: $1084.66You Save: $344.54 (32%)Ships in 1-3 Business DaysProduct Specifications- Other Name: Computer, Engine Control; Engine Control Module


Toyota ECM Part Number: 89661-0C400
$729.24 MSRP: $1068.70You Save: $339.46 (32%)Ships in 1-3 Business DaysProduct Specifications- Other Name: Computer, Engine Control; Engine Control Module
- Manufacturer Note: PART NUMBER LABEL=89661-0C400


Toyota ECM Part Number: 89661-35D31
$767.93 MSRP: $1125.41You Save: $357.48 (32%)Ships in 1-3 Business DaysProduct Specifications- Other Name: Computer, Engine Control; Engine Control Module
- Replaces: 89661-35D30


Toyota ECM Part Number: 89661-08271
$808.56 MSRP: $1184.96You Save: $376.40 (32%)Ships in 1-2 Business DaysProduct Specifications- Other Name: Computer, Engine Control; Engine Control Module
- Replaces: 89661-08240, 89661-08270, 89661-08170


Toyota ECM Part Number: 89661-35B80
$857.48 MSRP: $1256.65You Save: $399.17 (32%)Ships in 1-3 Business DaysProduct Specifications- Other Name: Computer, Engine Control; Engine Control Module


Toyota ECM Part Number: 89661-42E91
$879.05 MSRP: $1288.25You Save: $409.20 (32%)Ships in 1-3 Business DaysProduct Specifications- Other Name: Computer, Engine Control; Engine Control Module
- Replaces: 89661-42E90


Toyota ECM Part Number: 89661-0CB51
$866.33 MSRP: $1269.62You Save: $403.29 (32%)Ships in 1-3 Business DaysProduct Specifications- Other Name: Computer, Engine Control; Engine Control Module
- Replaces: 89661-0CB50


Toyota ECM Part Number: 89661-35J51
$900.84 MSRP: $1320.19You Save: $419.35 (32%)Ships in 1-3 Business DaysProduct Specifications- Other Name: Computer, Engine Control; Engine Control Module
- Replaces: 89661-35F30, 89661-35J50, 89661-35F31


Toyota ECM Part Number: 89661-0CP13
$952.48 MSRP: $1395.87You Save: $443.39 (32%)Ships in 1-3 Business DaysProduct Specifications- Other Name: Computer, Engine Control; Engine Control Module
- Manufacturer Note: TOWING PACKAGE-WITH
- Replaces: 89661-0CP10, 89661-0CP12, 89661-0CP11
| Page 1 of 79 |Next >
1-20 of 1562 Results
Toyota Engine Control Module
OEM parts deliver unmatched quality you can rely on. They pass extensive quality control inspections. Toyota produces them to the official factory specifications. This process helps prevent defects and imperfections. So you can get exceptional lifespan and a flawless fit. Need new OEM Toyota Engine Control Module? You'll love our wide selection of genuine options. Shop in minutes and skip the hunt. Our prices are unbeatable, you'll save time and money. It's easy to shop and find the right piece. Our committed customer service team gives professional help from start to finish. Every part includes a manufacturer's warranty. We ship quickly, your parts will arrive fast at your door.
Toyota Engine Control Module ensures all the combustion remains neat, squeezing greater miles and power out of each drop. Wastes in the assembly line are cut down by Toyota, allowing the workers to see problems at an early stage and produce vehicles that will survive commutes, bad weather and long road trips without a flame of grumbling due to the unremitting efforts to improve the hybrid drives. Made on the adaptable TNGA platform, Toyota develops bodies with reduced centers of gravity, more rigid frames, and impact areas that distribute the forces in an intelligent manner, and this combination enhances ride comfort, safety standards, and assured cornering to motorists from Manila to Milwaukee. The constant improvements such as the 42-mile plug-in RAV4 range demonstrate that Toyota transforms what they dream of in the lab into reality in showrooms in a matter of minutes, meaning that efficiency and durability can also have a driveway without requiring owners to revere their vehicles. Engine Control Module is deep in any engine and reads sensor data in a few microseconds and triggers commands to balance air, fuel, and spark to start smoothly, release clean exhaust, and accelerate strongly despite the model applied. As the load varies, the Engine Control Module uses on-the-fly retuning of valve timing, throttle angle and injection duration to maintain torque constant without damaging pistons and catalytic converters to heat spikes. Since its code can remain rewritable, the Engine Control Module can react to changes in fuel quality, components or emissions adjustments, without physical replacement of hardware, extending the lifespan of the whole powertrain. All Toyotas with electronic injection and ignition are dependent on the Engine Control Module which converts the pressure of the pedal to produce motion with a minimum use of fuel.
Toyota Engine Control Module Parts and Q&A
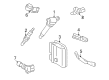
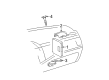
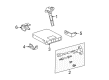
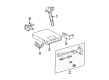
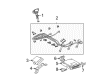
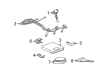
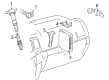
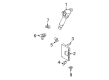
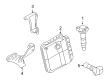
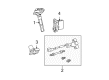
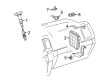
- Q: How to replace the Engine Control Module (ECM) on Toyota 4Runner?A:Replacing the Engine Control Module (ECM) requires starting with Instrument Panel Under Cover Sub-Assembly No. 2 removal before removing the glove compartment door sub-assembly and finally removing the instrument panel finish panel lower No. 2. Begin by disconnecting the 5 ECM connectors from the ECM as the next step and unload the ECM by removing the 3 nuts and detaching it from the 2 screws on the ECM brackets No. 1 and No. 2. Begin by securely mounting ECM bracket No. 2 to the ECM with both of its screws before proceeding with ECM bracket No. 1 and its corresponding screws. Reattach the ECM using 3 nuts which should be tightened with 13 Nm force (133 kgf.cm, 10 ft.lbf) torque while reconnecting the 5 ECM connectors.
- Q: How to register the Identification Number (VIN) into the replacement Engine Control Module (ECM) on Toyota Tacoma?A:Using a hand-held tester register the Vehicle Identification Number (VIN) by carefully providing its 17-digit alphanumeric code through the input process. The register-in process requires following instructions and reading from the Vehicle Identification Number display and then writing the displayed code. The hand-held tester employs up down right left keys as well as buttons numbered 0 through 9 for input. The right and left buttons advance the cursor while the up and down buttons select alphabet characters that can be entered by pressing their respective numbered buttons. Users can fix input mistakes by placing the cursor marker on the character through right or left button selection before selecting the correct character. The technician should double-check that the added VIN data matches the actual VIN and then activate the enter button. Read or write a VIN by using the hand-held tester according to the same procedure.


Related Toyota Parts
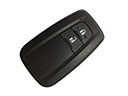 Toyota Key Fob
 Toyota Starter Relay
 Toyota Throttle Position Sensor
 Toyota Spark Plug
 Toyota MAP Sensor
 Toyota Air Bag Sensor
 Toyota Antenna
 Toyota Dimmer Switch
 Toyota Door Lock Actuator Motor
 Toyota Oil Pressure Gauge
 Toyota Back Up Light Switch
 Toyota Radiator Fan Relay
Browse Toyota Engine Control Module by Models
Tacoma 4Runner Camry Tundra Corolla RAV4 Highlander Prius Sienna Land Cruiser Pickup FJ Cruiser 86 Sequoia T100 Avalon Celica Supra Yaris Matrix MR2 Solara Venza GR86 Echo C-HR Cressida Grand Highlander Paseo Previa Prius C Prius Prime Corolla Cross Corolla iM Crown Crown Signia GR Corolla Mirai MR2 Spyder Prius V Tercel Van Yaris iA Prius Plug-In GR Supra Prius AWD-e RAV4 Prime