×
ToyotaParts- Hello
- Login or Register
- Quick Links
- Live Chat
- Track Order
- Parts Availability
- RMA
- Help Center
- Contact Us
- Shop for
- Toyota Parts
- Scion Parts
My Garage
My Account
Cart
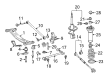
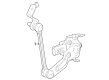
OEM Toyota Ride Height Sensor
Suspension Level Hight Sensor- Select Vehicle by Model
- Select Vehicle by VIN
Select Vehicle by Model
orMake
Model
Year
Select Vehicle by VIN
For the most accurate results, select vehicle by your VIN (Vehicle Identification Number).
29 Ride Height Sensors found


Toyota Sensor Sub-Assembly, Height Control, Rear Part Number: 89407-60010
$501.77 MSRP: $735.36You Save: $233.59 (32%)Ships in 1 Business DayProduct Specifications- Other Name: Sensor Sub-Assembly, Height Control; Suspension Ride Height Sensor; Ride Height Sensor
- Position: Rear


Toyota Sensor Sub-Assembly, Height Control, Rear Passenger Side Part Number: 89407-60022
$447.07 MSRP: $655.18You Save: $208.11 (32%)Ships in 1-3 Business DaysProduct Specifications- Other Name: Sensor Sub-Assembly, Height Control; Headlight Level Sensor; Ride Height Sensor
- Position: Rear Passenger Side
- Replaces: 89407-60021


Toyota Level Sensor Part Number: 89272-WAA01
$69.20 MSRP: $97.14You Save: $27.94 (29%)Ships in 1-3 Business DaysProduct Specifications- Other Name: Sensor, Height Control; Suspension Ride Height Sensor, Front, Rear; Height Sensor; Sensor Sub-Assembly, Height Control, Front; Sensor Sub-Assembly, Height Control, Rear; Ride Height Sensor

Toyota Level Sensor Part Number: 89272-WAA02
$75.11 MSRP: $105.42You Save: $30.31 (29%)Ships in 1-3 Business DaysProduct Specifications- Other Name: Sensor, Height Control; Ride Height Sensor; Height Sensor; Sensor Sub-Assembly, Height Control, Front; Sensor Sub-Assembly, Height Control, Rear

Toyota Height Sensor Part Number: 89407-12030
$354.00 MSRP: $518.78You Save: $164.78 (32%)Ships in 1-3 Business DaysProduct Specifications- Other Name: Sensor Sub-Assembly, Height Control; Suspension Ride Height Sensor; Headlight Level Sensor; Sensor Sub-Assembly, Height Control, Rear Passenger Side; Sensor Sub-Assembly, Height Control, Rear; Ride Height Sensor

Toyota Position Sensor, Rear Driver Side Part Number: 89408-34030
$360.01 MSRP: $527.59You Save: $167.58 (32%)Ships in 1-3 Business DaysProduct Specifications- Other Name: Sensor Sub-Assembly, Height Control; Suspension Ride Height Sensor, Left; Height Sensor; Sensor Sub-Assembly, Height Control, Rear Driver Side; Ride Height Sensor
- Manufacturer Note: REAR SUSPENSION-AIR SUSPENSION
- Position: Rear Driver Side

Toyota Sensor Sub-Assembly, Height Control, Rear Passenger Side Part Number: 89407-41010
$360.01 MSRP: $527.59You Save: $167.58 (32%)Ships in 1 Business DayProduct Specifications- Other Name: Sensor Sub-Assembly, Height Control; Headlight Level Sensor; Ride Height Sensor
- Manufacturer Note: SPORTS PACKAGE
- Position: Rear Passenger Side
Toyota Position Sensor, Rear Passenger Side Part Number: 89407-34020
$360.01 MSRP: $527.59You Save: $167.58 (32%)Ships in 1-3 Business DaysProduct Specifications- Other Name: Sensor Sub-Assembly, Height Control; Suspension Ride Height Sensor, Right; Height Sensor; Sensor Sub-Assembly, Height Control, Rear Passenger Side; Ride Height Sensor
- Manufacturer Note: REAR SUSPENSION-AIR SUSPENSION
- Position: Rear Passenger Side

Toyota Height Sensor, Rear Passenger Side Part Number: 89407-0T020
$360.01 MSRP: $527.59You Save: $167.58 (32%)Ships in 1-3 Business DaysProduct Specifications- Other Name: Sensor Sub-Assembly, Height Control; Headlight Level Sensor; Ride Height Sensor; Sensor Sub-Assembly, Height Control, Rear Passenger Side
- Position: Rear Passenger Side

Toyota Sensor Sub-Assembly, Height Control, Rear Passenger Side Part Number: 89407-06010
$360.01 MSRP: $527.59You Save: $167.58 (32%)Ships in 1-3 Business DaysProduct Specifications- Other Name: Sensor Sub-Assembly, Height Control; Headlight Level Sensor; Ride Height Sensor
- Position: Rear Passenger Side

Toyota Sensor Sub-Assembly, Height Control, Rear Driver Side Part Number: 89408-0R011
$363.08 MSRP: $532.09You Save: $169.01 (32%)Ships in 1-3 Business DaysProduct Specifications- Other Name: Sensor Sub-Assembly, Height Control
- Manufacturer Note: HEAD LAMP-PROJECTOR & WITH(*AHB & AFS)
- Position: Rear Driver Side
- Replaces: 89408-42031

Toyota Sensor Sub-Assembly, Height Control, Rear Driver Side Part Number: 89408-0E010
$363.08 MSRP: $532.09You Save: $169.01 (32%)Ships in 1-3 Business DaysProduct Specifications- Other Name: Sensor Sub-Assembly, Height Control; Suspension Ride Height Sensor; Ride Height Sensor
- Manufacturer Note: HEADLAMP-PROJECTOR & *AHB & *AFLS
- Position: Rear Driver Side
- Replaces: 89408-0E011

Toyota Level Sensor, Rear Driver Side Part Number: 89408-0C010
$363.08 MSRP: $532.09You Save: $169.01 (32%)Product Specifications- Other Name: Sensor Sub-Assembly, Height Control; Headlight Level Sensor, Front Left; Height Sensor; Sensor Sub-Assembly, Height Control, Rear Driver Side
- Position: Rear Driver Side

Toyota Sensor Sub-Assembly, Height Control, Rear Driver Side Part Number: 89408-06030
$363.08 MSRP: $532.09You Save: $169.01 (32%)Ships in 1-3 Business DaysProduct Specifications- Other Name: Sensor Sub-Assembly, Height Control
- Position: Rear Driver Side
Toyota Level Sensor, Rear Passenger Side Part Number: 89407-0C010
$363.08 MSRP: $532.09You Save: $169.01 (32%)Ships in 1-3 Business DaysProduct Specifications- Other Name: Sensor Sub-Assembly, Height Control; Headlight Level Sensor, Front Right; Height Sensor; Sensor Sub-Assembly, Height Control, Rear Passenger Side
- Position: Rear Passenger Side

Toyota Height Sensor, Rear Part Number: 89407-62010
$374.99 MSRP: $549.56You Save: $174.57 (32%)Ships in 1-3 Business DaysProduct Specifications- Other Name: Sensor Sub-Assembly, Height Control; Ride Height Sensor; Sensor Sub-Assembly, Height Control, Rear
- Position: Rear

Toyota Sensor Sub-Assembly, Height Control Part Number: 89408-0E030
$394.74 MSRP: $578.50You Save: $183.76 (32%)Ships in 1-2 Business DaysProduct Specifications- Other Name: SENSOR SUB-ASSY, HEI

Toyota Sensor Sub-Assembly, Height Control, Rear Driver Side Part Number: 89408-11010
$404.84 MSRP: $593.30You Save: $188.46 (32%)Ships in 1-3 Business DaysProduct Specifications- Other Name: Sensor Sub-Assembly, Height Control; Ride Height Sensor
- Position: Rear Driver Side
Toyota Height Sensor, Rear Passenger Side Part Number: 89407-0T010
$407.79 MSRP: $597.63You Save: $189.84 (32%)Ships in 1-3 Business DaysProduct Specifications- Other Name: Sensor Sub-Assembly, Height Control; Headlight Level Sensor; Ride Height Sensor; Sensor Sub-Assembly, Height Control, Rear Passenger Side
- Position: Rear Passenger Side

Toyota Sensor Sub-Assembly, Height Control Part Number: 89407-60050
$418.24 MSRP: $612.93You Save: $194.69 (32%)Ships in 1-2 Business DaysProduct Specifications- Other Name: SENSOR SUB-ASSY, HEI
- Position: Passenger Side
| Page 1 of 2 |Next >
1-20 of 29 Results
Toyota Ride Height Sensor
OEM parts deliver unmatched quality you can rely on. They pass extensive quality control inspections. Toyota produces them to the official factory specifications. This process helps prevent defects and imperfections. So you can get exceptional lifespan and a flawless fit. Need new OEM Toyota Ride Height Sensor? You'll love our wide selection of genuine options. Shop in minutes and skip the hunt. Our prices are unbeatable, you'll save time and money. It's easy to shop and find the right piece. Our committed customer service team gives professional help from start to finish. Every part includes a manufacturer's warranty. We ship quickly, your parts will arrive fast at your door.
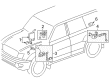
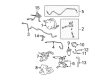
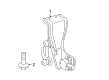
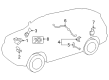
Toyota Ride Height Sensor maintains the level of the vehicles by measuring the angles of the suspension and changing the clearances dozens of times per minute. Toyota has become a household name worldwide by eliminating waste throughput, allowing employees to stop the line at the first hint of trouble, and introducing Hybrid Synergy Drive, TNGA chassis platforms, and long-range plug-in capability that can offer big efficiency improvements without compromising durability or practicality in everyday use by drivers anywhere on the planet. Toyota also drives on with all-electric bZ and enhanced RAV4 plug-in hybrids, each making their debuts displaying the same fixation on affordable running costs, sure safety performance, and a reputation for build quality that makes buyers believe that their cars will be left behind by the fashions but will still feel snug in years of hard driving. The Ride Height Sensor also links up in that broader system with suspension controllers such that a Toyota can keep its battery pack, exhaust, and underbody panels undisturbed by speed bumps and the load balancing of passengers or cargo and may also level the ride to drive experience, align the LED headlights aim, and reduce aerodynamic drag at highway velocity. Any time a car is turning on its heels or riding over ruts, the Ride Height Sensor sends accurate travel information to the connected dampers allowing a Toyota to remain stable, limit tire scrubbing, and maintain the relaxing cabin ambiance that consumers equate with the badge. The Ride Height Sensor will even protect delicate battery cooling lines by monitoring vehicle height in real time.
Toyota Ride Height Sensor Parts and Q&A
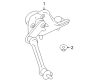
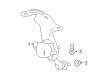
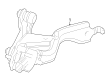
- Q: How to replace the rear Ride Height Sensor on Toyota 4Runner?A:The replacement of the rear height control sensor requires one to detach the rear disc wheel. Begin by disconnecting the connector from the height control sensor then apply matchmarks on both the link and bracket. To start the installation you should remove the nut which disconnects the sensor link while also taking out the 2 bolts and the height control sensor. When installing the new height control sensor you should position it with the 2 bolts then tighten them to 13 Nm of torque while using 133 kgf-cm or 10 ft. lbs. measurements. Place the matchmarks on the link and bracket components together before reconnecting the sensor link with the nut and connecting the height control sensor with its connector while applying a torque of 5.4 Nm (55 kgf-cm, 48 inch lbs.). The installation process ends with the rear disc wheel reinstall along with torquing it to 112 Nm (1,140 kgf-cm, 83 ft. lbs.). Verify the vehicle height and adjust it accordingly.
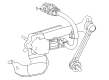
- Q: How to service and repair the Ride Height Sensor on Toyota Sequoia?A:Starting the procedure for Ride Height Sensor servicing and repair requires disconnecting the connector. First separate the height control sensor link by marking both link and bracket positions. Then remove the nut while tightening the sensor link to 5.4 N.m (55 kgf.cm, 48 in.lbf). First disconnect the wire harness clamp then remove the 2 bolts on the sensor that requires application of 29 N.m (300 kgf.cm, 21 ft.lbf) torque. The process of installation follows the exact opposite sequence used during removal steps.


Related Toyota Parts
 Toyota Ignition Coil
 Toyota Distributor
 Toyota Ignition Switch
 Toyota Horn
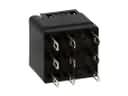 Toyota ABS Relay
 Toyota Body Control Module
 Toyota Ignition Control Module
 Toyota Power Window Switch
 Toyota Daytime Running Light Relay
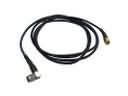 Toyota Antenna Cable
 Toyota Distributor Rotor
 Toyota Relay Block