×
ToyotaParts- Hello
- Login or Register
- Quick Links
- Live Chat
- Track Order
- Parts Availability
- RMA
- Help Center
- Contact Us
- Shop for
- Toyota Parts
- Scion Parts
My Garage
My Account
Cart
OEM Toyota Antenna Cable
Radio Antenna Cable- Select Vehicle by Model
- Select Vehicle by VIN
Select Vehicle by Model
orMake
Model
Year
Select Vehicle by VIN
For the most accurate results, select vehicle by your VIN (Vehicle Identification Number).
631 Antenna Cables found


Toyota Antenna Cable Part Number: 86101-04010
$104.51 MSRP: $146.69You Save: $42.18 (29%)Ships in 1-3 Business DaysProduct Specifications- Other Name: Cord Sub-Assembly, Antenna


Toyota Antenna Cable, Rear Part Number: 86101-04120
$85.55 MSRP: $120.08You Save: $34.53 (29%)Ships in 1-3 Business DaysProduct Specifications- Other Name: Cord Sub-Assembly, Antenna; Antenna Cable, Rear
- Position: Rear


Toyota Antenna Cable, Center Part Number: 86101-47E80
$108.89 MSRP: $152.85You Save: $43.96 (29%)Ships in 1-3 Business DaysProduct Specifications- Other Name: Cord Sub-Assembly, Antenna; Antenna Cable, Center
- Position: Center


Toyota Cable, Center Part Number: 86101-47200
$117.77 MSRP: $165.30You Save: $47.53 (29%)Ships in 1-3 Business DaysProduct Specifications- Other Name: Cord Sub-Assembly, Antenna; Antenna Cable, Center
- Position: Center

Toyota Harness Part Number: 82171-06T73
$151.56 MSRP: $214.56You Save: $63.00 (30%)Ships in 1-3 Business DaysProduct Specifications- Other Name: Wire, Roof; Headliner Wiring Harness
- Manufacturer Note: MOON ROOF-WITH(PANORAMA ROOF)

Toyota Antenna Cable, Center Part Number: 86101-06880
$166.72 MSRP: $236.01You Save: $69.29 (30%)Ships in 1-3 Business DaysProduct Specifications- Other Name: Cord Sub-Assembly, Antenna; Antenna Cable, Center
- Position: Center

Toyota Wire Part Number: 82172-35030
$34.14 MSRP: $47.53You Save: $13.39 (29%)Ships in 1-3 Business DaysProduct Specifications- Other Name: Wire, Roof; Console Wiring Harness

Toyota Antenna Cable Part Number: 86101-02390
$77.68 MSRP: $109.04You Save: $31.36 (29%)Ships in 1-3 Business DaysProduct Specifications- Other Name: Cord Sub-Assembly, Antenna

Toyota Antenna Cable, Rear Part Number: 86101-0R540
$85.55 MSRP: $120.08You Save: $34.53 (29%)Ships in 1-3 Business DaysProduct Specifications- Other Name: Cord Sub-Assembly, Antenna; Antenna Cable, Rear
- Position: Rear

Toyota Antenna Cable, Front Part Number: 86101-0R560
$118.78 MSRP: $168.15You Save: $49.37 (30%)Ships in 1-3 Business DaysProduct Specifications- Other Name: Cord Sub-Assembly, Antenna; Antenna Cable, Front
- Position: Front

Toyota Antenna Cable Part Number: 86101-08591
$440.46 MSRP: $645.50You Save: $205.04 (32%)Ships in 1-3 Business DaysProduct Specifications- Other Name: Cord Sub-Assembly, Antenna

Toyota Antenna Cable Part Number: 86101-08130
$455.34 MSRP: $667.31You Save: $211.97 (32%)Ships in 1-3 Business DaysProduct Specifications- Other Name: Cord Sub-Assembly, Antenna
Toyota Antenna Cable Part Number: 86101-08561
$469.08 MSRP: $687.45You Save: $218.37 (32%)Ships in 1-3 Business DaysProduct Specifications- Other Name: Cord Sub-Assembly, Antenna
Toyota Antenna Cable Part Number: 86101-08110
$476.18 MSRP: $697.85You Save: $221.67 (32%)Ships in 1-3 Business DaysProduct Specifications- Other Name: Cord Sub-Assembly, Antenna
Toyota Antenna Cable Part Number: 86101-08571
$548.76 MSRP: $804.22You Save: $255.46 (32%)Ships in 1-3 Business DaysProduct Specifications- Other Name: Cord Sub-Assembly, Antenna
Toyota Antenna Cable Part Number: 86101-08711
$561.02 MSRP: $822.18You Save: $261.16 (32%)Ships in 1-3 Business DaysProduct Specifications- Other Name: Cord Sub-Assembly, Antenna
- Manufacturer Note: TELEVISION & DVD PLAYER-WITH
Toyota Antenna Cable Part Number: 86101-08721
$607.12 MSRP: $889.75You Save: $282.63 (32%)Ships in 1-3 Business DaysProduct Specifications- Other Name: Cord Sub-Assembly, Antenna

Toyota Antenna Cable, Front Part Number: 86101-42530
$117.70 MSRP: $166.62You Save: $48.92 (30%)Ships in 1-3 Business DaysProduct Specifications- Other Name: Cord Sub-Assembly, Antenna; Antenna Cable, Front
- Manufacturer Note: AUDIO-*DX*DA&XM TUNER&USB&*BT&6SPEAKER
- Position: Front

Toyota Antenna Cable Part Number: 86101-02330
$117.70 MSRP: $166.62You Save: $48.92 (30%)Ships in 1-3 Business DaysProduct Specifications- Other Name: Cord Sub-Assembly, Antenna

Toyota Harness Part Number: 82171-06Y21
$118.78 MSRP: $168.15You Save: $49.37 (30%)Ships in 1-3 Business DaysProduct Specifications- Other Name: Wire, Roof; Headliner Wiring Harness
| Page 1 of 32 |Next >
1-20 of 631 Results
Toyota Antenna Cable
OEM parts deliver unmatched quality you can rely on. They pass extensive quality control inspections. Toyota produces them to the official factory specifications. This process helps prevent defects and imperfections. So you can get exceptional lifespan and a flawless fit. Need new OEM Toyota Antenna Cable? You'll love our wide selection of genuine options. Shop in minutes and skip the hunt. Our prices are unbeatable, you'll save time and money. It's easy to shop and find the right piece. Our committed customer service team gives professional help from start to finish. Every part includes a manufacturer's warranty. We ship quickly, your parts will arrive fast at your door.
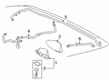
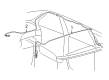
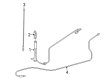
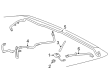
Toyota Antenna Cable enhances radio quality through the transmission of pure signals between the mast and the dashboard electronics. Toyota manufactures vehicles in a lean manner by reducing waste, allowing workers to stop snags in a flash, and proceeding with the TNGA platform that tightens handling, lowers the center of gravity, expands safety nets, and provides hybrids such as the new plug-in Prius and RAV4 with added power without losing the trust of the world in its durability. Drivers around the globe like the low cost of operation, the silence of hybrid cruising, and the calmness of knowing that a vehicle will be ready after a few minutes and not months is to perfection, and this is how good vehicles are built to ensure that every single commute to work is evidence that everything is fine and that the vehicle is ready to drive. Hybrid Synergy Drive is also refined annually by Toyota, which is also able to squeeze more range without increasing weight. Antenna Cable is comprised of threads, which run spirit through the cabin with noise, moisture, and vibration resistant shielded core protecting all broadcast frequencies. The Antenna Cable is unceremoniously inserted in any Toyota in its factory ports and immediately recovers clear AM, FM, satellite, and navigation information. The Antenna Cable performs one task, but it does it perfectly, maintaining signal quality at a high level; therefore, voice prompts remain crisp and playlists do not stutter. Drivers believe in Toyota since the Antenna Cable is something that does not wear out after one mile as a result of hard jacketing that ignores heat and bends.
Toyota Antenna Cable Parts and Q&A
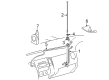
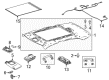
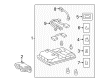
- Q: How to replace the Antenna Cable Sub-Assembly on Toyota 4Runner?A:Starting the Antenna Cord Sub-Assembly replacement requires the removal of the Instrument Panel Safety Pad Sub-Assembly. Start by removing the Antenna Cord Sub-Assembly through clamp removal of its four retaining elements. Install the Instrument Panel Safety Pad Sub-Assembly as the last step.
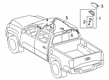
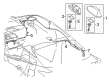
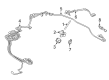
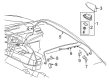
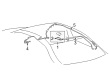
- Q: How to remove the radio antenna cable on Toyota Tacoma?A:Start by detaching the cable connected to the negative battery terminal before removing the radio antenna cord. Start by removing the front floor footrest followed by taking off the front door scuff plates from both sides and cowl side trim boards from both sides and finally separating the front door opening trim Weather Strips from both sides. The installation process starts with taking off front pillar garnishes (LH and RH) as well as the instrument panel under tray for the pedal type parking brake alongside the instrument panel hole cover for lever type parking brake. The technician should detach both automatic and manual transmission console upper rear panel sub-assemblies from separate seat configurations alongside the rear console box assembly and instrument panel cup holder tray (for automatic transmission on separate seats) and the front console box which serves both automatic and manual transmissions on separate and bench seat configurations. First remove the air conditioner control assembly and radio receiver assembly before separate the hood lock control lever sub-assembly. Proceed by disassembling the instrument panel finish panel No. 1 and instrument cluster finish panel sub-assembly and combination meter assembly along with instrument cluster center finish panel sub-assembly and glove compartment door assembly. Also remove instrument panel lower finish panel sub-assembly (RH), lower instrument panel (LH), instrument lower cover sub-assembly, instrument side panel (RH). First disconnect the passenger Air Bag connector then take out the instrument panel passenger Air Bag assembly followed by removing the instrument panel sub-assembly then lastly remove the radio antenna cord sub-assembly by disconnecting its 4 claws.


Related Toyota Parts
 Toyota Oxygen Sensor
 Toyota Distributor
 Toyota Fuse
 Toyota Camshaft Position Sensor
 Toyota Antenna Mast
 Toyota Horn Relay
 Toyota Mirror Switch
 Toyota Power Window Switch
 Toyota Distributor Rotor
 Toyota Ignition Lock Assembly
 Toyota Radiator Fan Relay
 Toyota Relay Block
Browse Toyota Antenna Cable by Models
Tacoma 4Runner Camry Tundra Corolla RAV4 Highlander Prius Sienna Land Cruiser FJ Cruiser 86 Sequoia Avalon Celica Supra Yaris Matrix MR2 Solara Venza GR86 Echo C-HR Cressida Grand Highlander Paseo Previa Prius C Prius Prime bZ4X Corolla Cross Corolla iM Crown Crown Signia GR Corolla Mirai MR2 Spyder Prius V Starlet Yaris iA Prius Plug-In Prius AWD-e RAV4 Prime