×
ToyotaParts- Hello
- Login or Register
- Quick Links
- Live Chat
- Track Order
- Parts Availability
- RMA
- Help Center
- Contact Us
- Shop for
- Toyota Parts
- Scion Parts
My Garage
My Account
Cart
OEM Toyota Solara Antenna Cable
Radio Antenna Cable- Select Vehicle by Model
- Select Vehicle by VIN
Select Vehicle by Model
orMake
Model
Year
Select Vehicle by VIN
For the most accurate results, select vehicle by your VIN (Vehicle Identification Number).
6 Antenna Cables found

Toyota Solara Antenna Part Number: 86101-AA082
$61.32 MSRP: $86.08You Save: $24.76 (29%)Ships in 1-3 Business Days
Toyota Solara Wire Part Number: 86101-AA120
$76.15 MSRP: $106.88You Save: $30.73 (29%)Ships in 1-3 Business DaysToyota Solara Antenna Part Number: 86101-AA111
$100.81 MSRP: $141.51You Save: $40.70 (29%)Ships in 1-3 Business DaysToyota Solara Antenna Part Number: 86101-AA081
Toyota Solara Antenna Part Number: 86101-AA112

Toyota Solara Antenna Cable Part Number: 86101-06140
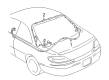
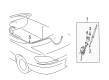
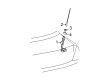
Toyota Solara Antenna Cable
Choose genuine Antenna Cable that pass strict quality control tests. You can trust the top quality and lasting durability. Shopping for OEM Antenna Cable for your Toyota Solara? Our website is your one-stop destination. We stock an extensive selection of genuine Toyota Solara parts. The price is affordable so you can save more. It only takes minutes to browse and find the exact fit. Easily add to cart and check out fast. Our hassle-free return policy will keep you stress-free. We process orders quickly for swift delivery. Your parts will arrive faster, so you can get back on the road sooner.
The Toyota Solara Antenna Cable serves as a crucial element which demonstrates the Toyota brand reputation for superior performance together with reliability. This Antenna Cable links the radio antenna to the radio receiver to achieve superior signal transmission for audio services and communication throughout multiple Toyota Solara models. The Antenna cable ensures radio effectiveness for both generations of Solara vehicles from 1999 to 2003 and 2004 to 2008 thereby establishing its fundamental role in radio operations. A clear radio reception becomes essential for navigation and emergency communication thanks to the Toyota Solara Antenna Cable which increases operational efficiency as well as safety. Multiple antenna setups in the Solara can be serviced by the Antenna Cable since it reads various configurations which delivers flexible sound output. You should check the Toyota car Antenna Cable consistently and exchange it right away to stop signal weakening while delivering continuous audio entertainment to drivers. The car Antenna Cable delivers exceptional durability along with distinct design elements which made it stand out as a quality product in the automotive field. The part strengthens both the performance level of the model and the automaker's reliability reputation which attracts enthusiasts of the brand.
Toyota Solara Antenna Cable Parts and Q&A
- Q: How to install the radio antenna cable on Toyota Solara?A:The installation of radio antenna cord begins with mounting the antenna cord sub-assembly then continuing with installing the quarter trim panel upper RH and roof side garnish assembly inner RH and ending with center pillar garnish RH. You must install the following elements the quarter trim panel assembly front RH followed by front door scuff plate RH and the rear seat back hinge sub-assembly LH. Install the rear seat assembly while following it with the center cluster integration panel assembly and the instrument cluster finish panel sub-assembly center. The last assembly steps include placing the console panel sub-assembly upper, the console box assembly (rear w/ console door), the console upper rear panel sub-assembly and the shift lever knob sub-assembly.

Related Toyota Solara Parts
 Toyota Solara Fuse Box
 Toyota Solara Air Bag Sensor
 Toyota Solara Airbag
 Toyota Solara Antenna
 Toyota Solara Antenna Mast
 Toyota Solara Body Control Module
 Toyota Solara Brake Light Switch
 Toyota Solara Car Key
 Toyota Solara Fuel Pump Relay
 Toyota Solara Knock Sensor
 Toyota Solara Power Window Switch
 Toyota Solara Starter Relay