×
ToyotaParts- Hello
- Login or Register
- Quick Links
- Live Chat
- Track Order
- Parts Availability
- RMA
- Help Center
- Contact Us
- Shop for
- Toyota Parts
- Scion Parts
My Garage
My Account
Cart
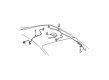
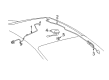
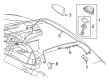
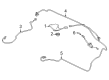
OEM Toyota Camry Antenna Cable
Radio Antenna Cable- Select Vehicle by Model
- Select Vehicle by VIN
Select Vehicle by Model
orMake
Model
Year
Select Vehicle by VIN
For the most accurate results, select vehicle by your VIN (Vehicle Identification Number).
83 Antenna Cables found

Toyota Camry Harness Part Number: 82171-06T73
$151.56 MSRP: $214.56You Save: $63.00 (30%)Ships in 1-3 Business Days
Toyota Camry Antenna Cable, Center Part Number: 86101-06880
$166.72 MSRP: $236.01You Save: $69.29 (30%)Ships in 1-3 Business Days
Toyota Camry Harness Part Number: 82171-06Y21
$118.78 MSRP: $168.15You Save: $49.37 (30%)Ships in 1-3 Business DaysToyota Camry Harness Part Number: 82171-06S61
$118.78 MSRP: $168.15You Save: $49.37 (30%)Ships in 1-3 Business Days
Toyota Camry Antenna Cable, Center Part Number: 86101-06F30
$130.18 MSRP: $184.28You Save: $54.10 (30%)Ships in 1-3 Business DaysToyota Camry Antenna Cable, Center Part Number: 86101-06E90
$126.32 MSRP: $178.83You Save: $52.51 (30%)Ships in 1-3 Business Days
Toyota Camry Antenna Cable, Front Part Number: 86101-06E70
$130.30 MSRP: $184.45You Save: $54.15 (30%)Ships in 1-3 Business Days
Toyota Camry Antenna Cable Part Number: 86101-06241
$126.85 MSRP: $179.58You Save: $52.73 (30%)Ships in 1-3 Business Days
Toyota Camry Antenna Cable Part Number: 86101-06560
$130.95 MSRP: $185.38You Save: $54.43 (30%)Ships in 1-3 Business DaysToyota Camry Antenna Cable Part Number: 86101-06221
$130.95 MSRP: $185.38You Save: $54.43 (30%)Ships in 1-3 Business Days
Toyota Camry Cord Sub-Assembly, Antenna Part Number: 86101-AQ150
$139.34 MSRP: $197.26You Save: $57.92 (30%)Ships in 1-2 Business Days
Toyota Camry Antenna Cable, Rear Part Number: 86101-06460
$143.46 MSRP: $203.08You Save: $59.62 (30%)Ships in 1-3 Business Days
Toyota Camry Antenna Cable, Center Part Number: 86101-06500
$143.57 MSRP: $203.25You Save: $59.68 (30%)Ships in 1-3 Business DaysToyota Camry Cord Sub-Assembly, Antenna Part Number: 86101-AQ170
$151.45 MSRP: $214.39You Save: $62.94 (30%)Ships in 1-2 Business DaysToyota Camry Cord Sub-Assembly, Antenna Part Number: 86101-AQ130
$146.98 MSRP: $208.07You Save: $61.09 (30%)Ships in 1-2 Business Days
Toyota Camry Harness Part Number: 82171-06X33
$151.56 MSRP: $214.56You Save: $63.00 (30%)Ships in 1-3 Business DaysToyota Camry Antenna Cable Part Number: 86101-06270
$157.74 MSRP: $223.31You Save: $65.57 (30%)Ships in 1-3 Business DaysToyota Camry Antenna Cable Part Number: 86101-06271
$158.05 MSRP: $223.74You Save: $65.69 (30%)Ships in 1-3 Business DaysToyota Camry Antenna Cable, Front Part Number: 86101-06J50
$166.72 MSRP: $236.01You Save: $69.29 (30%)Ships in 1-3 Business Days
Toyota Camry Antenna Cable Part Number: 86101-AA170
$164.30 MSRP: $232.59You Save: $68.29 (30%)Ships in 1-3 Business Days
| Page 1 of 5 |Next >
1-20 of 83 Results
Toyota Camry Antenna Cable
Choose genuine Antenna Cable that pass strict quality control tests. You can trust the top quality and lasting durability. Shopping for OEM Antenna Cable for your Toyota Camry? Our website is your one-stop destination. We stock an extensive selection of genuine Toyota Camry parts. The price is affordable so you can save more. It only takes minutes to browse and find the exact fit. Easily add to cart and check out fast. Our hassle-free return policy will keep you stress-free. We process orders quickly for swift delivery. Your parts will arrive faster, so you can get back on the road sooner.
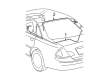
A central element for Toyota Camry measures both brand reliability and performance quality through its Antenna Cable component. Through its function as the critical connection between radio antenna and radio receiver the Toyota Camry Antenna Cable provides perfect signal delivery for audio entertainment and communication which boosts the driving experience. This Antenna Cable functions with all Toyota Camry models from its twelve generations and operates without limitations between internal antennas or external antennas or satellite antennas which position themselves optimally to receive maximum signals. Automotive technology development led to modifications of the Toyota Camry Antenna Cable such that its original flexible adjustable form evolved into modern sleek compact designs which combine outstanding form and operational enhancement. The Antenna Cable stands vital for vehicle performance and safety because its malfunction or disconnection leads to reception problems which could divert attention from drivers. Among automotive consumers the Toyota Camry Antenna Cable stands apart because it offers durable construction together with effortless installation which allows drivers to easily bring back their audio system to top functionality. As part of Toyota's commitment to quality the Camry Antenna Cable demonstrates how the brand delivers dependable state-of-the-art components that improve the total quality of the model model.
Toyota Camry Antenna Cable Parts and Q&A
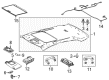
- Q: How to remove the antenna cable on Toyota Camry?A:You must begin by setting the front wheels in a straight-ahead position before disconnecting the cable from the negative battery terminal. Then wait for 90 seconds before continuing to prevent Air Bags from deploying. The work proceeds by first removing the lower sequence of covers numbered 3, No. 2, steering pad, and Steering Wheel assembly. Proceed to remove the front door scuff plate LH, cowl side trim sub-assembly LH, lower instrument panel finish panel LH (for TMC Made), lower instrument panel finish panel LH (for TMMK Made), steering column cover (for TMC Made), steering column cover (for TMMK Made), turn signal switch assembly with spiral cable sub-assembly, No. 1 instrument panel sub-assembly, lower instrument panel finish panel (w/o Smart Key System), lower instrument panel finish panel (w/ Smart Key System), instrument cluster finish panel No.1, combination meter assembly (for TMC Made), combination meter assembly (for TMMK Made), front door scuff plate RH, cowl side trim sub-assembly RH, instrument panel No. 2 under cover sub-assembly, lower instrument panel sub-assembly (for TMC Made), lower instrument panel sub-assembly (for TMMK Made), shift lever knob sub-assembly (for Automatic Transaxle), shift lever knob sub-assembly (for Manual Transaxle), No. 1 instrument cluster finish panel garnish, No. 2 instrument cluster finish panel garnish, floor shift position indicator housing sub-assembly (for Automatic Transaxle), upper console panel (for Manual Transaxle), upper console rear panel sub-assembly (for Automatic Transaxle), upper console rear panel sub-assembly (for Manual Transaxle), upper console panel sub-assembly (for TMC Made), upper console panel sub-assembly (for TMMK Made), instrument panel No. 2 register assembly, radio receiver with heater control panel assembly (w/o Navigation System), navigation receiver with heater control panel assembly, console box pocket, console box carpet, console box assembly (for TMC Made), console box assembly (for TMMK Made), No. 2 console box insert front (for TMC Made), No. 2 console box insert front (for TMMK Made), No. 1 console box insert front (for TMC Made), No. 1 console box insert front (for TMMK Made), front pillar garnish LH, instrument panel No. 1 register assembly, instrument panel No. 1 speaker panel sub-assembly, front No. 2 speaker assembly (for LH Side), front pillar garnish RH, instrument panel No. 3 register assembly, instrument panel No. 2 speaker panel sub-assembly, front No. 2 speaker assembly (for RH Side), No. 1 defroster nozzle garnish, instrument panel safety pad assembly (for TMC Made), instrument panel safety pad assembly (for TMMK Made), No. 3 instrument panel stay, side No. 1 defroster nozzle duct (for TMC Made), side No. 1 defroster nozzle duct (for TMMK Made), side No. 2 defroster nozzle duct (for TMC Made), side No. 2 defroster nozzle duct (for TMMK Made), defroster nozzle assembly (for TMC Made), defroster nozzle assembly (for TMMK Made), No. 1 heater to register duct (for TMC Made), No. 1 heater to register duct (for TMMK Made), No. 3 heater to register duct (for TMC Made), No. 3 heater to register duct (for TMMK Made), No. 2 heater to register duct (for TMC Made), and No. 2 heater to register duct (for TMMK Made). The technician should disengage the 6 clamps and clip to extract the No. 2 antenna cord sub-assembly. The front seat headrest assembly with seat track cover LH as well as inner seat track bracket cover LH and front seat assembly LH needs removal on both sides. Manual and power seat owners need to perform this operation. You should next take off rear seat cushion assembly, headrest assemblies and rear seat back assemblies which may apply to your particular project. The antenna cord sub-assembly removal proceeds by cleaning the tape securing it to the roof headlining before pulling out the cord keeping as much tape available for reusing purposes.
- Q: How to install the antenna cable sub-assembly and the associated components on Toyota Camry?A:The first step for installing the antenna cord sub-assembly requires an evaluation of the existing double-sided tape on the roof headliner; use the old tape if sticky or replace with new tape by stripping away the previous tape then positioning and stripping the new tape without touching its adhesive. After positioning the antenna cord at the front of the vehicle its taped section should match the roof headlining protrusion before securing it with tape. To secure the tape properly place it against the protrusion in the right front corner and surround both the antenna cord and headlining assembly with tape. Similarly in the right rear corner work with the tape against the rear edge while applying tape. Proceed to install the roof headlining assembly (w/o Sliding Roof) using part numbers as needed, followed by the roof headlining assembly (w/ Sliding Roof), sunshade trim holder (w/ Rear Sunshade), sunroof opening trim moulding (w/ Sliding Roof), spot light assembly (w/ Sliding Roof), No. 1 room light assembly (w/o Sliding Roof), front assist grip sub-assembly, rear assist grip sub-assembly, visor holder, visor assembly LH, visor assembly RH, roof console box assembly, front pillar garnish LH, front pillar garnish RH, roof side inner garnish LH, roof side inner garnish RH, upper center pillar garnish LH, lower center pillar garnish LH, connect front seat outer belt assembly LH, install lap belt outer anchor cover, front door opening trim Weather Strip LH, cowl side trim sub-assembly LH, front door scuff plate LH, upper center pillar garnish RH, lower center pillar garnish RH, connect front seat outer belt assembly RH, install lap belt outer anchor cover, front door opening trim Weather Strip RH, cowl side trim sub-assembly RH, front door scuff plate RH, rear door inner glass Weather Strip LH, rear door trim board sub-assembly LH, door assist grip cover LH, rear door inside handle bezel plug LH, reclining remote control lever sub-assembly LH (for Reclining Seat Type), reclining remote control lever sub-assembly RH (for Reclining Seat Type), rear door opening trim Weather Strip LH, rear door scuff plate LH, rear door opening trim Weather Strip RH, rear door scuff plate RH, center seat back assembly (for Reclining Seat Type), separate type rear seat back assembly LH (for Reclining Seat Type), separate type rear seat back assembly RH (for Reclining Seat Type), rear seat back cover (for Reclining Seat Type), rear side seat back assembly LH (for Fold Down Seat Type), rear side seat back assembly RH (for Fold Down Seat Type), separate type rear seat back assembly LH (for Fold Down Seat Type), separate type rear seat back assembly RH (for Fold Down Seat Type), rear seat back assembly (for Fixed Seat Type), rear center seat headrest assembly, rear seat headrest assembly, rear seat cushion assembly (for Fold Down Seat Type), front seat assembly LH (for Power Seat), inner seat track bracket cover LH (for Power Seat), seat track cover LH (for Power Seat), front seat headrest assembly (for Power Seat), front seat assembly LH (for Manual Seat), inner seat track bracket cover LH (for Manual Seat), seat track cover LH (for Manual Seat), front seat headrest assembly (for Manual Seat), front seat assembly RH (for Power Seat), inner seat track bracket cover RH (for Power Seat), seat track cover RH (for Power Seat), front seat headrest assembly (for Power Seat), front seat assembly RH (for Manual Seat), inner seat track bracket cover RH (for Manual Seat), seat track cover RH (for Manual Seat), front seat headrest assembly (for Manual Seat), install No. 2 antenna cord sub-assembly by engaging the 6 clamps and clip, and proceed with the installation of the heater to register ducts for TMC and TMMK made, defroster nozzle assembly for TMC and TMMK made, side defroster nozzle ducts for TMC and TMMK made, instrument panel stay, instrument panel safety pad assembly for TMC and TMMK made, No. 1 defroster nozzle garnish, front No. 2 speaker assembly for LH side, instrument panel No. 1 speaker panel sub-assembly, instrument panel No. 1 register assembly, front pillar garnish LH, front No. 2 speaker assembly for RH side, instrument panel No. 2 speaker panel sub-assembly, instrument panel No. 3 register assembly, front pillar garnish RH, No. 1 console box insert front for TMC and TMMK made, No. 2 console box insert front for TMC and TMMK made, console box assembly for TMC and TMMK made, console box carpet, console box pocket, radio receiver with heater control panel assembly (w/o Navigation System), navigation receiver with heater control panel assembly (w/ Navigation System), instrument panel No. 2 register assembly, upper console panel sub-assembly for TMC and TMMK made, upper console rear panel sub-assembly for Automatic and Manual Transaxle, floor shift position indicator housing sub-assembly for Automatic Transaxle, upper console panel for Manual Transaxle, No. 2 instrument cluster finish panel garnish, No. 1 instrument cluster finish panel garnish, shift lever knob sub-assembly for Automatic and Manual Transaxle, lower instrument panel sub-assembly for TMC and TMMK made, instrument panel No. 2 under cover sub-assembly, cowl side trim sub-assembly RH, front door scuff plate RH, combination meter assembly for TMC and TMMK made, instrument cluster finish No.1 panel, lower instrument panel finish panel (w/o and w/ Smart Key System), No. 1 instrument panel sub-assembly, turn signal switch assembly with spiral cable sub-assembly, adjust spiral cable sub-assembly, steering column cover for TMC and TMMK made, lower instrument panel finish panel LH for TMC and TMMK made, cowl side trim sub-assembly LH, and front door scuff plate LH, ensuring all part numbers are correctly utilized throughout the installation process.


Related Toyota Camry Parts
 Toyota Camry Antenna
 Toyota Camry Flasher Relay
 Toyota Camry Horn
 Toyota Camry Throttle Position Sensor
 Toyota Camry Antenna Mast
 Toyota Camry Body Control Module
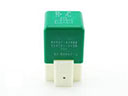 Toyota Camry Cooling Fan Relay
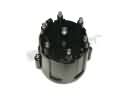 Toyota Camry Distributor Cap
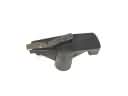 Toyota Camry Distributor Rotor
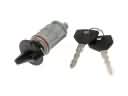 Toyota Camry Ignition Lock Assembly
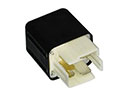 Toyota Camry Overload Relay
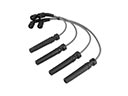 Toyota Camry Spark Plug Wire