×
ToyotaParts- Hello
- Login or Register
- Quick Links
- Live Chat
- Track Order
- Parts Availability
- RMA
- Help Center
- Contact Us
- Shop for
- Toyota Parts
- Scion Parts
My Garage
My Account
Cart
OEM Toyota Dimmer Switch
Light Dimmer Switch- Select Vehicle by Model
- Select Vehicle by VIN
Select Vehicle by Model
orMake
Model
Year
Select Vehicle by VIN
For the most accurate results, select vehicle by your VIN (Vehicle Identification Number).
236 Dimmer Switches found


Toyota Dimmer Switch Part Number: 84140-0E090
$133.59 MSRP: $189.10You Save: $55.51 (30%)Ships in 1-3 Business DaysProduct Specifications- Other Name: Switch Assembly, Headlamp Dimmer; Combination Switch; Multi Purpose Switch; Headlamp Switch; Headlamp Dimmer Switch


Toyota Headlamp Switch Part Number: 84140-08061
$183.83 MSRP: $262.46You Save: $78.63 (30%)Ships in 1-3 Business DaysProduct Specifications- Other Name: Switch Assembly, Headlamp Dimmer; Turn Signal & Combination Lever; Multi Purpose Switch; Signal Switch


Toyota Dimmer Switch Part Number: 84140-33020
$152.86 MSRP: $216.39You Save: $63.53 (30%)Ships in 1-3 Business DaysProduct Specifications- Other Name: Switch Assembly, Headlamp Dimmer; Instrument Panel Dimmer Switch; Multi Purpose Switch; Headlamp Switch; Signal Switch


Toyota Dimmer Switch Part Number: 84140-14120
$131.59 MSRP: $186.27You Save: $54.68 (30%)Ships in 1 Business DayProduct Specifications- Other Name: Switch Assembly, Headlamp Dimmer; Combination Switch; Multi Purpose Switch; Headlamp Switch; Headlamp Dimmer Switch


Toyota Dimmer Switch Part Number: 84140-02670
$138.05 MSRP: $195.43You Save: $57.38 (30%)Ships in 1-2 Business DaysProduct Specifications- Other Name: Switch Assembly, Headlamp Dimmer; Turn Signal & Combination Lever; Combination Switch; Multi Purpose Switch; Headlamp Switch
- Replaces: 84140-0C060


Toyota Headlamp Switch Part Number: 84140-06510
$140.05 MSRP: $198.25You Save: $58.20 (30%)Ships in 1-3 Business DaysProduct Specifications- Other Name: Switch Assembly, Headlamp Dimmer; Combination Switch; Multi Purpose Switch


Toyota Headlamp Switch Part Number: 84140-06400
$253.84 MSRP: $362.42You Save: $108.58 (30%)Ships in 1-3 Business DaysProduct Specifications- Other Name: Switch Assembly, Headlamp Dimmer; Multi Purpose Switch


Toyota Dimmer Switch Part Number: 84140-0R020
$130.06 MSRP: $184.12You Save: $54.06 (30%)Ships in 1-2 Business DaysProduct Specifications- Other Name: Switch Assembly, Headlamp Dimmer; Combination Switch; Multi Purpose Switch; Headlamp Switch; Multifunction Switch
- Replaces: 84140-42150


Toyota Dimmer Switch Part Number: 84140-07113
$155.68 MSRP: $220.38You Save: $64.70 (30%)Ships in 1 Business DayProduct Specifications- Other Name: Switch Assembly, Headlamp Dimmer; Combination Switch; Multi Purpose Switch; Headlamp Switch; Headlamp Dimmer Switch


Toyota Instrument Light Rheostat, Passenger Side Part Number: 84119-03010
$184.87 MSRP: $263.96You Save: $79.09 (30%)Ships in 1-3 Business DaysProduct Specifications- Other Name: Rheostat, Light Control; Instrument Panel Dimmer Switch; Rheostat
- Position: Passenger Side
- Replaces: 84119-89106, 84119-32090, 84119-01020


Toyota Dimmer Switch Part Number: 84140-06010
$217.73 MSRP: $310.87You Save: $93.14 (30%)Ships in 1-3 Business DaysProduct Specifications- Other Name: Switch Assembly, Headlamp Dimmer; Turn Signal & Combination Lever; Multi Purpose Switch; Headlamp Switch; Headlamp Dimmer Switch; Signal Switch
- Replaces: 84140-44010, 84140-26140


Toyota Headlamp Switch Part Number: 84140-08030
$118.43 MSRP: $167.65You Save: $49.22 (30%)Ships in 1-3 Business DaysProduct Specifications- Other Name: Switch Assembly, Headlamp Dimmer; Combination Switch; Turn Signal Switch; Multi Purpose Switch; Signal Switch
- Manufacturer Note: W(AUTOMATIC LIGHT CONTROL)
- Replaces: 84140-08010


Toyota Dimmer Switch Part Number: 84140-47161
$140.17 MSRP: $198.43You Save: $58.26 (30%)Ships in 1-3 Business DaysProduct Specifications- Other Name: Switch Assembly, Headlamp Dimmer; Combination Switch; Multi Purpose Switch; Headlamp Switch; Multifunction Switch


Toyota Dimmer Switch Part Number: 84140-04061
$140.75 MSRP: $199.25You Save: $58.50 (30%)Ships in 1-3 Business DaysProduct Specifications- Other Name: Switch Assembly, Headlamp Dimmer; Turn Signal & Combination Lever; Combination Switch; Multi Purpose Switch; Headlamp Switch; Headlamp Dimmer Switch


Toyota Headlamp Switch Part Number: 84140-52151
$146.63 MSRP: $207.56You Save: $60.93 (30%)Ships in 1-3 Business DaysProduct Specifications- Other Name: Switch Assembly, Headlamp Dimmer; Combination Switch; Multi Purpose Switch
- Replaces: 84140-52150

Toyota Dimmer Switch Part Number: 84140-0R010
$146.86 MSRP: $207.90You Save: $61.04 (30%)Ships in 1-2 Business DaysProduct Specifications- Other Name: Switch Assembly, Headlamp Dimmer; Combination Switch; Multi Purpose Switch; Headlamp Switch; Multifunction Switch


Toyota Instrument Light Rheostat, Passenger Side Part Number: 84119-04020
$163.55 MSRP: $231.52You Save: $67.97 (30%)Ships in 1-2 Business DaysProduct Specifications- Other Name: Rheostat, Light Control; Instrument Panel Dimmer Switch; Rheostat
- Position: Passenger Side


Toyota Instrument Light Rheostat, Passenger Side Part Number: 84119-AA010
$159.06 MSRP: $225.18You Save: $66.12 (30%)Ships in 1-3 Business DaysProduct Specifications- Other Name: Rheostat, Light Control; Instrument Panel Dimmer Switch; Rheostat
- Position: Passenger Side


Toyota Dimmer Switch Part Number: 84140-47140
$163.08 MSRP: $230.86You Save: $67.78 (30%)Ships in 1-2 Business DaysProduct Specifications- Other Name: Switch Assembly, Headlamp Dimmer; Combination Switch; Multi Purpose Switch; Headlamp Switch; Multifunction Switch; Headlamp Dimmer Switch
- Replaces: 84140-12720, 84140-12680


Toyota Instrument Light Rheostat, Passenger Side Part Number: 84119-52030
$175.65 MSRP: $248.66You Save: $73.01 (30%)Ships in 1-2 Business DaysProduct Specifications- Other Name: Rheostat, Light Control; Instrument Panel Dimmer Switch; Rheostat
- Position: Passenger Side
| Page 1 of 12 |Next >
1-20 of 236 Results
Toyota Dimmer Switch
OEM parts deliver unmatched quality you can rely on. They pass extensive quality control inspections. Toyota produces them to the official factory specifications. This process helps prevent defects and imperfections. So you can get exceptional lifespan and a flawless fit. Need new OEM Toyota Dimmer Switch? You'll love our wide selection of genuine options. Shop in minutes and skip the hunt. Our prices are unbeatable, you'll save time and money. It's easy to shop and find the right piece. Our committed customer service team gives professional help from start to finish. Every part includes a manufacturer's warranty. We ship quickly, your parts will arrive fast at your door.
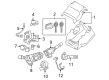
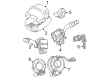
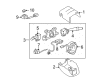
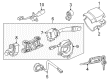
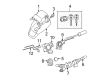
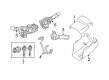
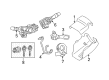
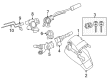
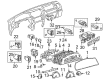
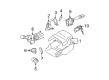
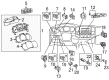
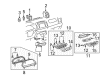
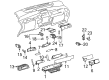
Toyota Dimmer Switch allows drivers to switch between beam settings in a faster day night vision. Toyota began in 1937, expanded internationally and continues to value lean manufacturing, which converts waste into nonexistence. Issues found on the line are spotted by workers and assembly stops until the fix is nailed. The TNGA platform of the company reduces weight, decreases the center of gravity, and enhances steering. Its Hybrid Synergy Drive continues to receive refinements, which provide the Prius and numerous other models with spirited torque and thrifty consumption. In 2024 the brand took the RAV4 Plug-in Hybrid to 42 electric miles, and that is evolution never giving up. Consumers have faith in Toyota since the car models drive long, consume fuel, and shake off harsh weather and potholes. Such strength helps save the owners money not months but years. The Dimmer Switch is placed on the column, in the place where the fingers of the driver fall, without looking. The clicking is sharp forward to the high beams, the pulling backwards to the low, and the tapping to the right or left, which switches to the flash-to-pass. Micro-spring within the Dimmer Switch helps to overcome dust and heat, therefore the control of light remains sharp even after several years. All existing Toyota wiring harnesses are compatible with the Dimmer Switch plug and therefore require no wire-cutting by swappers at upgrades or cross-generational repairs. The Dimmer Switch also regulates the brightness of dash lamps during night running, saving the eyes but leaving road awareness intact.
Toyota Dimmer Switch Parts and Q&A
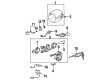
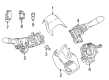
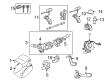
- Q: How to replace the headlamp dimmer switch assembly on Toyota 4Runner?A:Begin replacement of the headlamp dimmer switch assembly by taking off both steering wheel covers No.3 then steering wheel covers No.2. You must disconnect the connector followed by the removal of two screws that fasten the headlamp dimmer switch assembly. Install first the steering wheel cover lower No.2 before placing the steering wheel cover lower No.3.
- Q: How to remove and install the headlight dimmer switch on Toyota Tacoma?A:Begin the removal process of the headlight dimmer switch by disconnecting the cable from the negative battery terminal then waiting for at least 90 seconds to avoid Air Bag activation. The front wheels should be positioned forward before you detach the No. 2 and No. 3 steering wheel lower covers together with the horn button assembly and steering wheel assembly. The procedure requires the removal of the steering column lower cover then the upper cover before proceeding to separate the spiral cable sub-assembly from the windshield wiper switch assembly. First disconnect the connector and then remove the headlight dimmer switch assembly through the process of disengaging its two securing claws. Installation begins when the headlight dimmer switch assembly is installed by engaging the 2 claws followed by clamping it and reconnecting its connector. Customers should replace all components starting with the windshield wiper switch assembly followed by the spiral cable sub-assembly and finally reinstall the steering column covers while maintaining the spiral cable at center position. The installation process of the steering wheel assembly includes center point and horn button assembly examination followed by the horn button assembly reinstallation. The last procedure requires attaching the cable to the negative battery terminal at 3.9 N.m (40 kgf.cm, 35 in.lbf) then inspecting the SRS warning light before reinstalling the No. 3 and No. 2 steering wheel lower covers.


Related Toyota Parts
 Toyota TPMS Sensor
 Toyota Oxygen Sensor
 Toyota Airbag
 Toyota Ignition Switch
 Toyota Antenna Mast
 Toyota Horn Relay
 Toyota Oil Pressure Gauge
 Toyota PCV Hose
 Toyota Convertible Top Motor
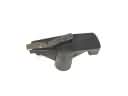 Toyota Distributor Rotor
 Toyota Radiator Fan Relay
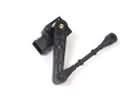 Toyota Ride Height Sensor
Browse Toyota Dimmer Switch by Models
Tacoma 4Runner Camry Tundra Corolla RAV4 Highlander Prius Sienna Land Cruiser Pickup FJ Cruiser 86 Sequoia T100 Avalon Celica Supra Yaris Matrix MR2 Solara Venza GR86 Echo C-HR Cressida Grand Highlander Paseo Previa Prius C Prius Prime Corolla Cross Corolla iM GR Corolla Mirai MR2 Spyder Prius V Starlet Tercel Van Yaris iA Prius Plug-In GR Supra Prius AWD-e RAV4 Prime