×
ToyotaParts- Hello
- Login or Register
- Quick Links
- Live Chat
- Track Order
- Parts Availability
- RMA
- Help Center
- Contact Us
- Shop for
- Toyota Parts
- Scion Parts
My Garage
My Account
Cart
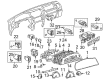
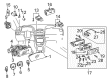
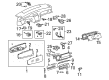
OEM Toyota RAV4 Dimmer Switch
Light Dimmer Switch- Select Vehicle by Model
- Select Vehicle by VIN
Select Vehicle by Model
orMake
Model
Year
Select Vehicle by VIN
For the most accurate results, select vehicle by your VIN (Vehicle Identification Number).
27 Dimmer Switches found


Toyota RAV4 Dimmer Switch Part Number: 84140-0E090
$133.59 MSRP: $189.10You Save: $55.51 (30%)Ships in 1-3 Business Days


Toyota RAV4 Dimmer Switch Part Number: 84140-02670
$138.05 MSRP: $195.43You Save: $57.38 (30%)Ships in 1-2 Business Days


Toyota RAV4 Dimmer Switch Part Number: 84140-0R020
$130.06 MSRP: $184.12You Save: $54.06 (30%)Ships in 1-2 Business Days


Toyota RAV4 Dimmer Switch Part Number: 84140-06010
$217.73 MSRP: $310.87You Save: $93.14 (30%)Ships in 1-3 Business Days
Toyota RAV4 Dimmer Switch Part Number: 84140-0R010
$146.86 MSRP: $207.90You Save: $61.04 (30%)Ships in 1-2 Business Days

Toyota RAV4 Dimmer Switch Part Number: 84140-47140
$163.08 MSRP: $230.86You Save: $67.78 (30%)Ships in 1-2 Business Days


Toyota RAV4 Dimmer Switch Part Number: 84140-42010
$205.96 MSRP: $294.06You Save: $88.10 (30%)Ships in 1-3 Business Days


Toyota RAV4 Dimmer Switch Part Number: 84140-02020
$217.03 MSRP: $309.87You Save: $92.84 (30%)Ships in 1-3 Business Days

Toyota RAV4 Rheostat Knob, Passenger Side Part Number: 84118-20011
$5.60 MSRP: $7.80You Save: $2.20 (29%)Ships in 1-3 Business Days


Toyota RAV4 Knob, Light Control Rheostat, Passenger Side Part Number: 84118-02020
$6.32 MSRP: $8.80You Save: $2.48 (29%)Ships in 1-3 Business Days
Toyota RAV4 Dimmer Switch Part Number: 84140-52020
$82.82 MSRP: $116.25You Save: $33.43 (29%)Ships in 1-3 Business DaysToyota RAV4 Dimmer Switch Part Number: 84140-0R030
$114.46 MSRP: $160.67You Save: $46.21 (29%)Ships in 1-3 Business DaysToyota RAV4 Dimmer Switch Part Number: 84140-07141
$163.08 MSRP: $230.86You Save: $67.78 (30%)Ships in 1 Business Day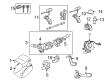
Toyota RAV4 Dimmer Switch Part Number: 84140-0E070
$118.43 MSRP: $167.65You Save: $49.22 (30%)Ships in 1-3 Business DaysToyota RAV4 Turn Signal Switch Part Number: 84140-42140
$146.39 MSRP: $207.24You Save: $60.85 (30%)Ships in 1-3 Business DaysToyota RAV4 Dimmer Switch Part Number: 84140-47130
$146.98 MSRP: $208.07You Save: $61.09 (30%)Ships in 1-2 Business Days
Toyota RAV4 Headlamp Switch Part Number: 84140-0E100
$152.03 MSRP: $215.22You Save: $63.19 (30%)Ships in 1-3 Business DaysToyota RAV4 Dimmer Switch Part Number: 84140-02660
$147.57 MSRP: $208.90You Save: $61.33 (30%)Ships in 1-3 Business Days

Toyota RAV4 Dimmer Switch, Passenger Side Part Number: 84119-0R020
$187.55 MSRP: $267.78You Save: $80.23 (30%)Ships in 1-3 Business Days


Toyota RAV4 Dimmer Switch, Passenger Side Part Number: 84119-06020
| Page 1 of 2 |Next >
1-20 of 27 Results
Toyota RAV4 Dimmer Switch
Choose genuine Dimmer Switch that pass strict quality control tests. You can trust the top quality and lasting durability. Shopping for OEM Dimmer Switch for your Toyota RAV4? Our website is your one-stop destination. We stock an extensive selection of genuine Toyota RAV4 parts. The price is affordable so you can save more. It only takes minutes to browse and find the exact fit. Easily add to cart and check out fast. Our hassle-free return policy will keep you stress-free. We process orders quickly for swift delivery. Your parts will arrive faster, so you can get back on the road sooner.
Toyota RAV4 Dimmer Switch Parts and Q&A
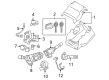
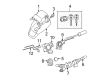
- Q: How to install the headlight dimmer switch assembly and related components on Toyota RAV4?A:The installation requires the switch attachment through the claw according to the illustration followed by switch placement with the clamp and connection of the connector. After the wiper and washer switch assembly installation comes the spiral cable sub-assembly installation. Begin by adding the Steering Column Cover followed by the installation process of the Steering Wheel assembly. Check that front wheels point forward directly before examining the steering wheel center mark. Install the steering pad assembly and complete the procedure by connecting the cable to the negative battery terminal. Complete the inspection of the steering pad assembly before you verify the SRS warning light operation.
- Q: How to remove the headlamp dimmer switch on Toyota RAV4?A:The first step to remove the headlamp dimmer switch demands disconnecting the negative battery cable then waiting at least 90 seconds to stop Air Bag and seat belt pretensioner activation. Steer the front wheels toward the same direction. The first step involves disconnecting the steering pad assembly then moving to the Steering Wheel assembly before taking off the Steering Column Cover. The wiper and washer switch together with the spiral cable sub-assembly need to be dismantled. In the last step to remove the headlight dimmer switch assembly disconnect the connector after using needle-nose pliers to pull out the band clamp followed by detaching the claws with a screwdriver which requires taping the tip before application.


Related Toyota RAV4 Parts
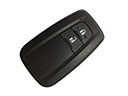 Toyota RAV4 Key Fob
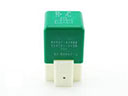 Toyota RAV4 Cooling Fan Relay
 Toyota RAV4 Headlight Relay
 Toyota RAV4 Speedometer
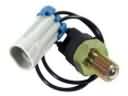 Toyota RAV4 Back Up Light Switch
 Toyota RAV4 Body Control Module
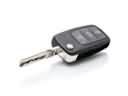 Toyota RAV4 Car Key
 Toyota RAV4 Daytime Running Light Relay
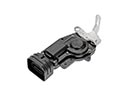 Toyota RAV4 Door Lock Actuator Motor
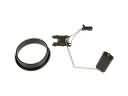 Toyota RAV4 Fuel Level Sensor
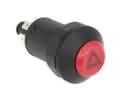 Toyota RAV4 Hazard Warning Switch
 Toyota RAV4 Relay Block