×
ToyotaParts- Hello
- Login or Register
- Quick Links
- Live Chat
- Track Order
- Parts Availability
- RMA
- Help Center
- Contact Us
- Shop for
- Toyota Parts
- Scion Parts
My Garage
My Account
Cart
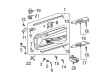
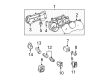
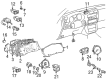
OEM Toyota RAV4 Door Jamb Switch
Door Jamb Interior Dome Light Switch- Select Vehicle by Model
- Select Vehicle by VIN
Select Vehicle by Model
orMake
Model
Year
Select Vehicle by VIN
For the most accurate results, select vehicle by your VIN (Vehicle Identification Number).
7 Door Jamb Switches found


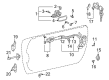
Toyota RAV4 Door Jamb Switch Part Number: 84231-08030
$21.86 MSRP: $30.42You Save: $8.56 (29%)Ships in 1-3 Business Days


Toyota RAV4 Door Jamb Switch Part Number: 84231-60070
$23.29 MSRP: $32.42You Save: $9.13 (29%)Ships in 1-3 Business Days

Toyota RAV4 Switch Assembly, Courtesy Lamp (For Front Door) Part Number: 84231-53010
$23.29 MSRP: $32.42You Save: $9.13 (29%)Ships in 1-3 Business Days

Toyota RAV4 Switch Assembly, Courtesy Lamp (For Front Door) Part Number: 84231-32040
$23.41 MSRP: $32.59You Save: $9.18 (29%)Ships in 1-3 Business Days
Toyota RAV4 Door Jamb Switch Part Number: 84231-42030
$26.42 MSRP: $36.78You Save: $10.36 (29%)Ships in 1-3 Business Days
Toyota RAV4 Door Jamb Switch Part Number: 84231-42020
Toyota RAV4 Door Jamb Switch Part Number: 84231-42010
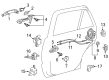
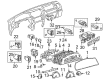
Toyota RAV4 Door Jamb Switch
Choose genuine Door Jamb Switch that pass strict quality control tests. You can trust the top quality and lasting durability. Shopping for OEM Door Jamb Switch for your Toyota RAV4? Our website is your one-stop destination. We stock an extensive selection of genuine Toyota RAV4 parts. The price is affordable so you can save more. It only takes minutes to browse and find the exact fit. Easily add to cart and check out fast. Our hassle-free return policy will keep you stress-free. We process orders quickly for swift delivery. Your parts will arrive faster, so you can get back on the road sooner.
The Toyota RAV4 Door Jamb Switch is one of the most important modules that mirrors Toyota's operations and its interest in offering quality products that are efficient in their role. This is the door jamb light switch or the door ajar switch that is meant to turn on the interior dome light whenever a door is opened and this makes the RAV4 even more useful and safe for its users. In different models of RAV4, the primary purpose of the Door Jamb Switch has remained relevant to guarantee reasonable visibility within the car for the motorists and other occupants either while or after opening the doors. This feature cuts across the interface to enhance the usability as well as to contribute to the avoidance of accidents where there is little light. The company's Flagship model, the Toyota RAV4 a sport utility vehicle manufactured since 1994 has gone through generations, all of which have been incorporated with the Door Jamb Switch which is remarkably reliable. The fact that this RAV4 model works with other RAV4 models shows how vital it is to Toyota since it connects with the car's electrical network. Also, the Door Jamb Switch aids in compromising the power usage of the RAV4 since the interior lights are only used when there is need. Therefore, this Toyota RAV4 Door Jamb Switch is designed with high solidity and practicality within the automotive industry, showcasing Toyota's commitment to safety and products innovation. This component is a true reflection of the brand that has been produced vehicles with prime concerns for both the drivers and persons inside the car.
Toyota RAV4 Door Jamb Switch Parts and Q&A
- Q: How to service the Front Door Jamb Switch on Toyota RAV4?A:Dismantling the negative battery terminal cable is the first step in servicing the Front Door Courtesy Switch yet the installer must wait 90 seconds to stop the deployment of Air Bags and seat belt pretensioners. The service begins with removing the Front Door Courtesy Light Switch Assembly by unfastening the bolt and switch before disconnecting the connector. The connector assembly installation requires first connecting the components followed by switch installation with the bolt that lacks torque requirements. Reinstall the cable to the negative battery terminal as the last step. The installation process must be applied identically to the RH and LH sides.

Related Toyota RAV4 Parts
 Toyota RAV4 TPMS Sensor
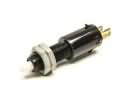 Toyota RAV4 Brake Light Switch
 Toyota RAV4 Headlight Switch
 Toyota RAV4 Power Window Switch
 Toyota RAV4 Speedometer
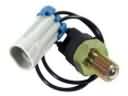 Toyota RAV4 Back Up Light Switch
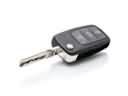 Toyota RAV4 Car Key
 Toyota RAV4 Door Lock Actuator Motor
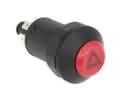 Toyota RAV4 Hazard Warning Switch
 Toyota RAV4 Ignition Lock Assembly
 Toyota RAV4 Ignition Lock Cylinder
 Toyota RAV4 Mirror Switch